Getting started with interactive notebooks? Here’s what to do!
The logistics of starting an interactive notebook is one of the most dauting barriers for math teachers. Here’s a set of simple 3 steps to take to get started!

1. Number the pages (If nothing else, do this!)
You will want to be on the same page as your students, quite literally, when using interactive notebooks. Being on the same page allows you so many opportunities to promote study skills and refer students back to a particular topic to help them get “un-stuck.” Promoting study skills is one of the biggest benefits of interactive notebooks so don’t skip this step.

WORD OF CAUTION: Make sure to number the pages as the very first thing that you do! Interactive notebooks get very thick over the course of a semester, and it will be difficult to write in the corners by the time the notebook is almost complete.
If you want more tips on choosing a notebook, read this post about What notebook should I use for an Algebra 1 Interactive Notebook?
2. Make a Plan
I use a planning document to help me map out what will go on every page. I like being able to plan how each 2-page spread will look (a 2-page spread being the neighboring left and right pages when the notebook is laying open), and I also want to be conscious about not running out of pages. Here’s a picture of the planning document I used. It’s not pretty, but it’s what I actually use and it works SO well.

You can also see around page 29-31 that I did some shuffling around of pages. Plans change, it’s ok. This planning document is immensely helpful for making sure I don’t run up against the page limit of the notebook. I once ran out of pages in my notebook early on in Algebra 1 because I wasn’t planning with that in mind. This has made it so it never happens again.
3. Set Up the First Pages
Interactive notebooks are meant to be tools above and beyond anything else, so thinking about how to set up the first pages is something that should be given a bit of thought.

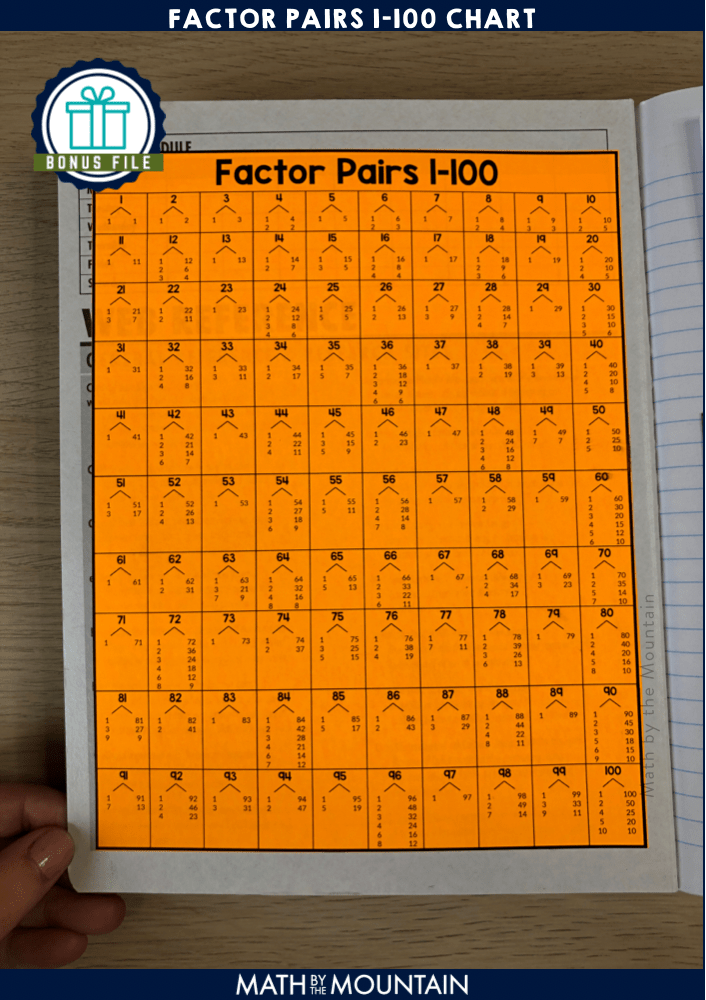
Factor Pairs Chart
I include a factor pairs chart that I print at 80% size so it fits perfectly in the front cover, and I put in a pocket with essential class information (my school has a building-wide grading policy, so I like to include that, along with my email for students to have easy reference to).
You can get the factor pair chart here-it’s particularly useful when factoring later on in Algebra 1. It’s also a bonus file in the Algebra 1 Interactive Notebook Kit Bundle.
Interactive Notebook Pocket
Pockets are EVERYTHING for interactive notebooks. We don’t always finish everything we are working on in class before the bell rings (everyone has those days), so the pocket is a perfect place to put in-progress notes that you actually want students to be able to find the next day. It’s also great for putting reference material you want students to have easy access to. I have my students keep their game-changing Quick Reference Mini-Book in the front cover (you can download it free here) so it’s always easy to quickly access!


Quick Reference Mini-Book
In the front pocket, I keep this quick reference mini-book (download it for free here). It is my students’ BFF for Algebra 1. It is the perfect scaffolding tool to help support all of my struggling learners. I don’t glue this in so students can easily take it out to use so they don’t have to keep flipping back and forth between this


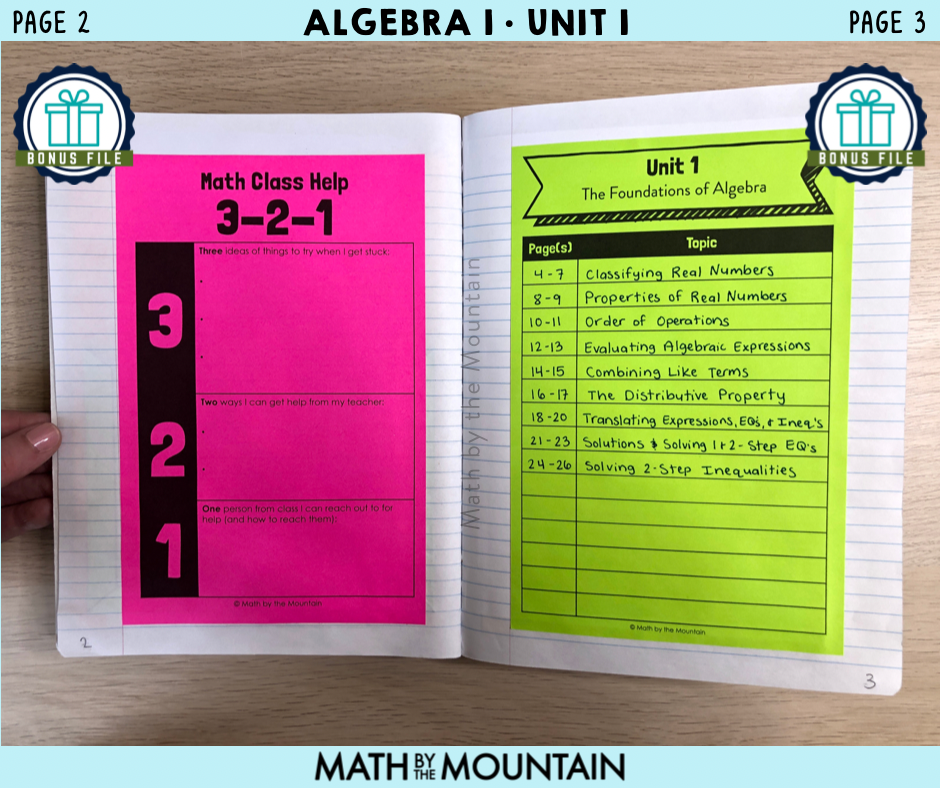
Math Class Help 3-2-1
The next thing I include is a “Math Class Help 3-2-1” page where students can look back to find ideas of how to get “un-stuck.” It may seem weird, but perseverance is actually a skill we need to teach to our students and consistently model what to do if we get stuck.

Students will write down three ideas of things to try when they get stuck, two ways they can get help from me (their teacher), and one person they can reach out to from class for help (as well as how to do it—so cell phone number, IG, Snapchat, etc.).
Interactive Notebook Table of Contents
At the beginning of every unit, I also have students put in a table of contents page. This helps ensure that they can find things when they get stuck and need to look back for help.

Over the years, I’ve done table of contents differently just about every time. I’ve settled on putting a page before each unit begins and grouping it into sections by topic, instead of writing down what is on each individual page. This makes it easier to find the general area of what they are looking for. I use Post-It tabs to mark each unit and easily flip to that page.
This post is part of the INB 101 – The Basics series.
What do the symbols mean?

Pages marked with the “understanding” symbol provide special opportunities to slow down a topic and build conceptual understanding so you can speed up later and in the long run. These will be essential in developing your students’ understanding of what it is that they are doing and why.
Pages marked with the “flowchart” symbol are the perfect companion differentiation tool to help ensure that all students can find success. They are great study tools that students can refer back to over and over again and to turn to when they need help getting “un-stuck.” Use them to introduce a topic!

Pages marked with the “bonus file” symbol provide extra utility to the interactive notebook. Starting an interactive notebook can feel really daunting, but it doesn’t need to be. These pages are those “extras” that make an interactive notebook function all the better, and make your life easier, too!

Thank you for the ideas on how to start! I’m wondering if you could share some examples of different things students could fill in on the page that has them list ideas for when they get stuck. What ways are there to get help from the teacher?
LikeLike
What kind of answers do they write on the 3-2-1 page? I can’t think of other ways to get help from the teacher… 😬
LikeLike
Send an email, come before school, come after school, come during lunch, come during designated “help sessions,” ask a question during class, etc.
LikeLike