You know that moment when a guest teacher actually takes the time to leave a compliment in the sub notes? It’s the dream. This year, all four of my guest teachers have specifically called out how smooth and easy attendance was in my room, and it’s all thanks to the cell hotel system.
Yep. My cell phone routine doubles as my attendance system, and it’s been an absolute game-changer. Here’s exactly how I make it work, and why I’ll be sticking with it.
What Is a Cell Hotel?
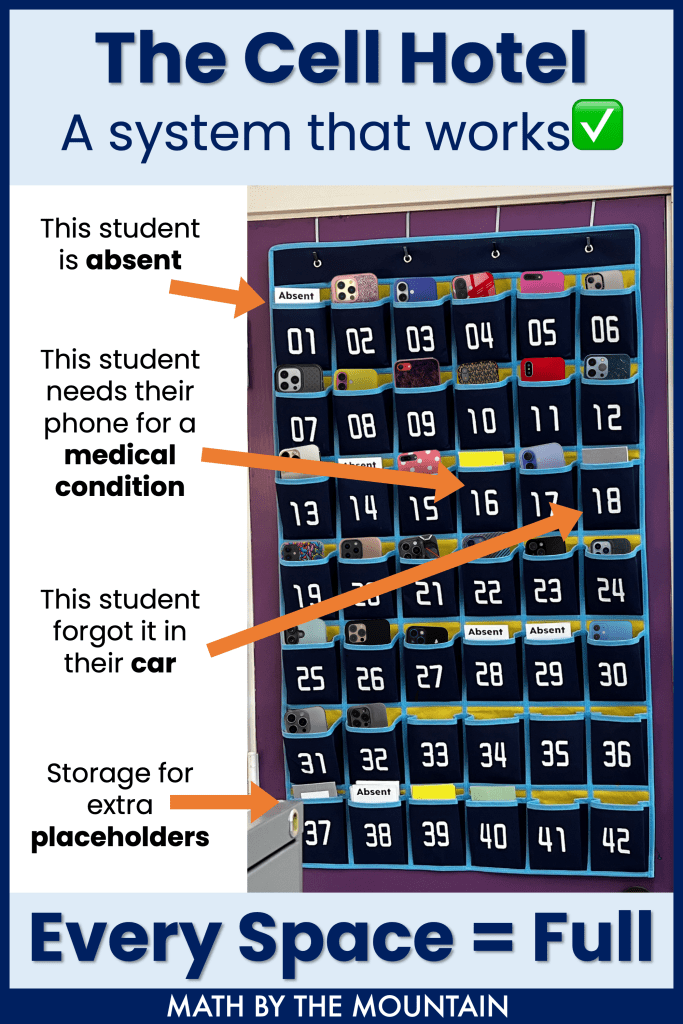
If you’re unfamiliar, a “cell hotel” is basically one of those hanging pocket charts (think shoe organizer) that students place their phones in at the start of class. Each student has a numbered pocket (matched to their seat number), and it becomes part of our daily entry routine.
It’s not a brand-new idea, but the way I use it for both phone management and attendance might be new to you.
You’re mid-lesson, the class is focused, and then—you see it. A student subtly shifts, hand to pocket. Their phone just buzzed.
They don’t even take it out. No screen, no scrolling.
But the damage is already done.
Research shows that just feeling a phone vibrate can knock a student off task for up to 5 minutes. Not because they checked it, but because their brain did—automatically.
That tiny buzz triggers a cognitive shift. Their mind starts to wonder: Who texted me? Is it urgent? Should I check? Even if they resist, their focus is gone, and it takes time—and effort—to get it back.
Studies on the impact of phones in classrooms reveal something every teacher has seen: tech distractions don’t need screens to sabotage attention. The anticipation alone burns mental fuel.
Over time, the problem compounds. Students conditioned by constant notifications develop twitchy attention spans. They struggle to stay present even when they aren’t actively on their device.
So what can we do? Create clear, consistent phone policies. Talk to students about why focus matters. Be transparent with students about the reasons behind those policies to develop buy-in.
Because that little buzz? It’s louder than it sounds.
As the old saying goes, “If you fail to plan (your interactive notebook gluing routines), you are planning to fail.”
More than any other point of frustration I hear from teachers when implementing interactive notebooks is how to deal with all of the glue. While glue may seem like an insignificant part of switching to interactive notebooks, it can really end up being a growing daily thorn if your classroom’s glue management hasn’t been given some intentional prior thought.
Whoo boy, that was a mouthful of a title, but it’s spot on! I’m now back in the thick of distance learning, once again, and this time it’s quite different than what I experienced in the Spring. In the Spring there were a lot of pre-recorded class sessions and we only met for 30 minutes 2x a week to do quick check-ins and a super fast mini-lesson. I also already knew all of my students so getting them to engage really wasn’t difficult at all.
This time around, it’s really different. Classes are 90 minutes each, 4x a week, and we’re doing a whole year of content in a semester. I also know only a small handful of my students because they’ve either been in my Advisory class for the last two years, or I had them last year and they have the total pleasure (mild sarcasm) of learning with me again. I’m grateful for all of the pictures of their faces on our online gradebook, because that’s the only way I know what any of them look like.
There are lots of blank screens and the chat box can be pretty quiet, but don’t let that intimidate you! I’m so excited to report that, amongst all the negative noise this year has brought, I’ve got something really good going on. I’ve found that Pear Deck has been aGAME CHANGER for student engagement and getting formative assessment feedbackthat iseven better than what I get in the classroom in a normal year!
If you’re not familiar with Pear Deck, I would HIGHLY recommend it. I have found it to be the closest way to recreate a typical classroom environment.
I use Pear Deck in conjunction with writing my notes under a document camera that I am screen-sharing through Google Meets. Students log in at the beginning of class every day, and it has quickly become a routine. I have more students engaging through Pear Deck than I have experienced over past years in the typical, in-person classroom setting that we’re all used to. If I have 26 students logged in on Pear Deck, I get 23 responses! That might not be a 100% success rate, but how many times in a traditional, in-person class do you get EVERYONE responding to every one of your questions?
At first, I was trying to be so fancy…Let’s make a new Pear Deck for every class every day, she said, only to later find out how unlikely of a routine that would be to maintain. So, here’s what I did–I made myself a Pear Deck Google Slides template that I can use with any of my math classes (this year, I have Algebra 1/Algebra Support, Pre-Calculus, and Statistics) and reuse every single day. All I have to do is launch the Pear Deck at the beginning of each class and generate a fresh code for my students and we’re in business! If you want to be extra fancy, you can log in early and grab a link for students to join with (so they don’t have to use a code) and post it to Google Classroom for a super painless way to join the Pear Deck every day.
So much of formative assessment are things that come up on the fly, and this template allows the flexibility to recreate it beautifully in a virtual setting. When I was pre-planning everything into Pear Deck, this didn’t allow me that same flexibility to ask questions if I didn’t think of adding them ahead of time. DISCLAIMER: You can add slides on the fly once a Pear Deck has been started, but I haven’t found a way to add custom slides that really fit my math-class needs.
I have created a Pear Deck Google Slides template that has multiple copies of the slides I like to use with my students for formative assessment so that there’s always a fresh slide of that type available if I decide that’s the type of check-in I need to do in that moment. When I use the Pear Deck, I always turn it to instructor-paced, which allows me to change slidesas needed, and students have no idea that there may be 7 identical prompts in a row that all say “Ask me a question!” If there’s a need for me to show another one of those slides later on, I can swap to a fresh slide so they can start typing again. If I don’t, no harm, no foul.
When the moment arises, I verbally direct students to swap over to their Pear Deck tab to respond to the question/prompt I just gave them. At this time, I turn my screen into split-screen mode where half of it is showing the Pear Deck slide in question (on projector mode) and the other half is still showing my document camera. Again, this duo has made student engagement in the lessons so much higher than simply relying on them to type into the chat box or asking them to unmute themselves and actually speak (I do both of those, but none of them come even close to the same level of student participation that I get with Pear Deck).
I hope you try incorporating this into your daily classroom routine! It has really been fantastic for me and I hope it does the same for you!
Although the idea of exit tickets is well known, figuring out how to master using them in your middle & high school math classes is a different story. From finding time to create them, remembering to actually give them, and teaching your students how to do them, this 5-part blogging series covers it all. At the end, there’s even a bonus installment that’s all about how to turn your exit tickets digital!
This is a bonus installment in the Everything You Ever Wanted To Know about Using Exit Tickets in your Math Classroom blogging series to show you how to take an exit ticket template that you use and love, and turn it into a digital format for your students to complete. As we grapple with hybrid schedules and the possibility of distance learning, this is more important than ever!
Read Post 1 here– 5 Reasons you Should be Using Exit Tickets in Your Middle & High School Math Class. This post covers what an exit ticket is and why you would want to use one in your math class.
Read Post 2 here– How often should I use an exit ticket? A secondary math teacher explains all. This post discusses how often you should be giving an exit ticket, and ways to save time in creating them so you can actually keep up and make it routine.
Read Post 3 here – How to Implement Exit Tickets like a Math Teacher Pro. This post discusses how to introduce them to your students and tips for actually remembering to give them each day!
Read Post 4 here– What do I do now? What to do with the exit tickets after your students hand them in. Reviewing, feedback, grading, and more! This post goves over all of the logistics and teacher-decisions behind what to do after your students actually complete an exit ticket. This one is jam-packed with easy-to-implement ideas!
Read Post 1 here– 5 Reasons you Should be Using Exit Tickets in Your Middle & High School Math Class. This post covers what an exit ticket is and why you would want to use one in your math class.
Read Post 2 here– How often should I use an exit ticket? A secondary math teacher explains all. This post discusses how often you should be giving an exit ticket, and ways to save time in creating them so you can actually keep up and make it routine.
Read Post 3 here – How to Implement Exit Tickets like a Math Teacher Pro. This post discusses how to introduce them to your students and tips for actually remembering to give them each day!
Read Post 1 here– 5 Reasons you Should be Using Exit Tickets in Your Middle & High School Math Class. This post covers what an exit ticket is and why you would want to use one in your math class.
Read Post 2 here–How often should I use an exit ticket? A secondary math teacher explains all. This post discusses how often you should be giving an exit ticket, and ways to save time in creating them so you can actually keep up and make it routine.
Now that you’re familiar with what an exit ticket is and why you should be using them in your math classes, let’s dig into some of the details. If you haven’t already read my first post in this series, make sure to read this first!