Although the idea of exit tickets is well known, figuring out how to master using them in your middle & high school math classes is a different story. From finding time to create them, remembering to actually give them, and teaching your students how to do them, this 5-part blogging series covers it all. At the end, there’s even a bonus installment that’s all about how to turn your exit tickets digital!
Continue readingReference Resources
How to Make a Digital Exit Ticket: Turn Your Exit Tickets DIGITAL!
This is a bonus installment in the Everything You Ever Wanted To Know about Using Exit Tickets in your Math Classroom blogging series to show you how to take an exit ticket template that you use and love, and turn it into a digital format for your students to complete. As we grapple with hybrid schedules and the possibility of distance learning, this is more important than ever!

Implementing Exit Tickets in Middle & High School Math – Why I Failed Before & How I Fixed It
This is the fifth installment in the Everything You Ever Wanted To Know about Using Exit Tickets in your Math Classroom blogging series. If you haven’t already, check out the first four posts and then keep reading!
Read Post 1 here – 5 Reasons you Should be Using Exit Tickets in Your Middle & High School Math Class. This post covers what an exit ticket is and why you would want to use one in your math class.
Read Post 2 here – How often should I use an exit ticket? A secondary math teacher explains all. This post discusses how often you should be giving an exit ticket, and ways to save time in creating them so you can actually keep up and make it routine.
Read Post 3 here – How to Implement Exit Tickets like a Math Teacher Pro. This post discusses how to introduce them to your students and tips for actually remembering to give them each day!
Read Post 4 here – What do I do now? What to do with the exit tickets after your students hand them in. Reviewing, feedback, grading, and more! This post goves over all of the logistics and teacher-decisions behind what to do after your students actually complete an exit ticket. This one is jam-packed with easy-to-implement ideas!

How to Implement Exit Tickets like a Math Teacher Pro
This is the third installment in the Everything You Ever Wanted To Know about Using Exit Tickets in your Math Classroom blogging series. If you haven’t already, check out the first two posts and then keep reading!
Read Post 1 here – 5 Reasons you Should be Using Exit Tickets in Your Middle & High School Math Class. This post covers what an exit ticket is and why you would want to use one in your math class.
Read Post 2 here – How often should I use an exit ticket? A secondary math teacher explains all. This post discusses how often you should be giving an exit ticket, and ways to save time in creating them so you can actually keep up and make it routine.

How Often Should I Use an Exit Ticket? A Secondary Math Teacher Explains All
This is the second post in the Everything You Ever Wanted To Know about Using Exit Tickets in your Math Classroom series. If you missed the first one about the 5 Reasons you Should be Using Exit Tickets in Your Middle & High School Math Class, you can catch up and read it here.
Now that you’re familiar with what an exit ticket is and why you should be using them in your math classes, let’s dig into some of the details. If you haven’t already read my first post in this series, make sure to read this first!

5 Reasons you Should be Using Exit Tickets in your Middle & High School Math Class
Exit slips, exit tickets, tickets out the door, quick-checks, check-ins, show me what you know’s…whatever you call them, they’re incredible teaching tools that every secondary math teacher should be incorporating into their regular teaching practice. In this first installment of the Everything You Ever Wanted To Know about Using Exit Tickets in your Math Classroom series, and I wanted to dive straight into the reasons why YOU, yes you, will benefit from using exit tickets in your classes. No need to waste any time, let’s get into it!

Algebra 1 Unit 3 Interactive Notebook Pages | Solving Equations
Unit 3 of Algebra 1 is all about solving equations and their applications. We start off with multi-step equations, because 1-step and 2-step equations were covered in Unit 1: Foundations of Algebra.
In addition to the notes that went into our composition books, students were each given a full-sized flowchart over solving one-variable equations. We did an example as a class, and then I also keep a class set laminated so students can use them with dry-erase markers whenever they like. Students referenced their notes and the laminated flowcharts while working on homework in class.
Day 2: Solving Multi-Step Equations with Special Case Solutions
To start off the lesson, we did a recap warm-up over the prior day’s lesson.
We then went into a foldable that covers what special solutions are and when they arise.
To get even more practice, students did the following Types of Solutions Sort, which emphasized common student errors and misconceptions I’ve noticed in the past.
Day 3: Writing Equations to Solve Multi-Step Equations
We started off the lesson with a recap warm-up that contained special solution types.
From there, we moved into our main set of notes for the day, with an emphasis on marking the text (NOTE: this is the same color-coding we used in Unit 1).
Day 4: Absolute Value Equations
Like usual, we started off the lesson with a recap warm-up of the previous day’s information.
We started off the topic of absolute value equations by really thinking about what an absolute value means/does.
From there, we used the information we’ve gathered to solve absolute value equations a bit more efficiently (without using the modified cover-up question mark method). Students had the even numbered problems as homework that night.
In addition to the notes that went into the composition books, students were given a flowchart for solving absolute value equations to reference whenever they got stuck. Here’s an example of how they could use it! Just like the others, I keep a class set of these laminated so students can use them with dry erase markers whenever they get stuck. I like to color-code each type of flowchart to make it easy to grab the exact one that they need from that unit.
Day 5: Absolute Value Equations Word Problems
To begin the class, we started off by working backwards: writing the absolute value equation that could’ve produced the given solutions.
From there, we went into story problems involving absolute value equations.
Day 6: Ratios and Proportions
We started the day off with a recap warm-up covering the last two days of information (all absolute value equation related).
The first thing that we talked about is what a ratio is and what it means to be proportional.
We then used the definition of proportional to solve equations requiring cross-multiplication.
After these examples, students filled out the other side of the flowchart that they were given on Day 1 with a more difficult example of solving for a variable in a proportion.
Day 7: Percent of Change
Percent of change is a funny topic to cover in Oregon…most of our textbook’s examples are about sales tax, and we have none. If we go to Washington, we just flash our Oregon ID and presto, bingo, bango, no more sales tax (for the little stuff). Anyway, we find other examples to try to make it more meaningful.
After taking notes, we did this Percent of Change Scavenger Hunt. Students worked really hard on it and had a lot of fun. For some of them, it was difficult to remember to put a negative sign on their r-value when it was a percent decrease!
Day 8: Literal Equations, Part 1
We recap percent of change problems and then move into basic solving literal equations problems.
We discuss what a literal equation is, compare and contrast the difference between literal equations and regular equations, and also introduce the flowchart method of solving.
Day 9: Literal Equations, Day 2
We move into more complicated literal equations that require more than one step to solve. After doing a few, students are able to choose which method they wish to solve with (I’m partial to the algebraic method, but some students love the flowchart way).
After notes, we play my favorite Connect 4 game for solving literal equations. We only played until 6 people won, which allowed us to get through about 70% of the problems. From there, students spent the remainder of class working on a festive Carving Pumpkins coloring activity for solving literal equations. This activity was awesome because students were super engaged in the coloring (every last one of them–even the boys! PS: I have 22 boys in this one class…ay, yai, yai), and it was super easy for me to find common trends that I might need to readdress (the eyes for Pumpkin #2 were the most common error). Also, for students, this activity is fairly self-checking, which is a great confidence boost for many of them.
Here’s an example that one student colored! She even named the pumpkins.
Day 10: Stations Review Activity Day
We did a recap warm-up over solving literal equations and then spend the rest of class doing a stations activity with my solving equations unit task cards.
Day 11: Review Day
Day 12: TEST!
How I Teach Factoring Trinomials
When I teach the unit on polynomials and factoring in Algebra 1, I start off my first lesson on factoring trinomials with a discussion on which has fewer options: multiplying to a number, or adding to the same number? Students take a couple minutes to list out all pairs of numbers they can think of and then share out to the class. After doing this twice, quite a few students start catching on to the fact that there’s an infinite amount of ways to add to any given number, but only a handful of ways to multiply to the same number. Multiplication gives us fewer options, which will allow us to do less work. This will be really important to what we do in just a moment. (NOTE #1: I provide students with a factor pair chart as an aid to help with identifying factors later on. NOTE #2: We originally began using only whole numbers as a starting point, but students then wanted to branch out further. Could we extend this question to include integers?! Yes-and we did!)
From there, we go back to something students have just learned a few sections earlier: multiplying two linear binomials of the form (x+A)(x+B). We do this a few times and then look at a bunch of already expanded examples and I ask students what they notice. It doesn’t take long before students start realizing that the middle term, the coefficient of the x, always comes from adding the two numbers A+B, and the end term, the constant, always comes from multiplying the two numbers, A⋅B.
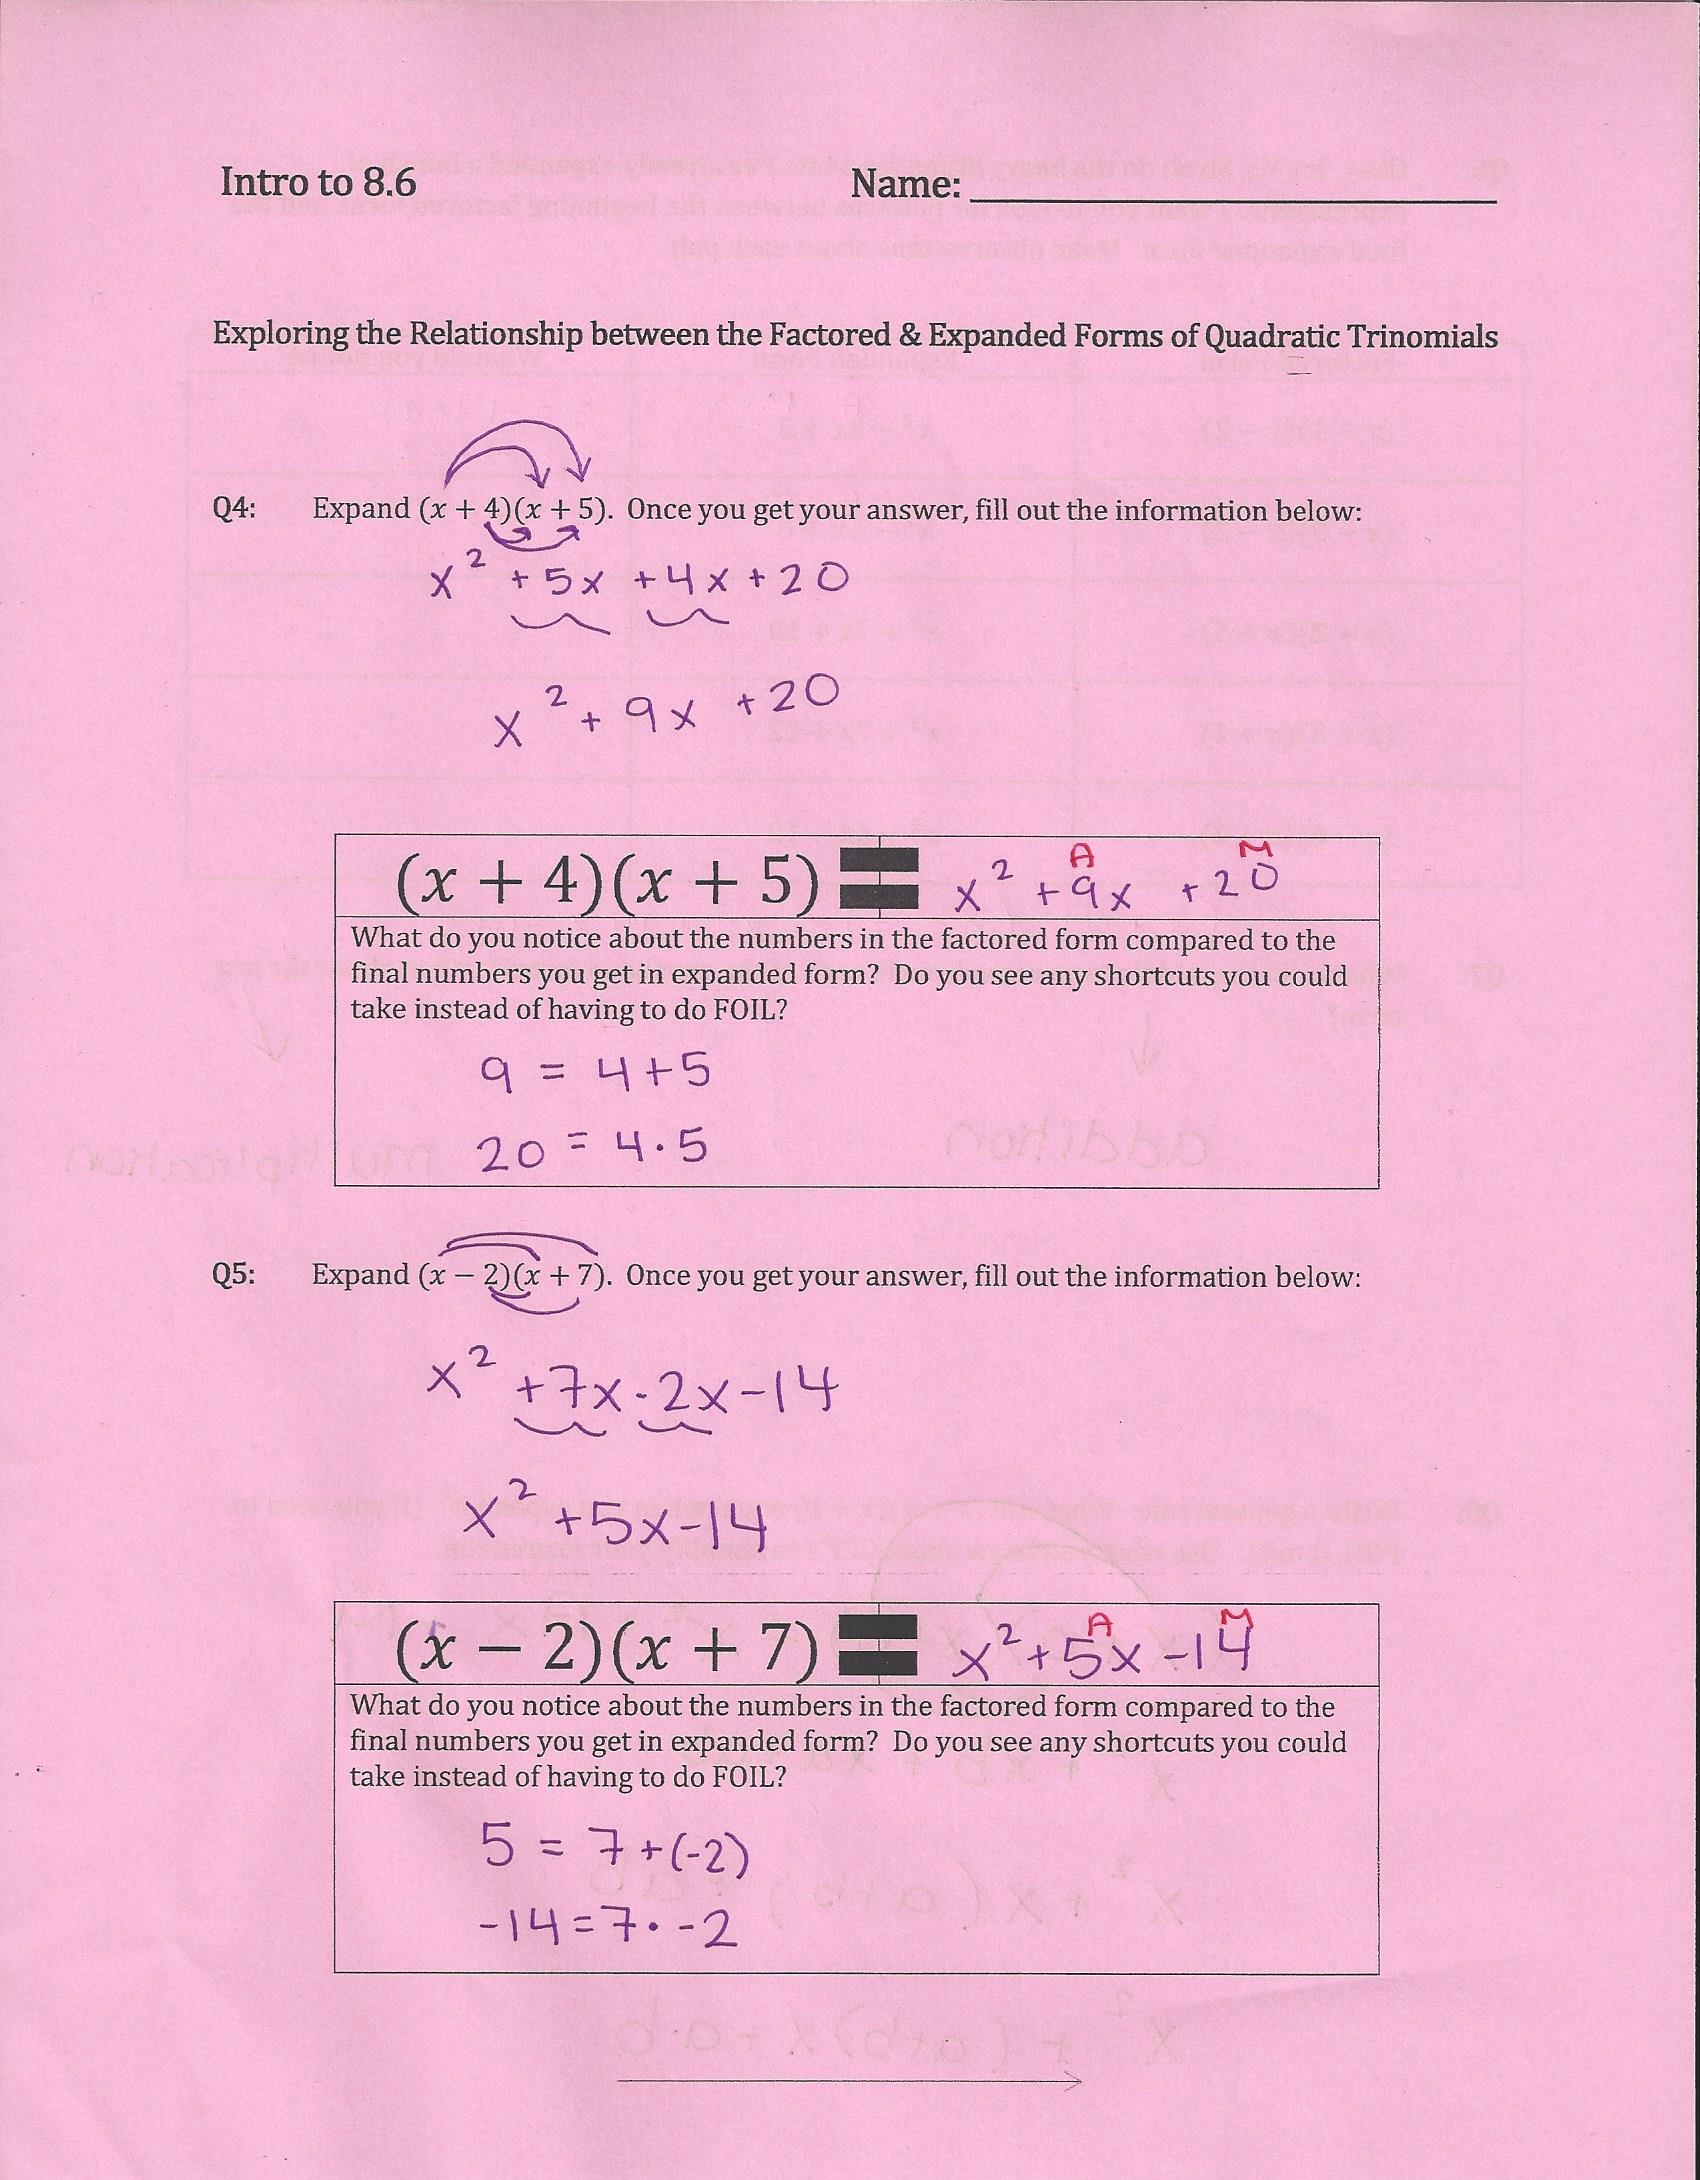
Then, I switch the question around. How can we figure out what someone expanded to create a quadratic expression? Is there any easy way to figure this out? Students start to volunteer info that they know: the middle term comes from the addition (A) of the two factors, and the constant term comes from the multiplication of these two numbers (M).
So, then the question is, which number do we look at? The addition number, or the multiplication number? Technically, it doesn’t matter, BUT mathematicians love to be lazy efficient, so we’ll look at the multiplication number. Students justify looking at the the multiplication number first because, just a few questions prior, they determined that there’ll be fewer options with multiplication than for addition.
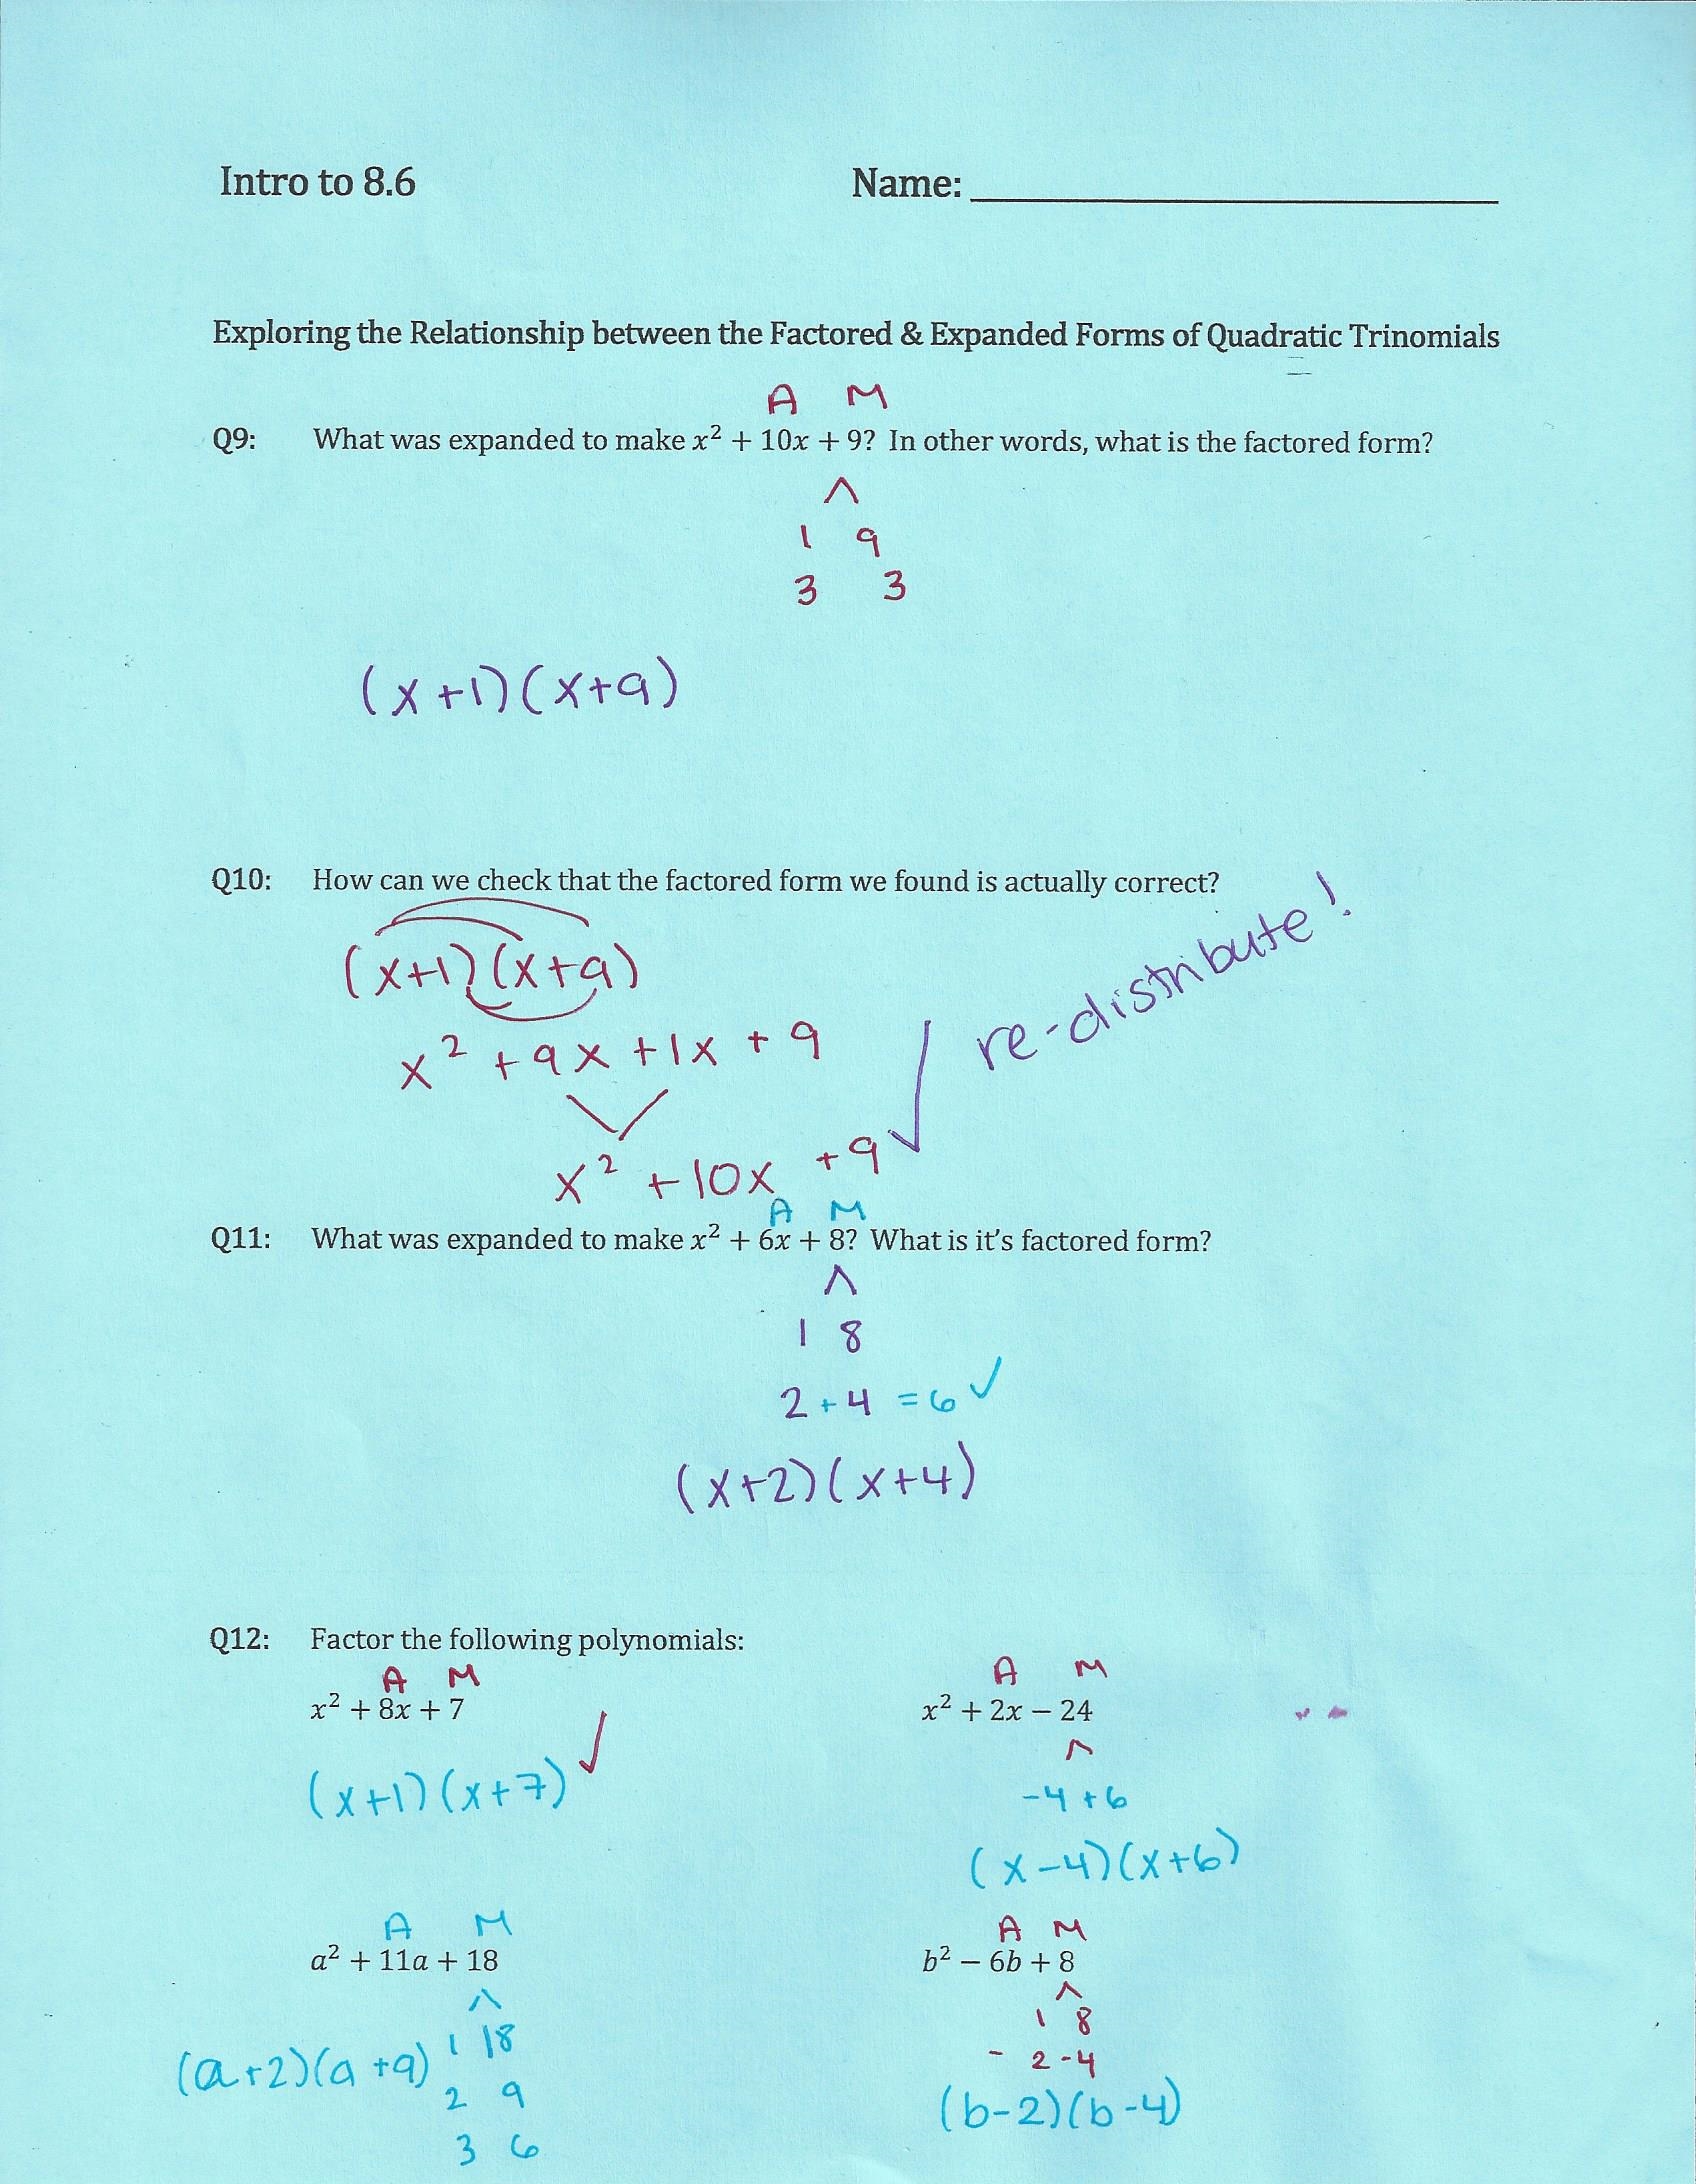
From there, I ask students to make further generalizations and predictions about the signs of the terms and the signs of the factors and use that information to work both forward (expanding) and backward (factoring) using some diamond puzzles.
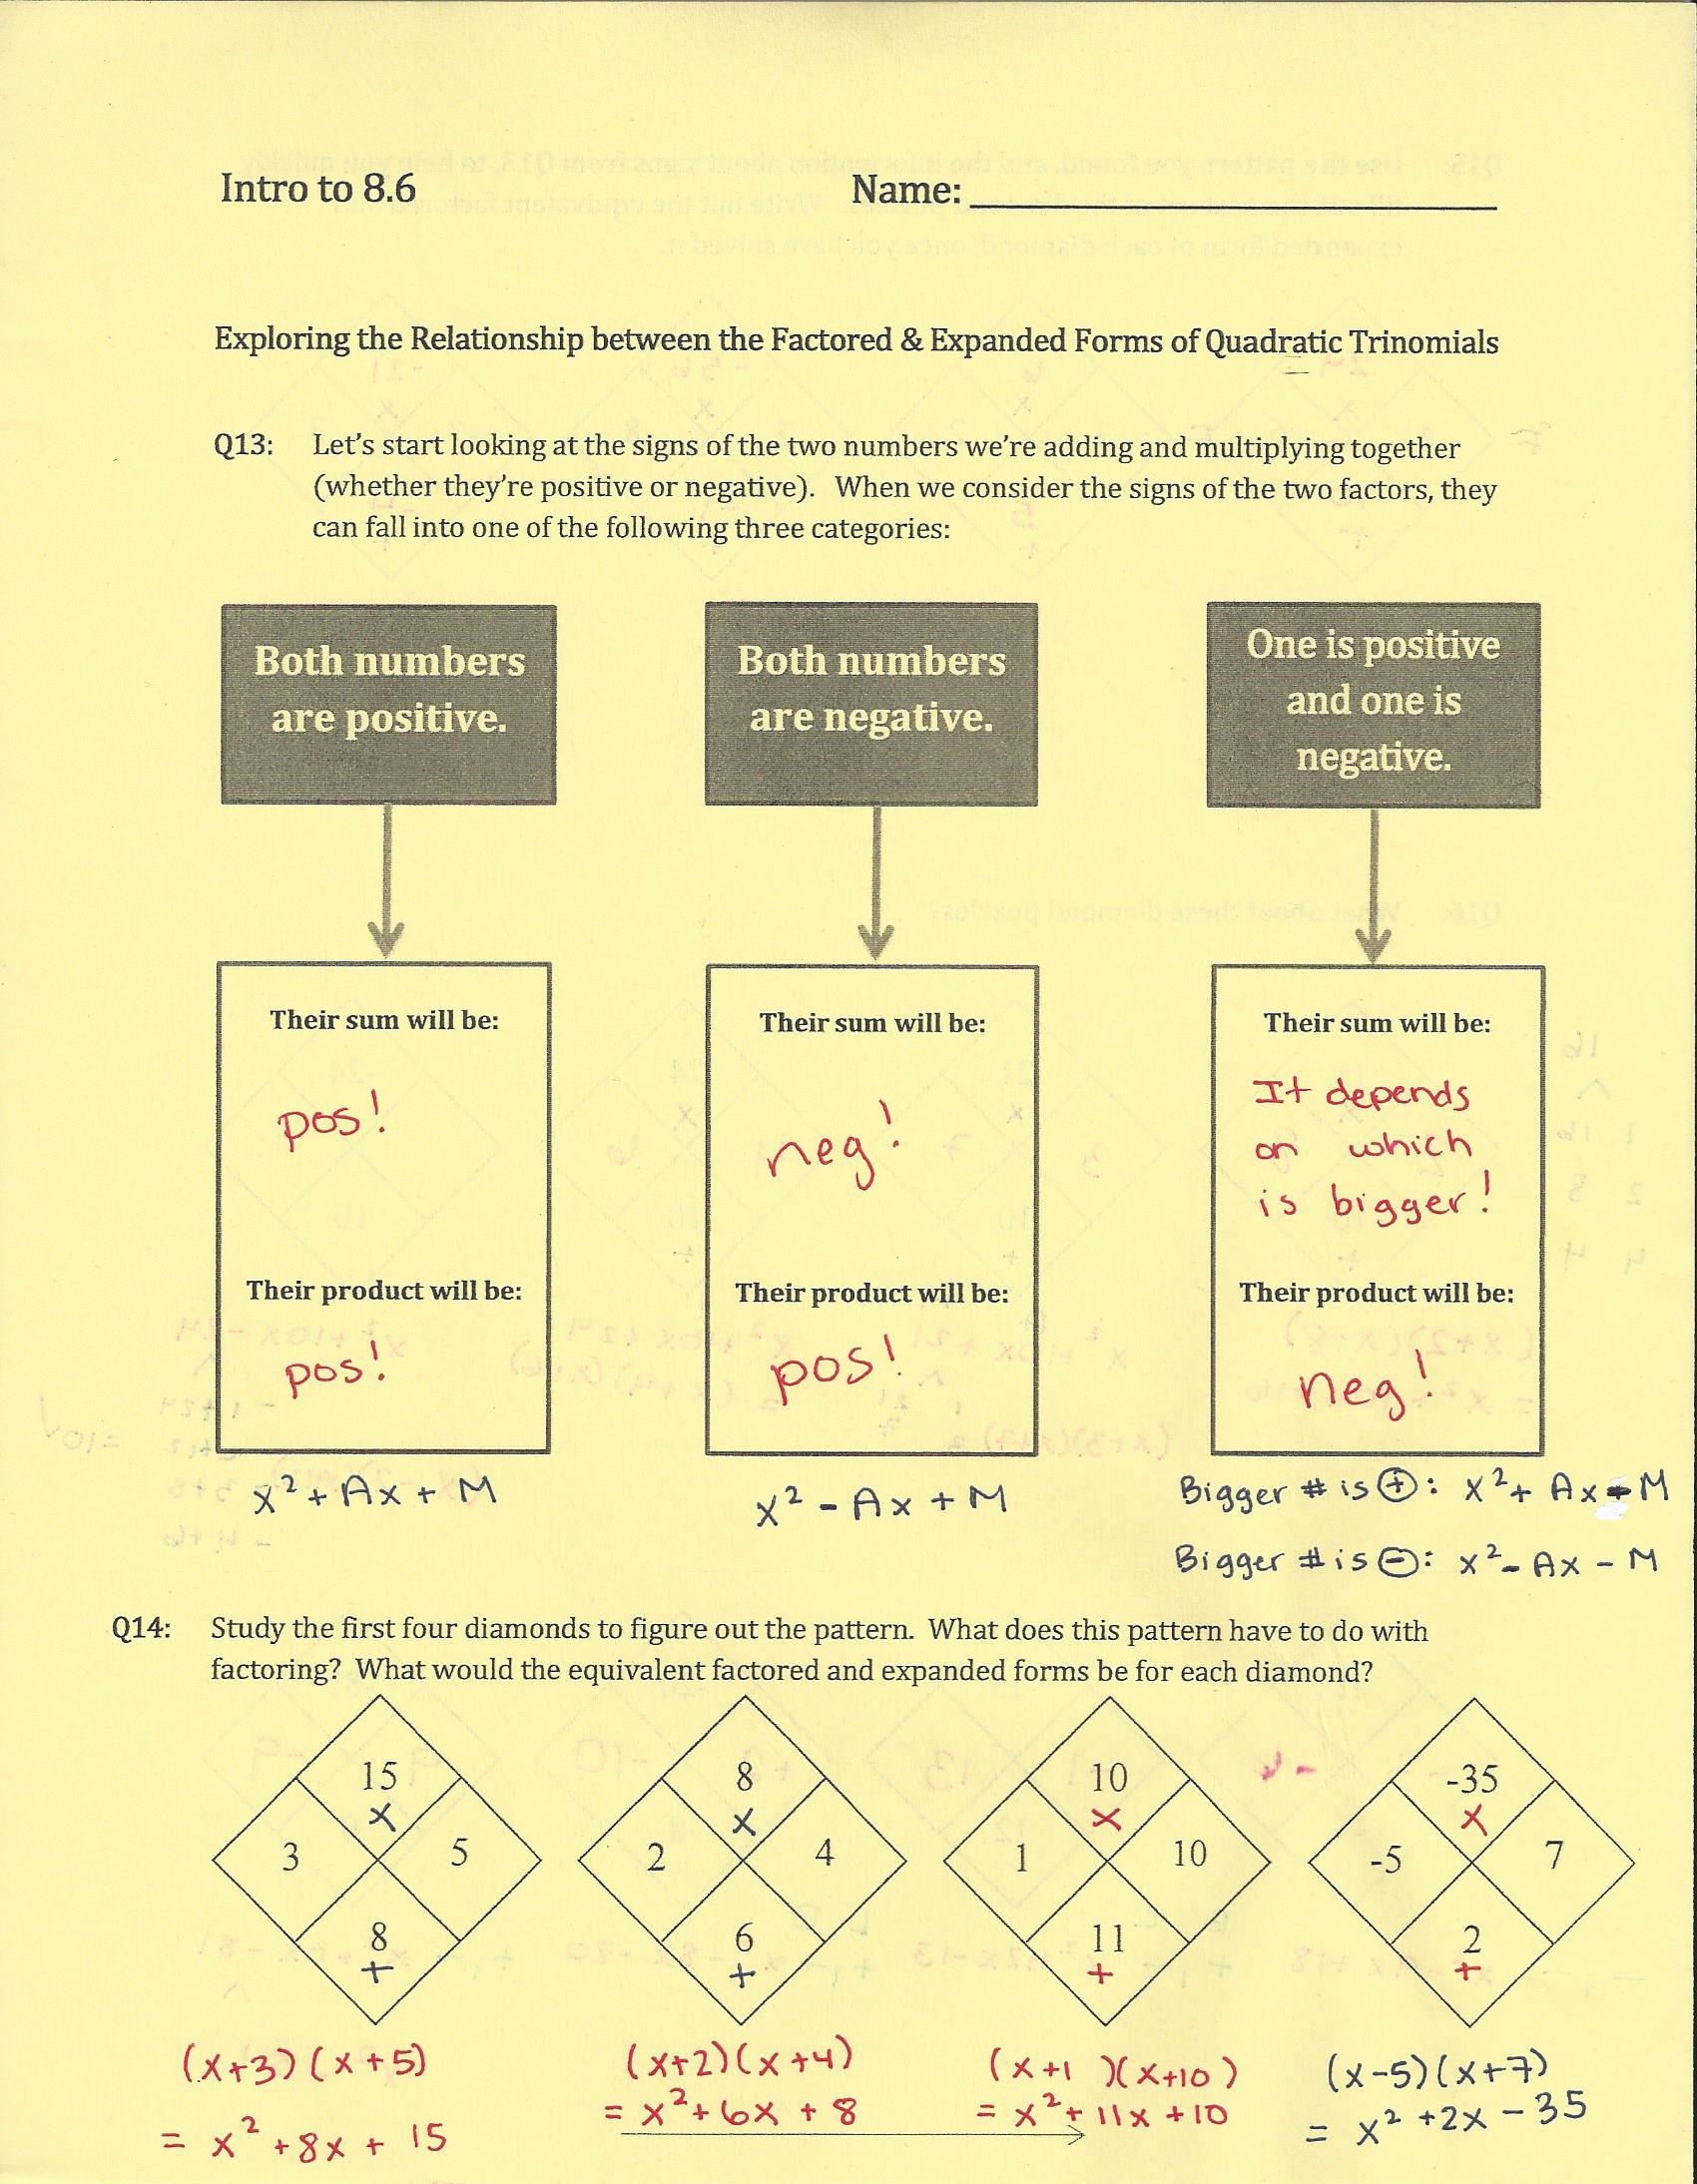
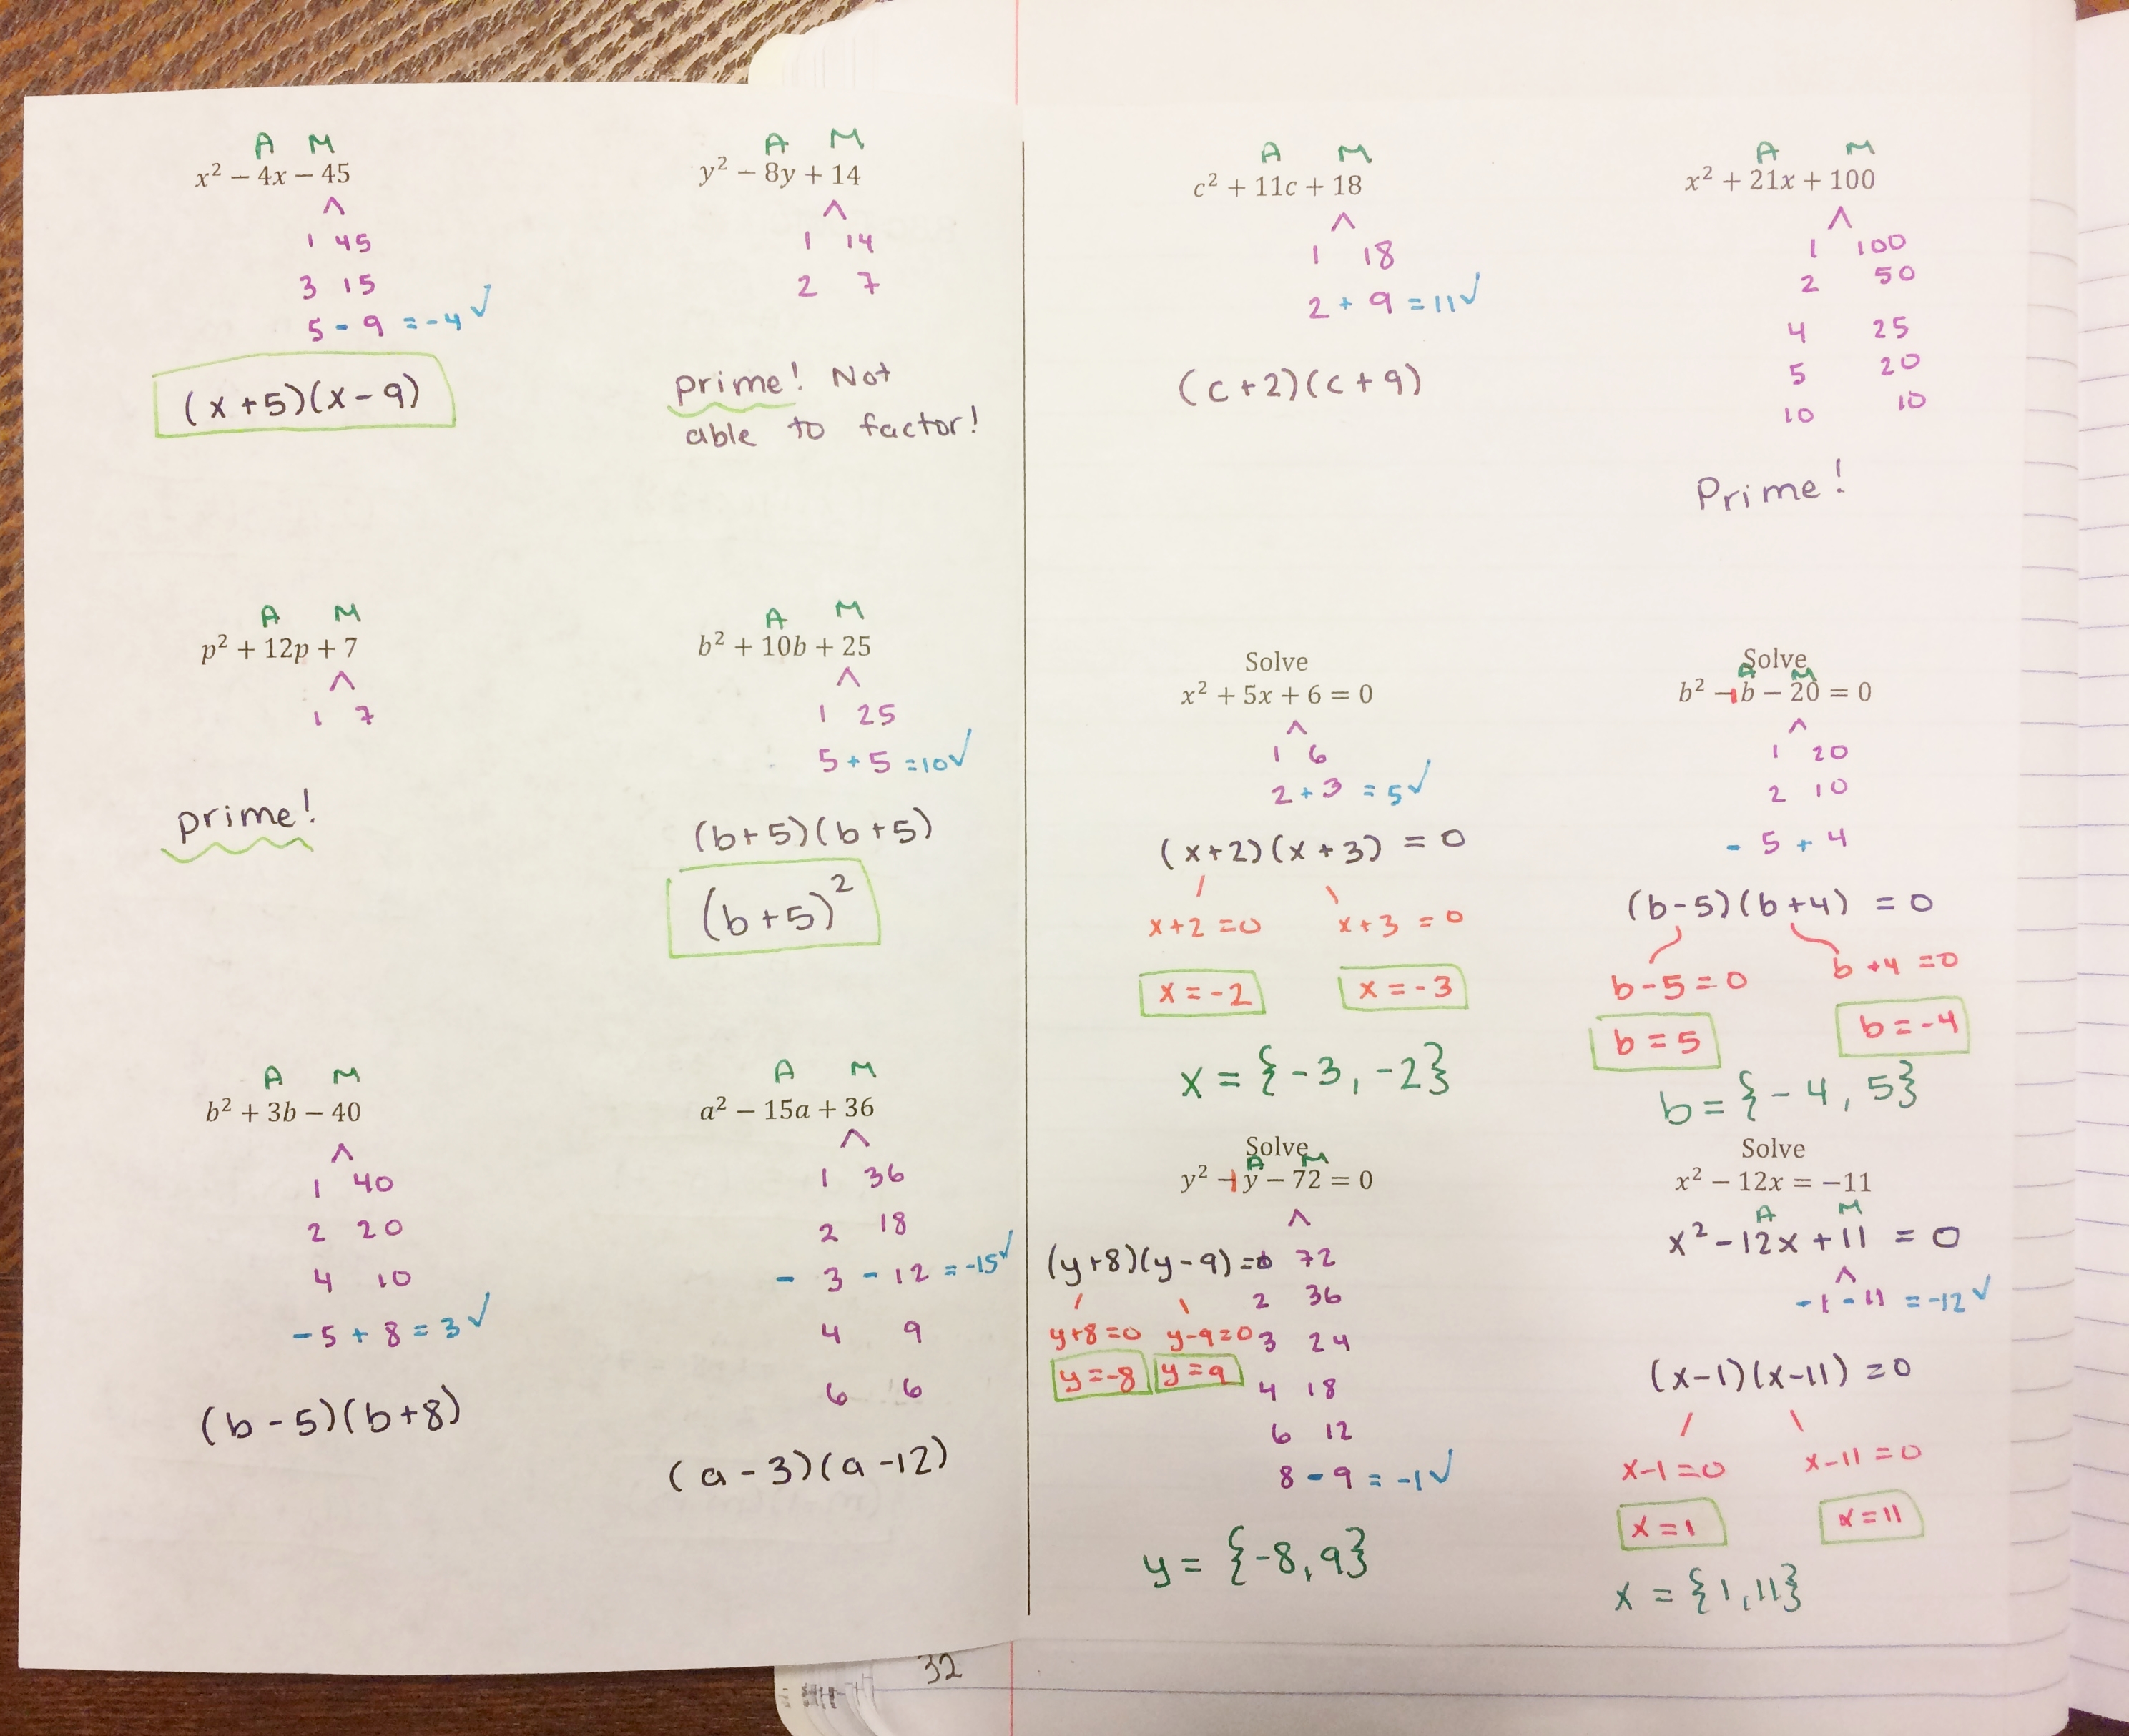
The next day, we practice some more with basic factoring when a=1, using the patterns we found from the investigation the day before:
Then, we kick it up a notch. How the heck do we do this factoring thing when there’s more than one x-squared?! No problem! GCF to the rescue.
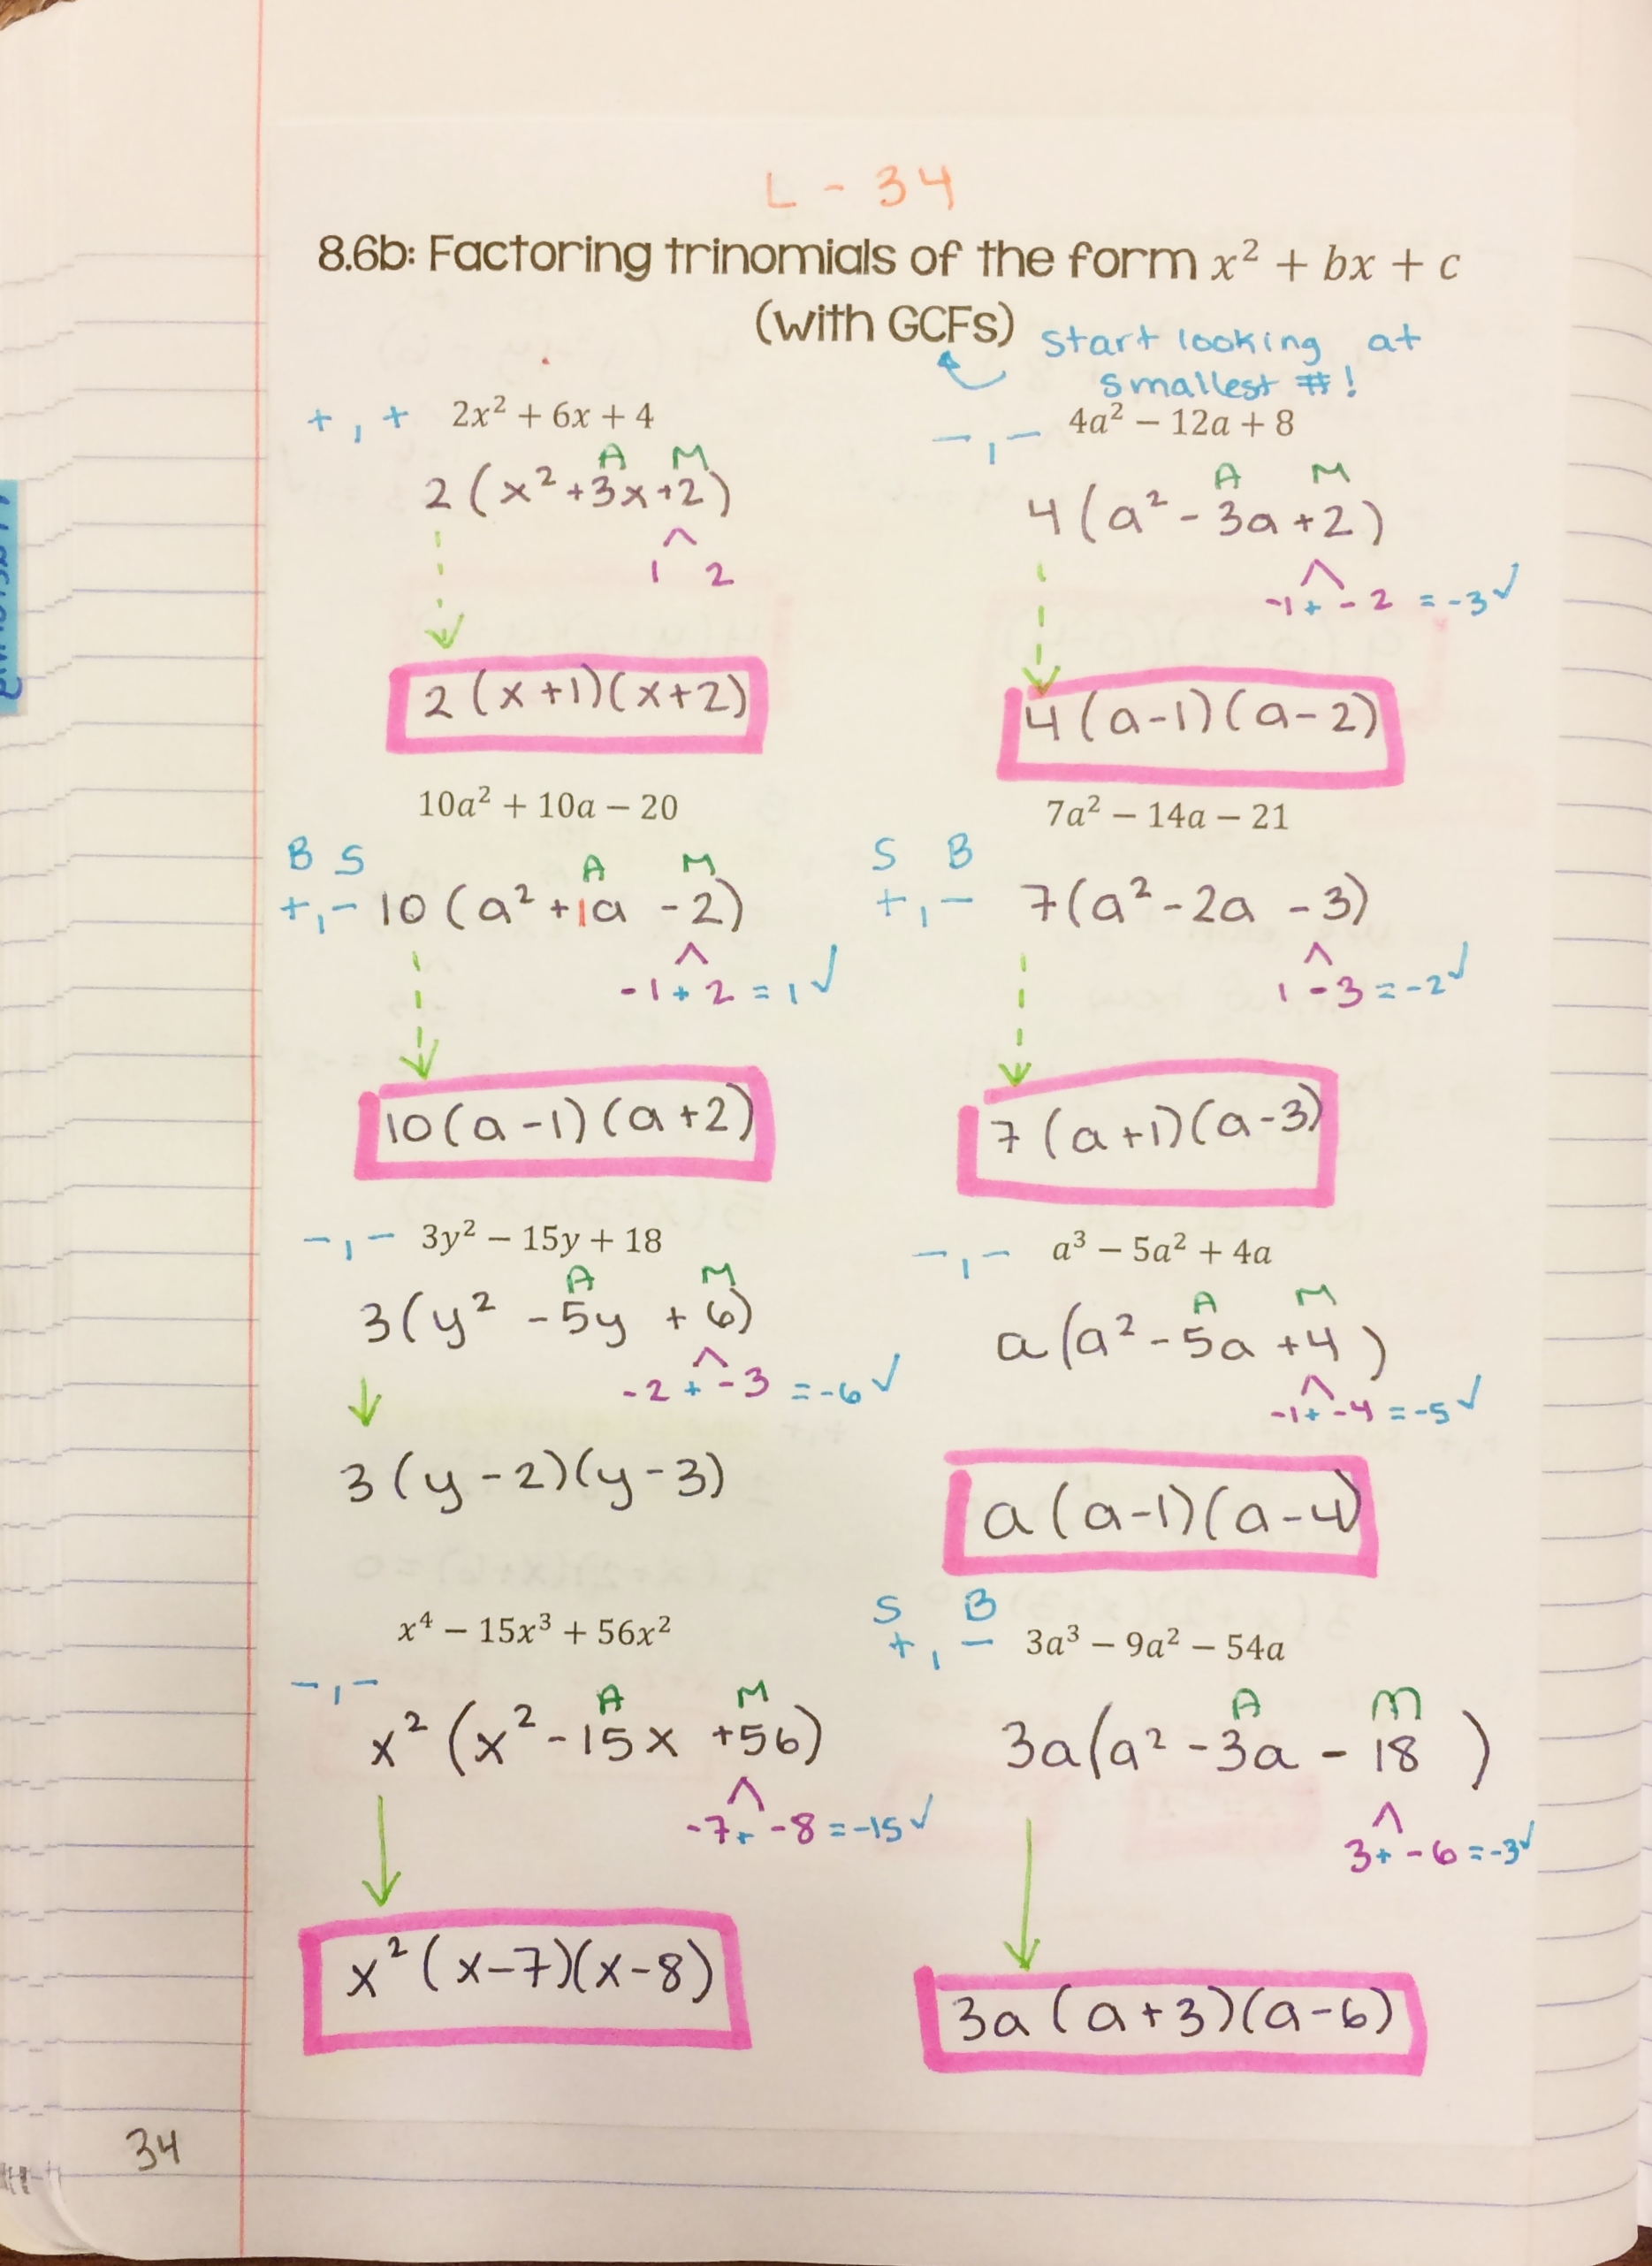
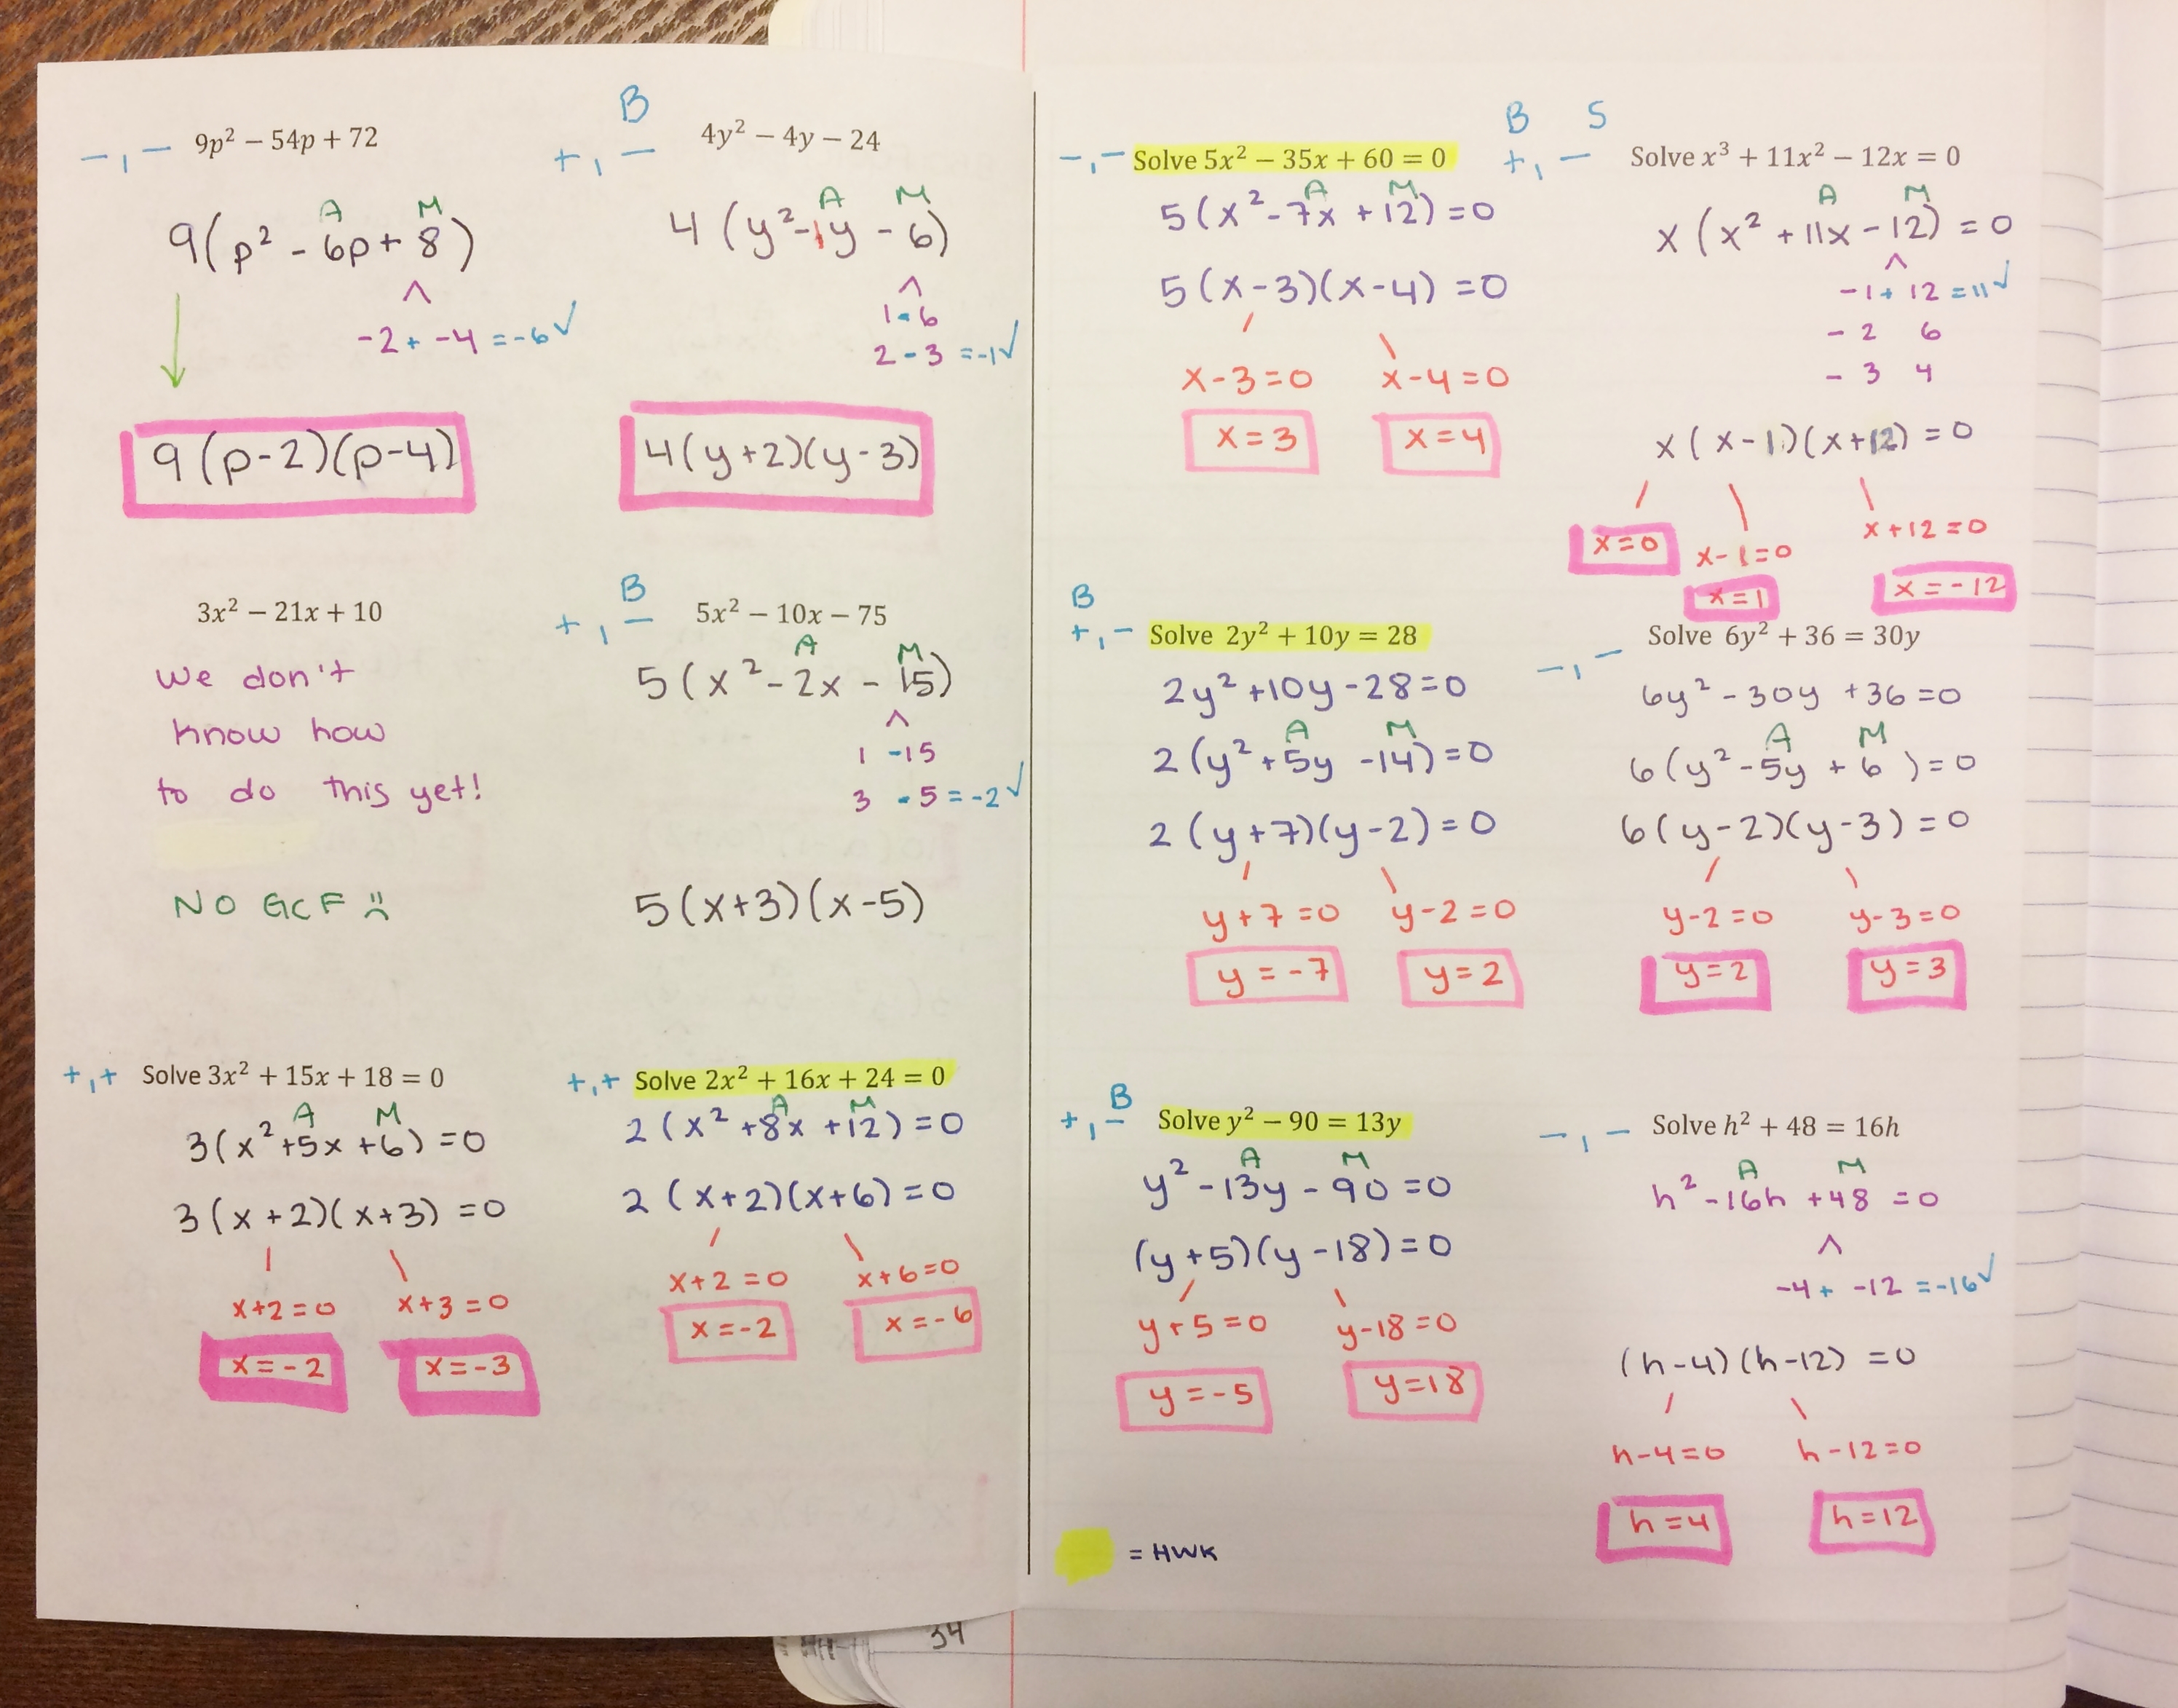
After that, we look at what do we do if a GCF alone isn’t enough to get rid of the a-value, or, even worse, there’s no GCF at all?
This brings us to my FAVORITE part of factoring quadratic trinomials: Slide, Divide, Bottoms Up! If you are unfamiliar with this method, let me start off by telling you that it’s awesome. It’s firmly rooted in the same concepts we’ve been using for the last three sections of factoring, and it just makes sense. Another benefit to the Slide, Divide, Bottoms Up method is that it is efficient. Doing guess and check (or the box method) can become very frustrating for students when the a-value is larger than, say, 4 or 5. There’s just too many options and it ends up taking forever, even with a decent intuition about which numbers to test out as factors. Also, this method even works for special factoring cases like difference of squares! Students can certainly utilize the factoring shortcut for difference of squares, but, if they forget, Slide, Divide, Bottoms Up still has their back.
Here’s how Slide, Divide, Bottoms Up works:
Let’s talk through an example:
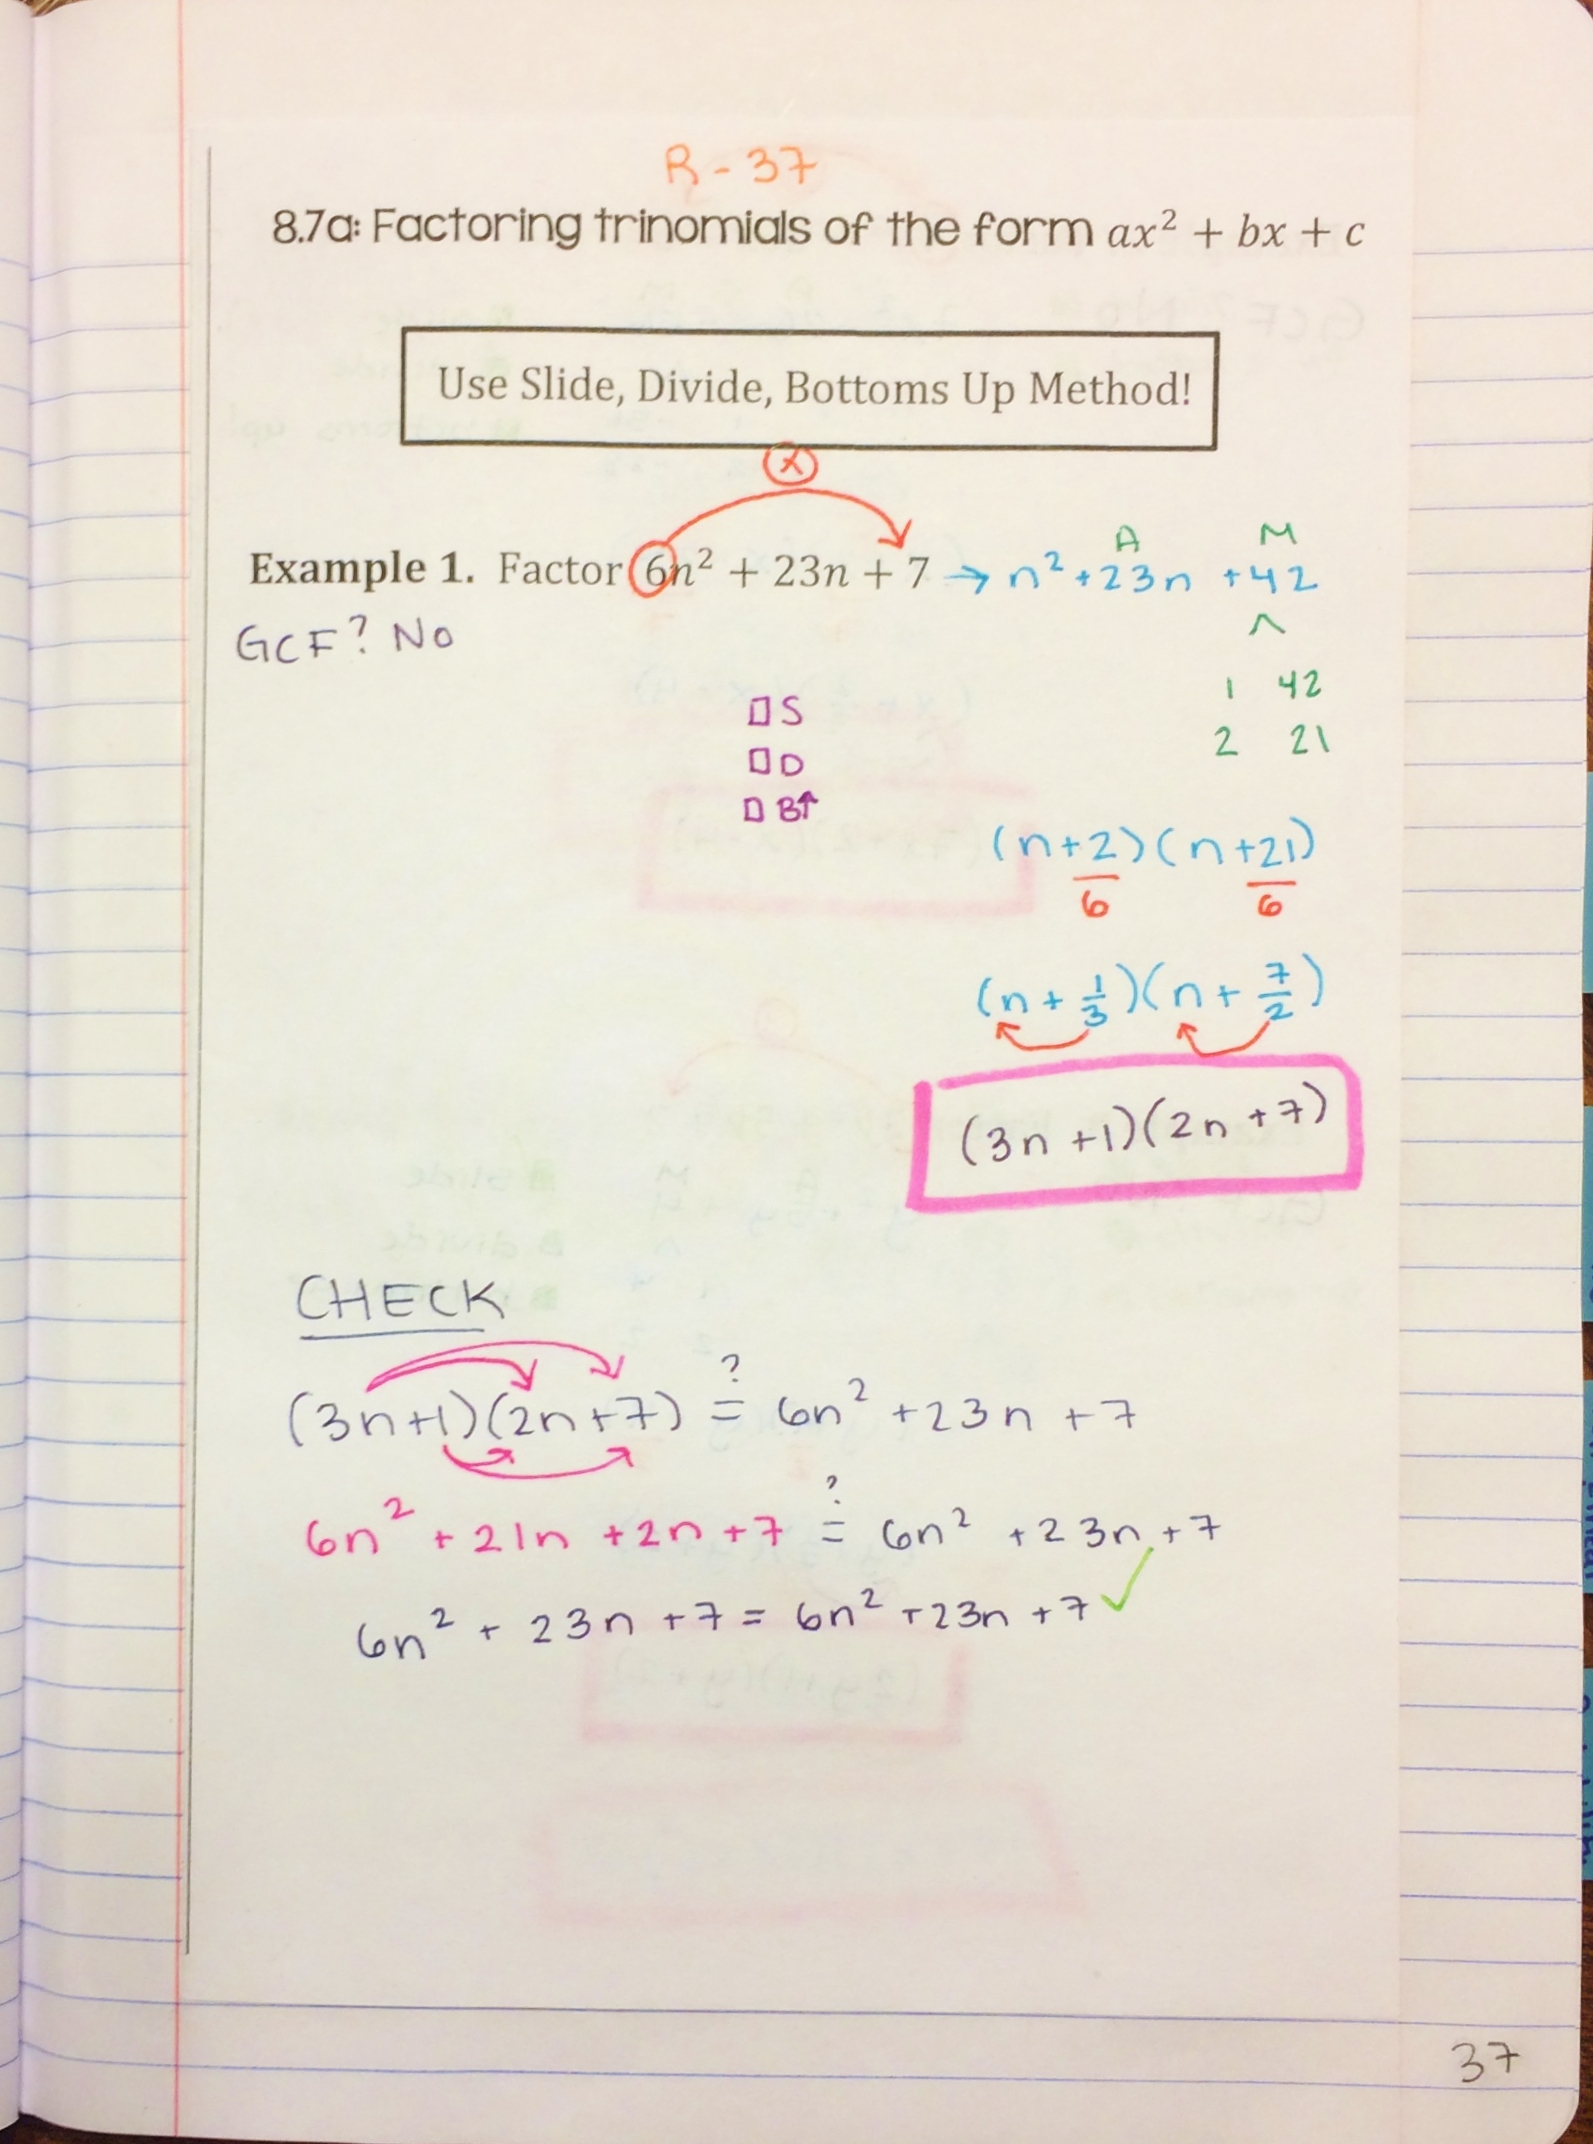
Like all factoring problems, we check if there is a GCF, first. If we’re lucky, that will remove the a-value and we will be good to do what we normally do. However, in this example, we weren’t that lucky. No GCF, so what to do with the 6? We certainly don’t want more than 1 n-squared, so we’re going to temporarily transfer it to the constant term by multiplication (we “SLIDE” it over). At this point, we discuss what “temporarily” means. It means, “only for a while,” so that tells us that, at some point, we’re going to have to undo it. This should be perfectly “legal” because if we do something but then undo it later, that just cancels out to what we started with. It might also be worth noting that we transfer the a-value through multiplication because we are factoring, which literally means returning an expression back into a product (multiplication) of two factors.
Now that we’ve gotten rid of the a-value of 6 for a moment, we’re left with a standard trinomial that students know how to factor in their sleep with their eyes shut, at this point. The only thing they have to remember after factoring it is that our factored form is for our temporary expression, not the one we started with. So, how to undo what we did?
Well, if we multiplied the a-value into the coefficient, it stands to reason that we should do the inverse operation and just divide it back out (DIVIDE)! Since we’re dividing, make sure to reduce the fractions!
Lastly, we didn’t start out with any fractions. Actually, we started out with a number that was a coefficient (our a-value of 6). To get rid of any fraction(s) that we introduced, we bring the denominator(s) back up in front of the variable to be a coefficient, once again (bring the “BOTTOMS UP“).
Here’s some more examples. Note example 5 where there’s a GCF but we’re still left with an a-value of 4.
Here’s how it works with difference of squares problems.
After using Slide, Divide, Bottoms Up for the past 3 years, I can’t see myself doing factoring any different. I’m pretty smitten with this method, and, hopefully, it’s easy to see why.
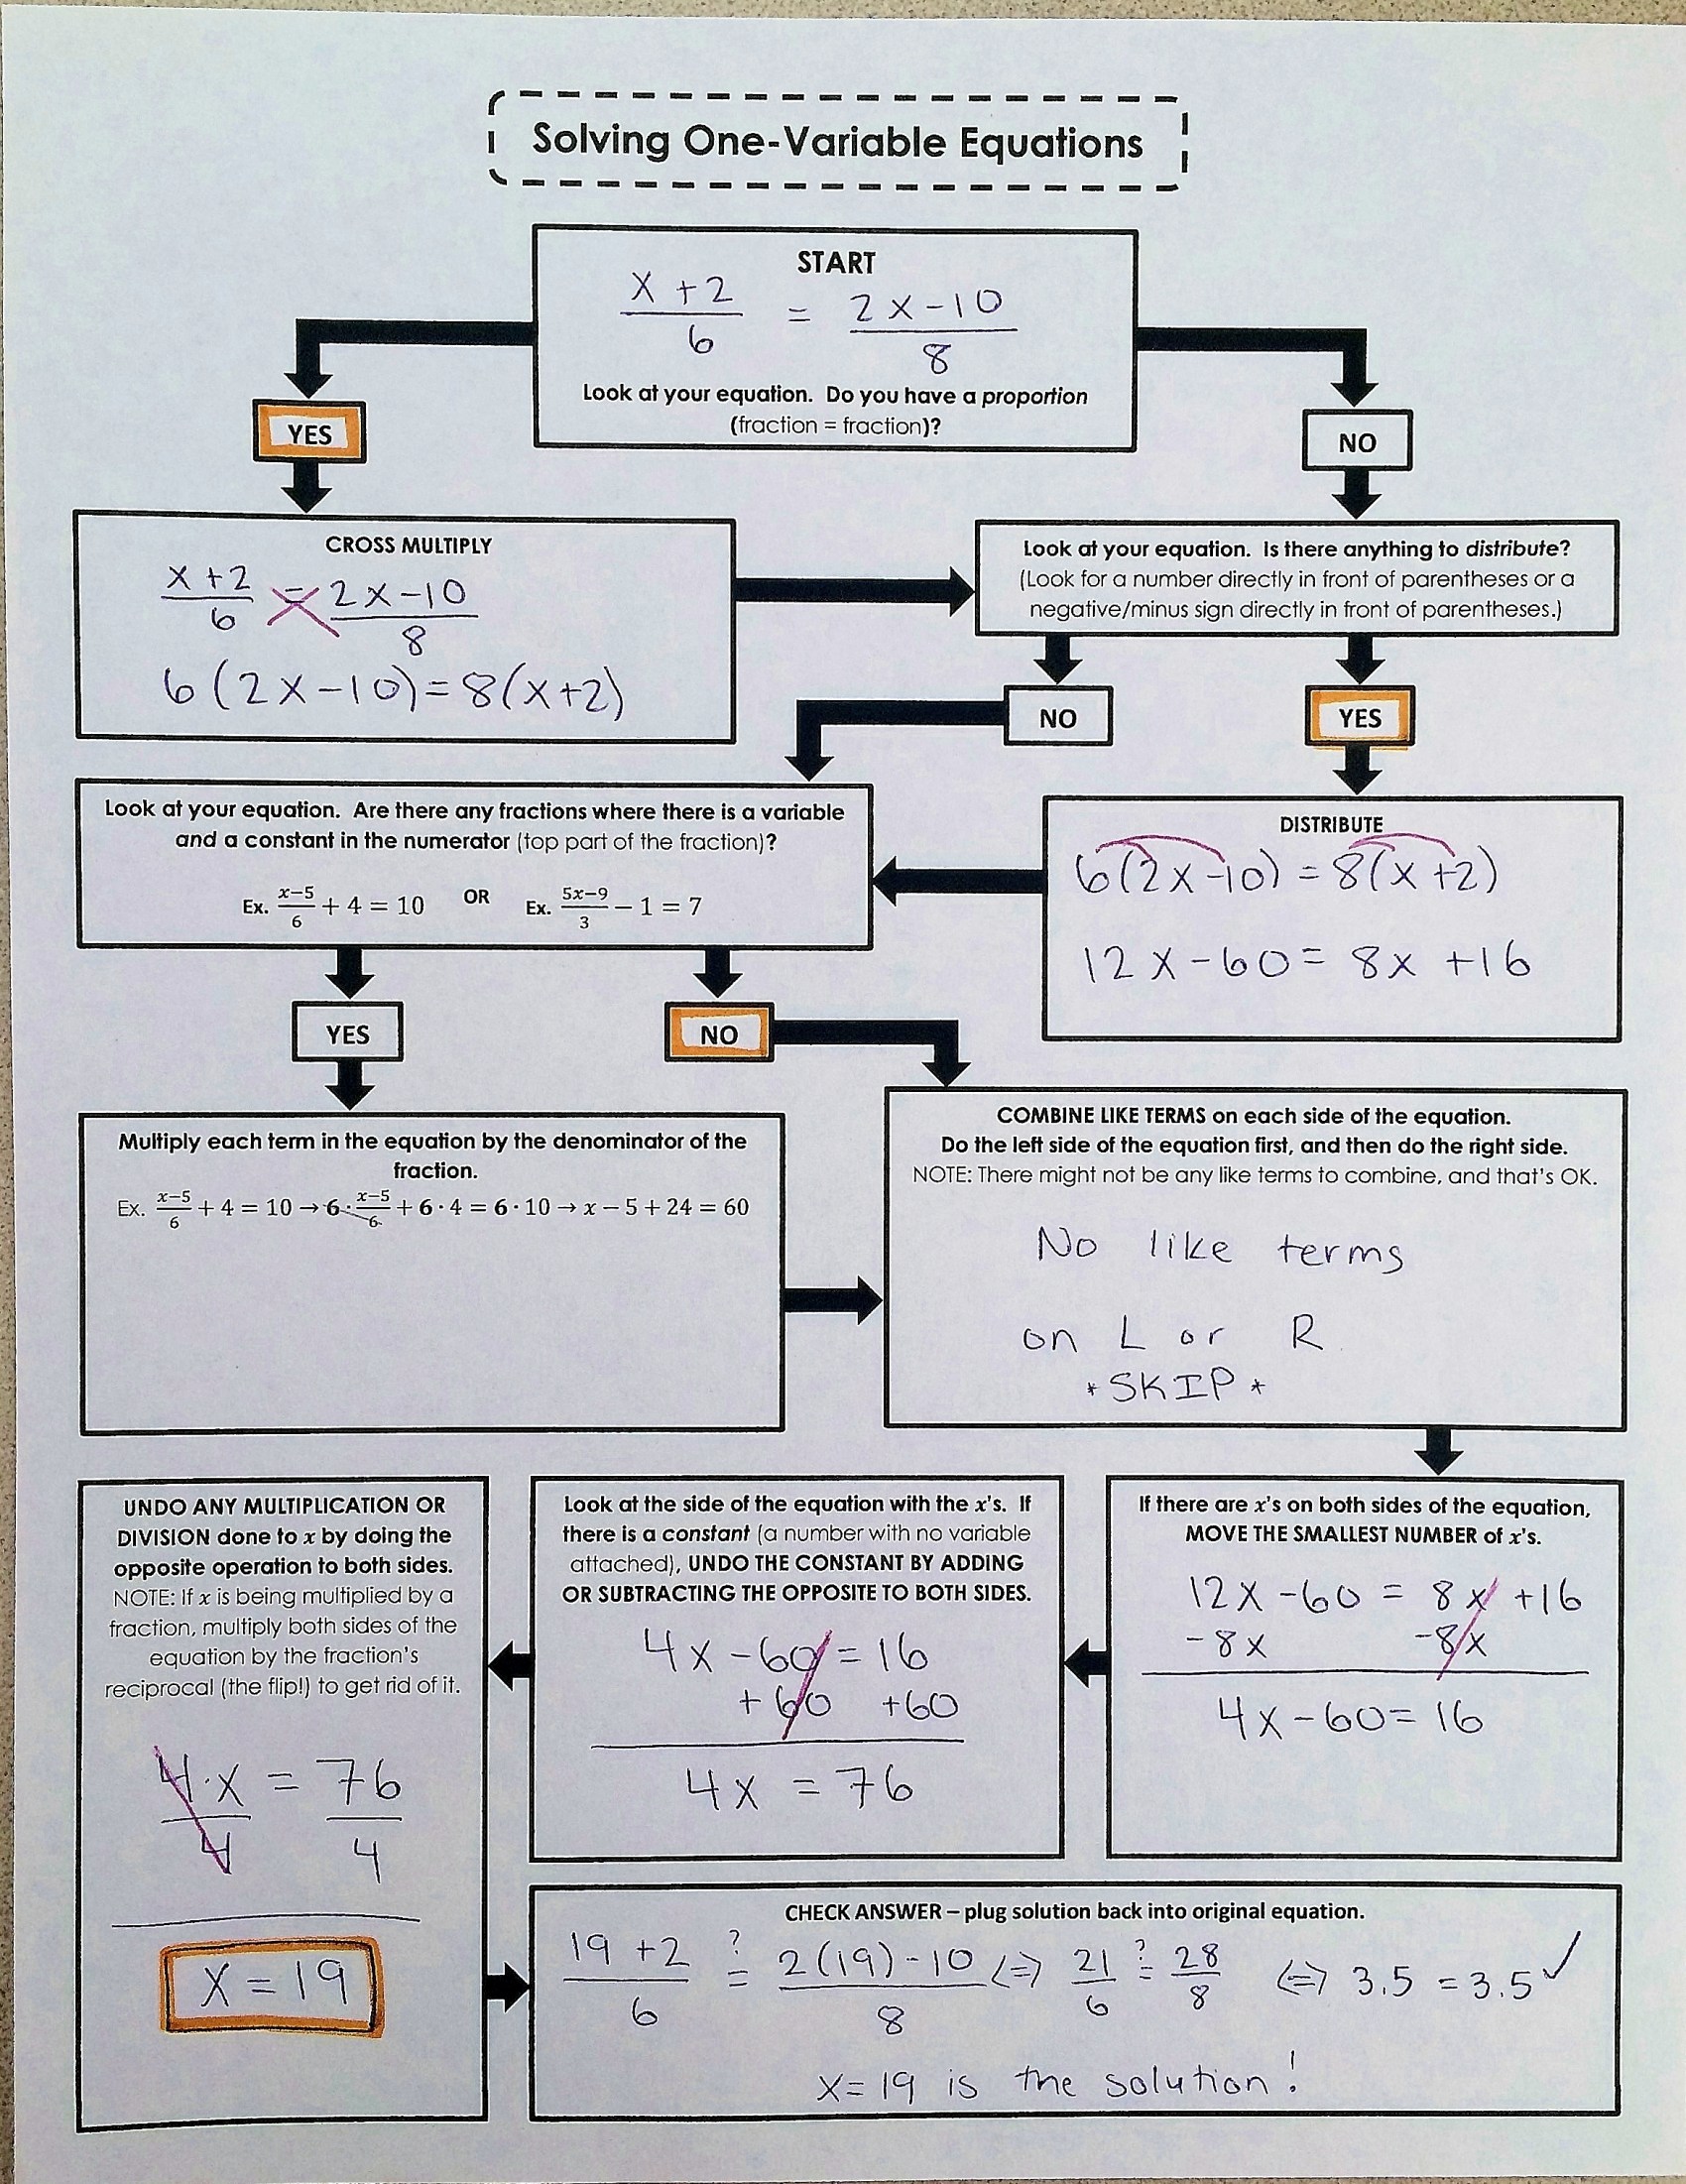
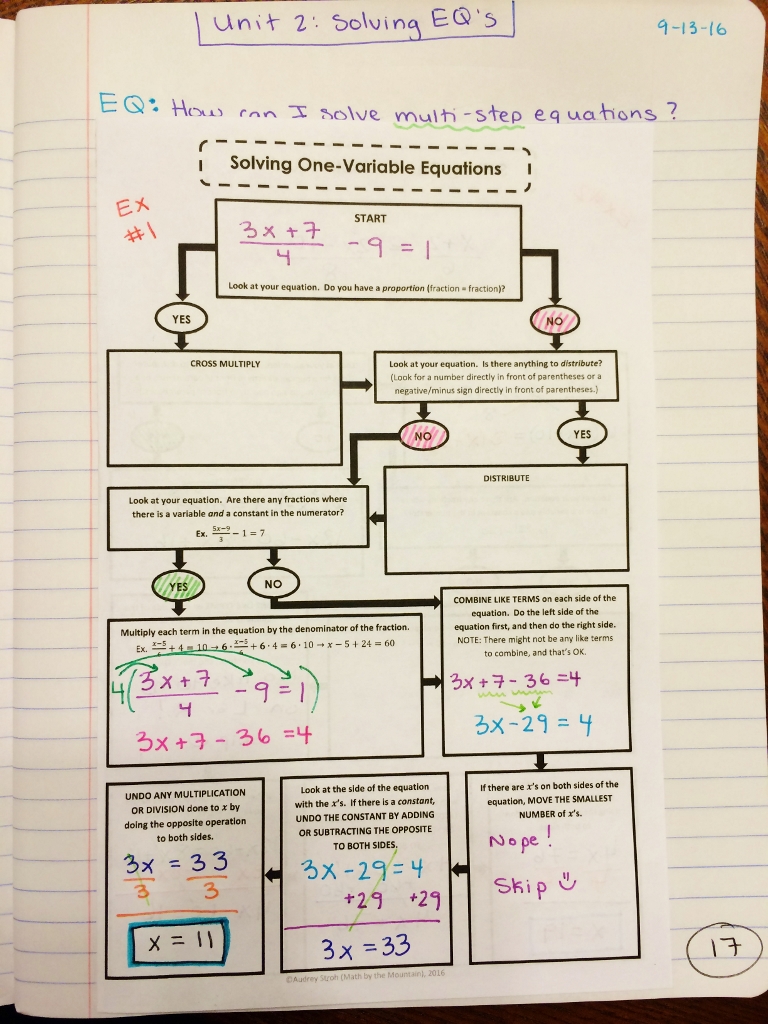
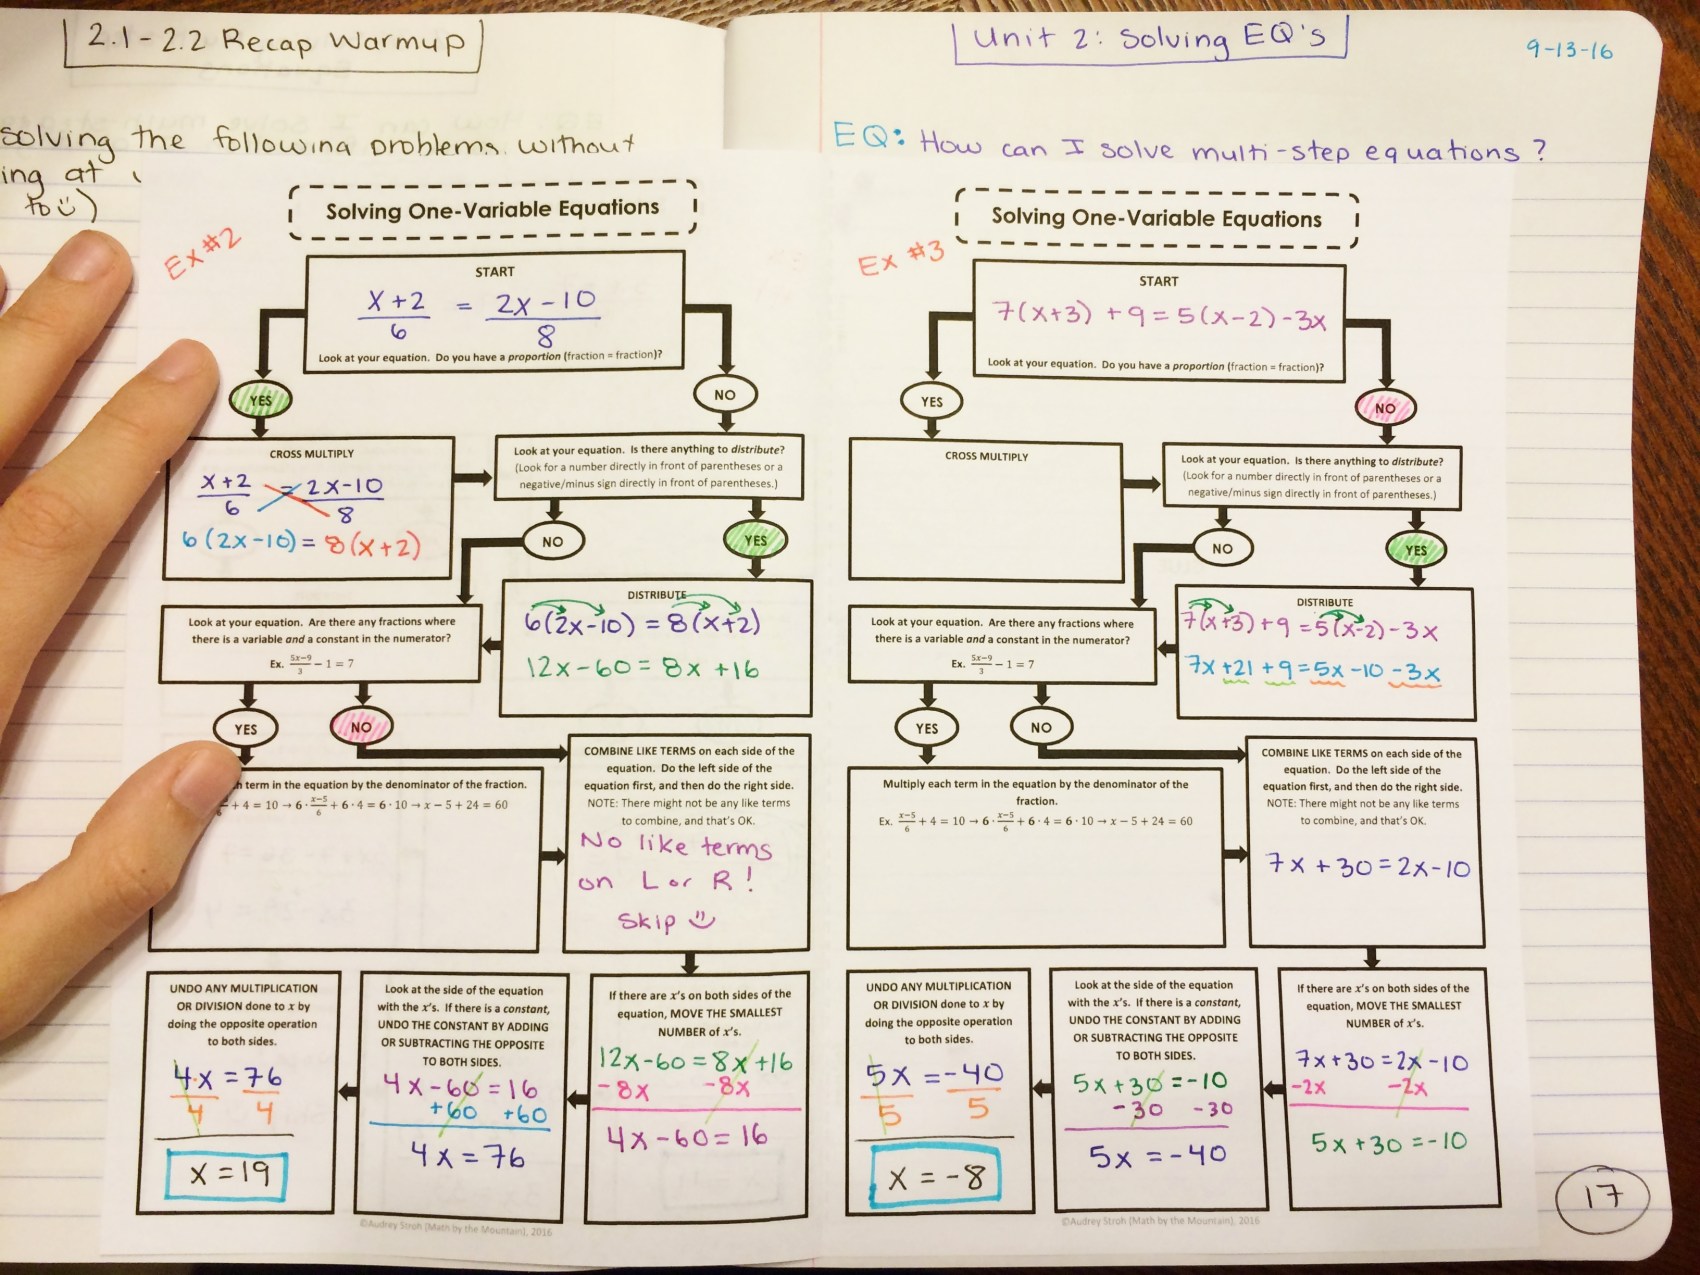
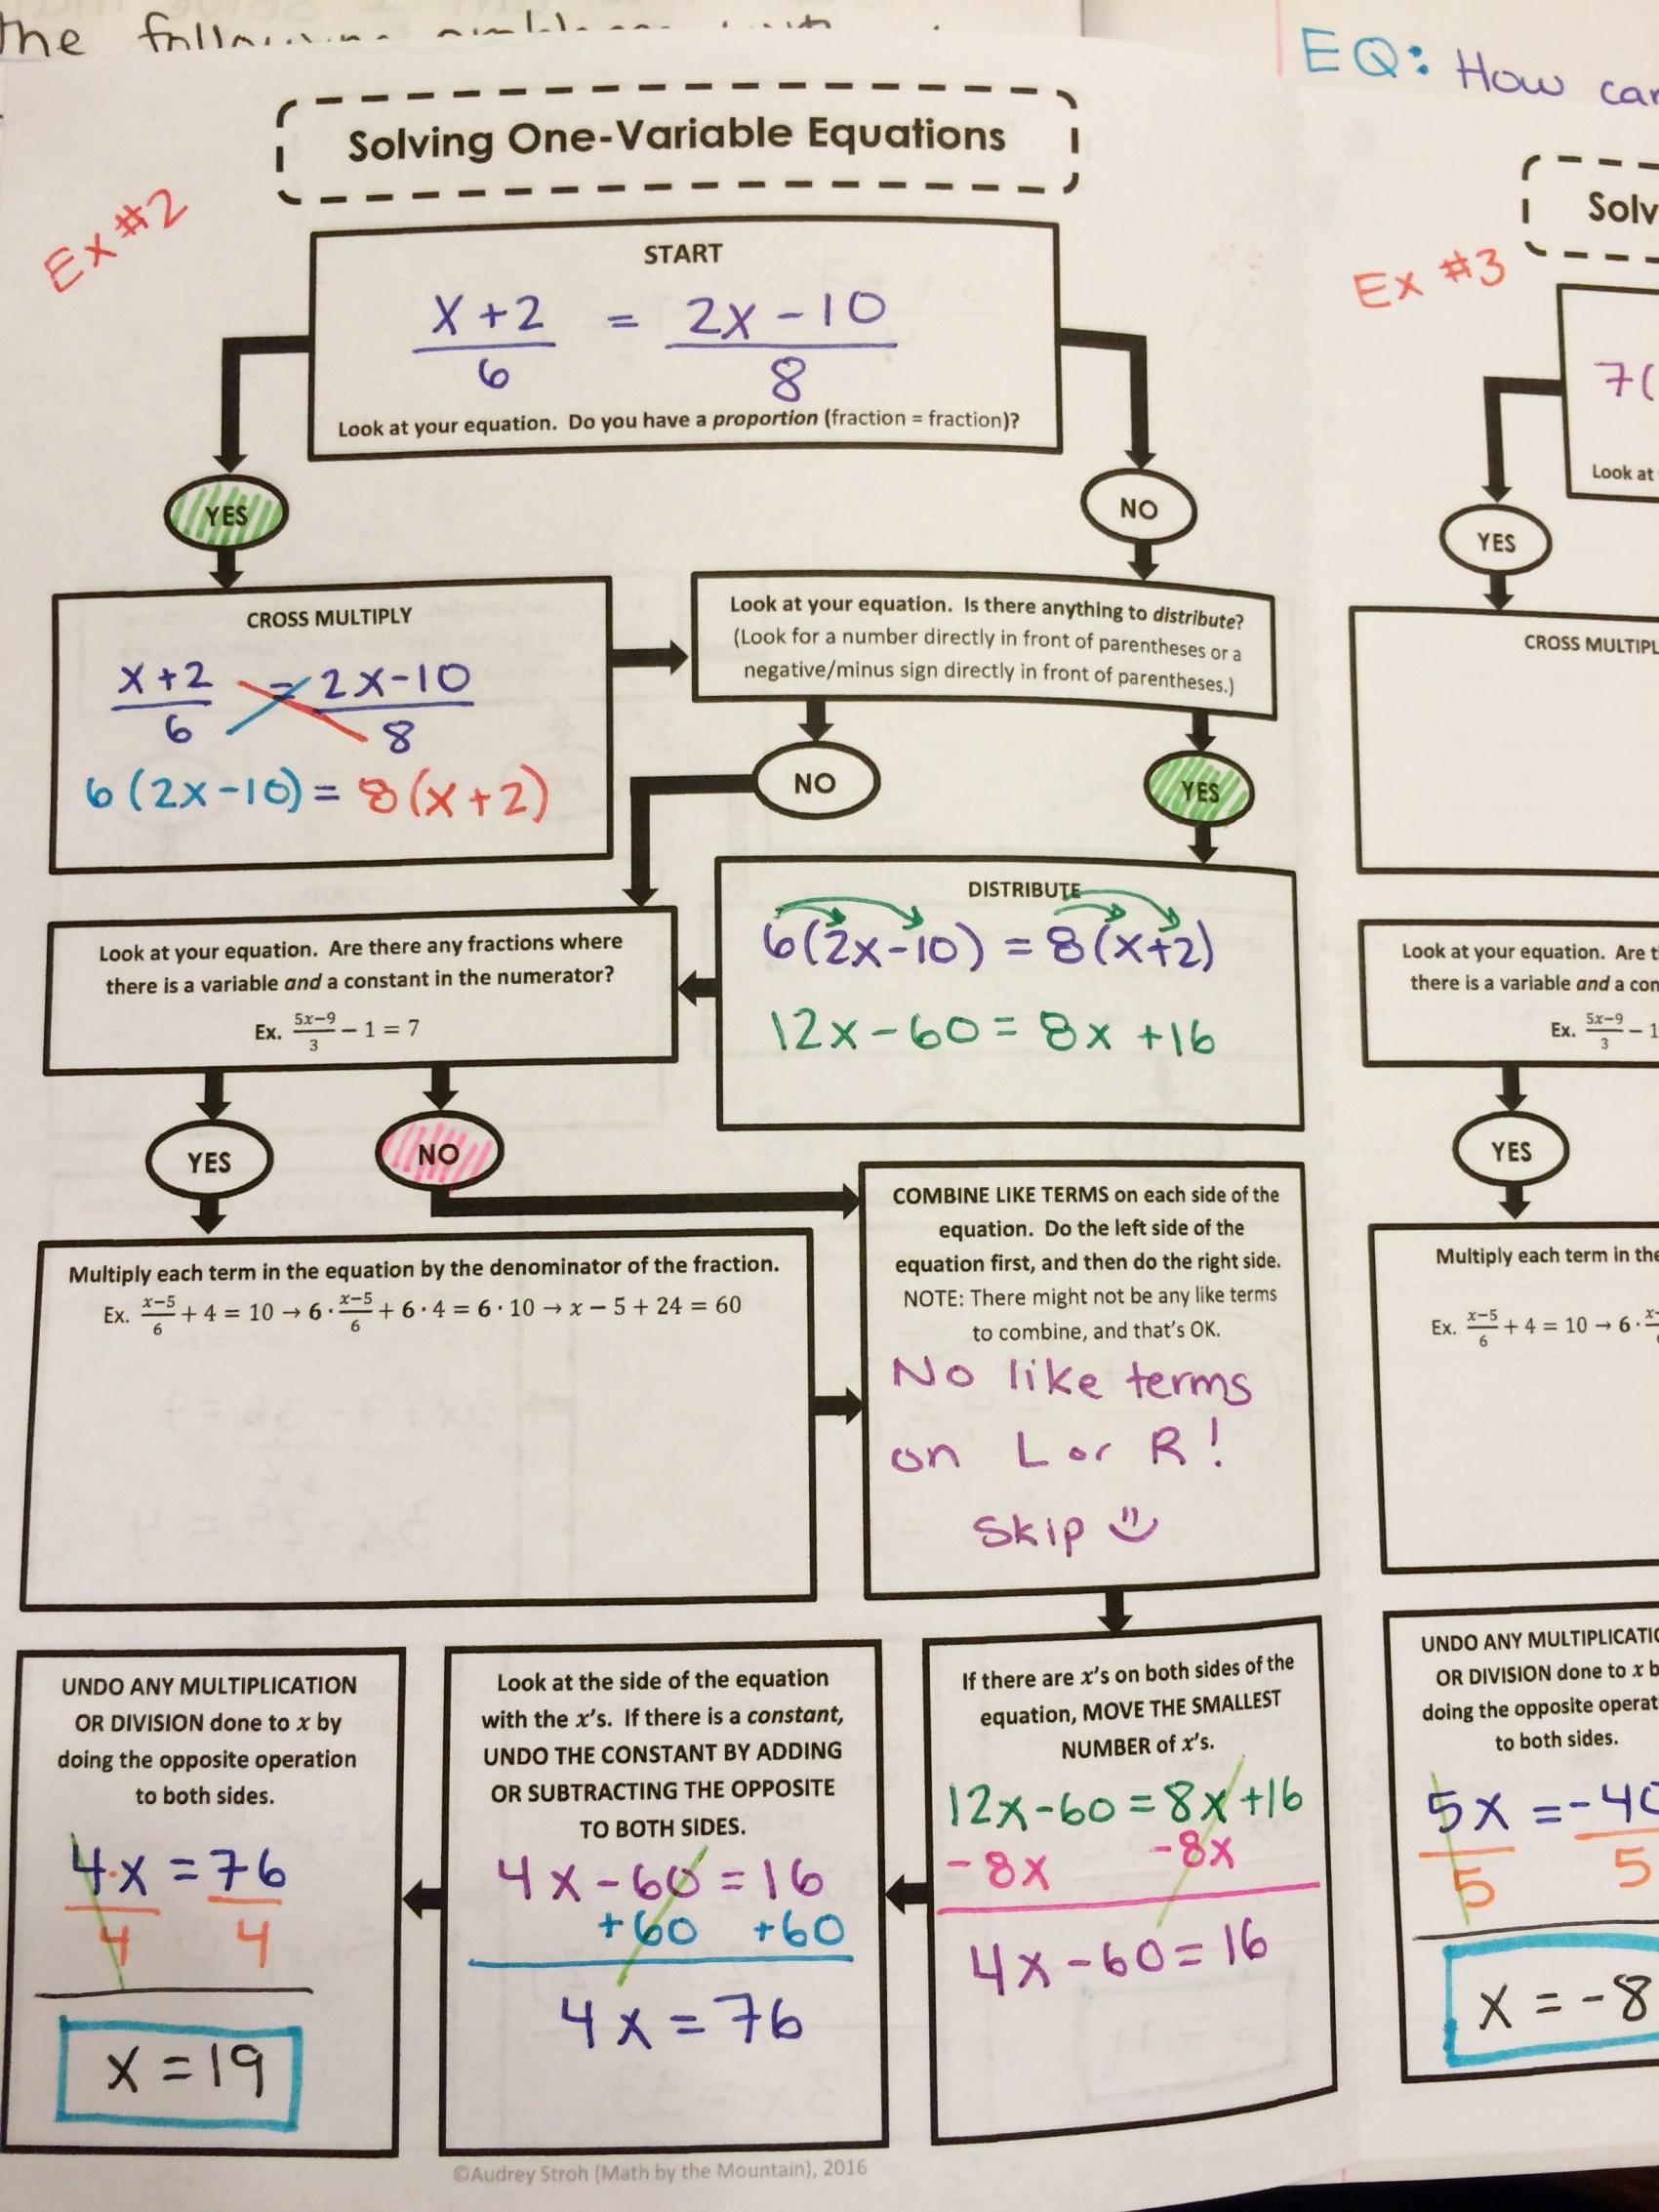
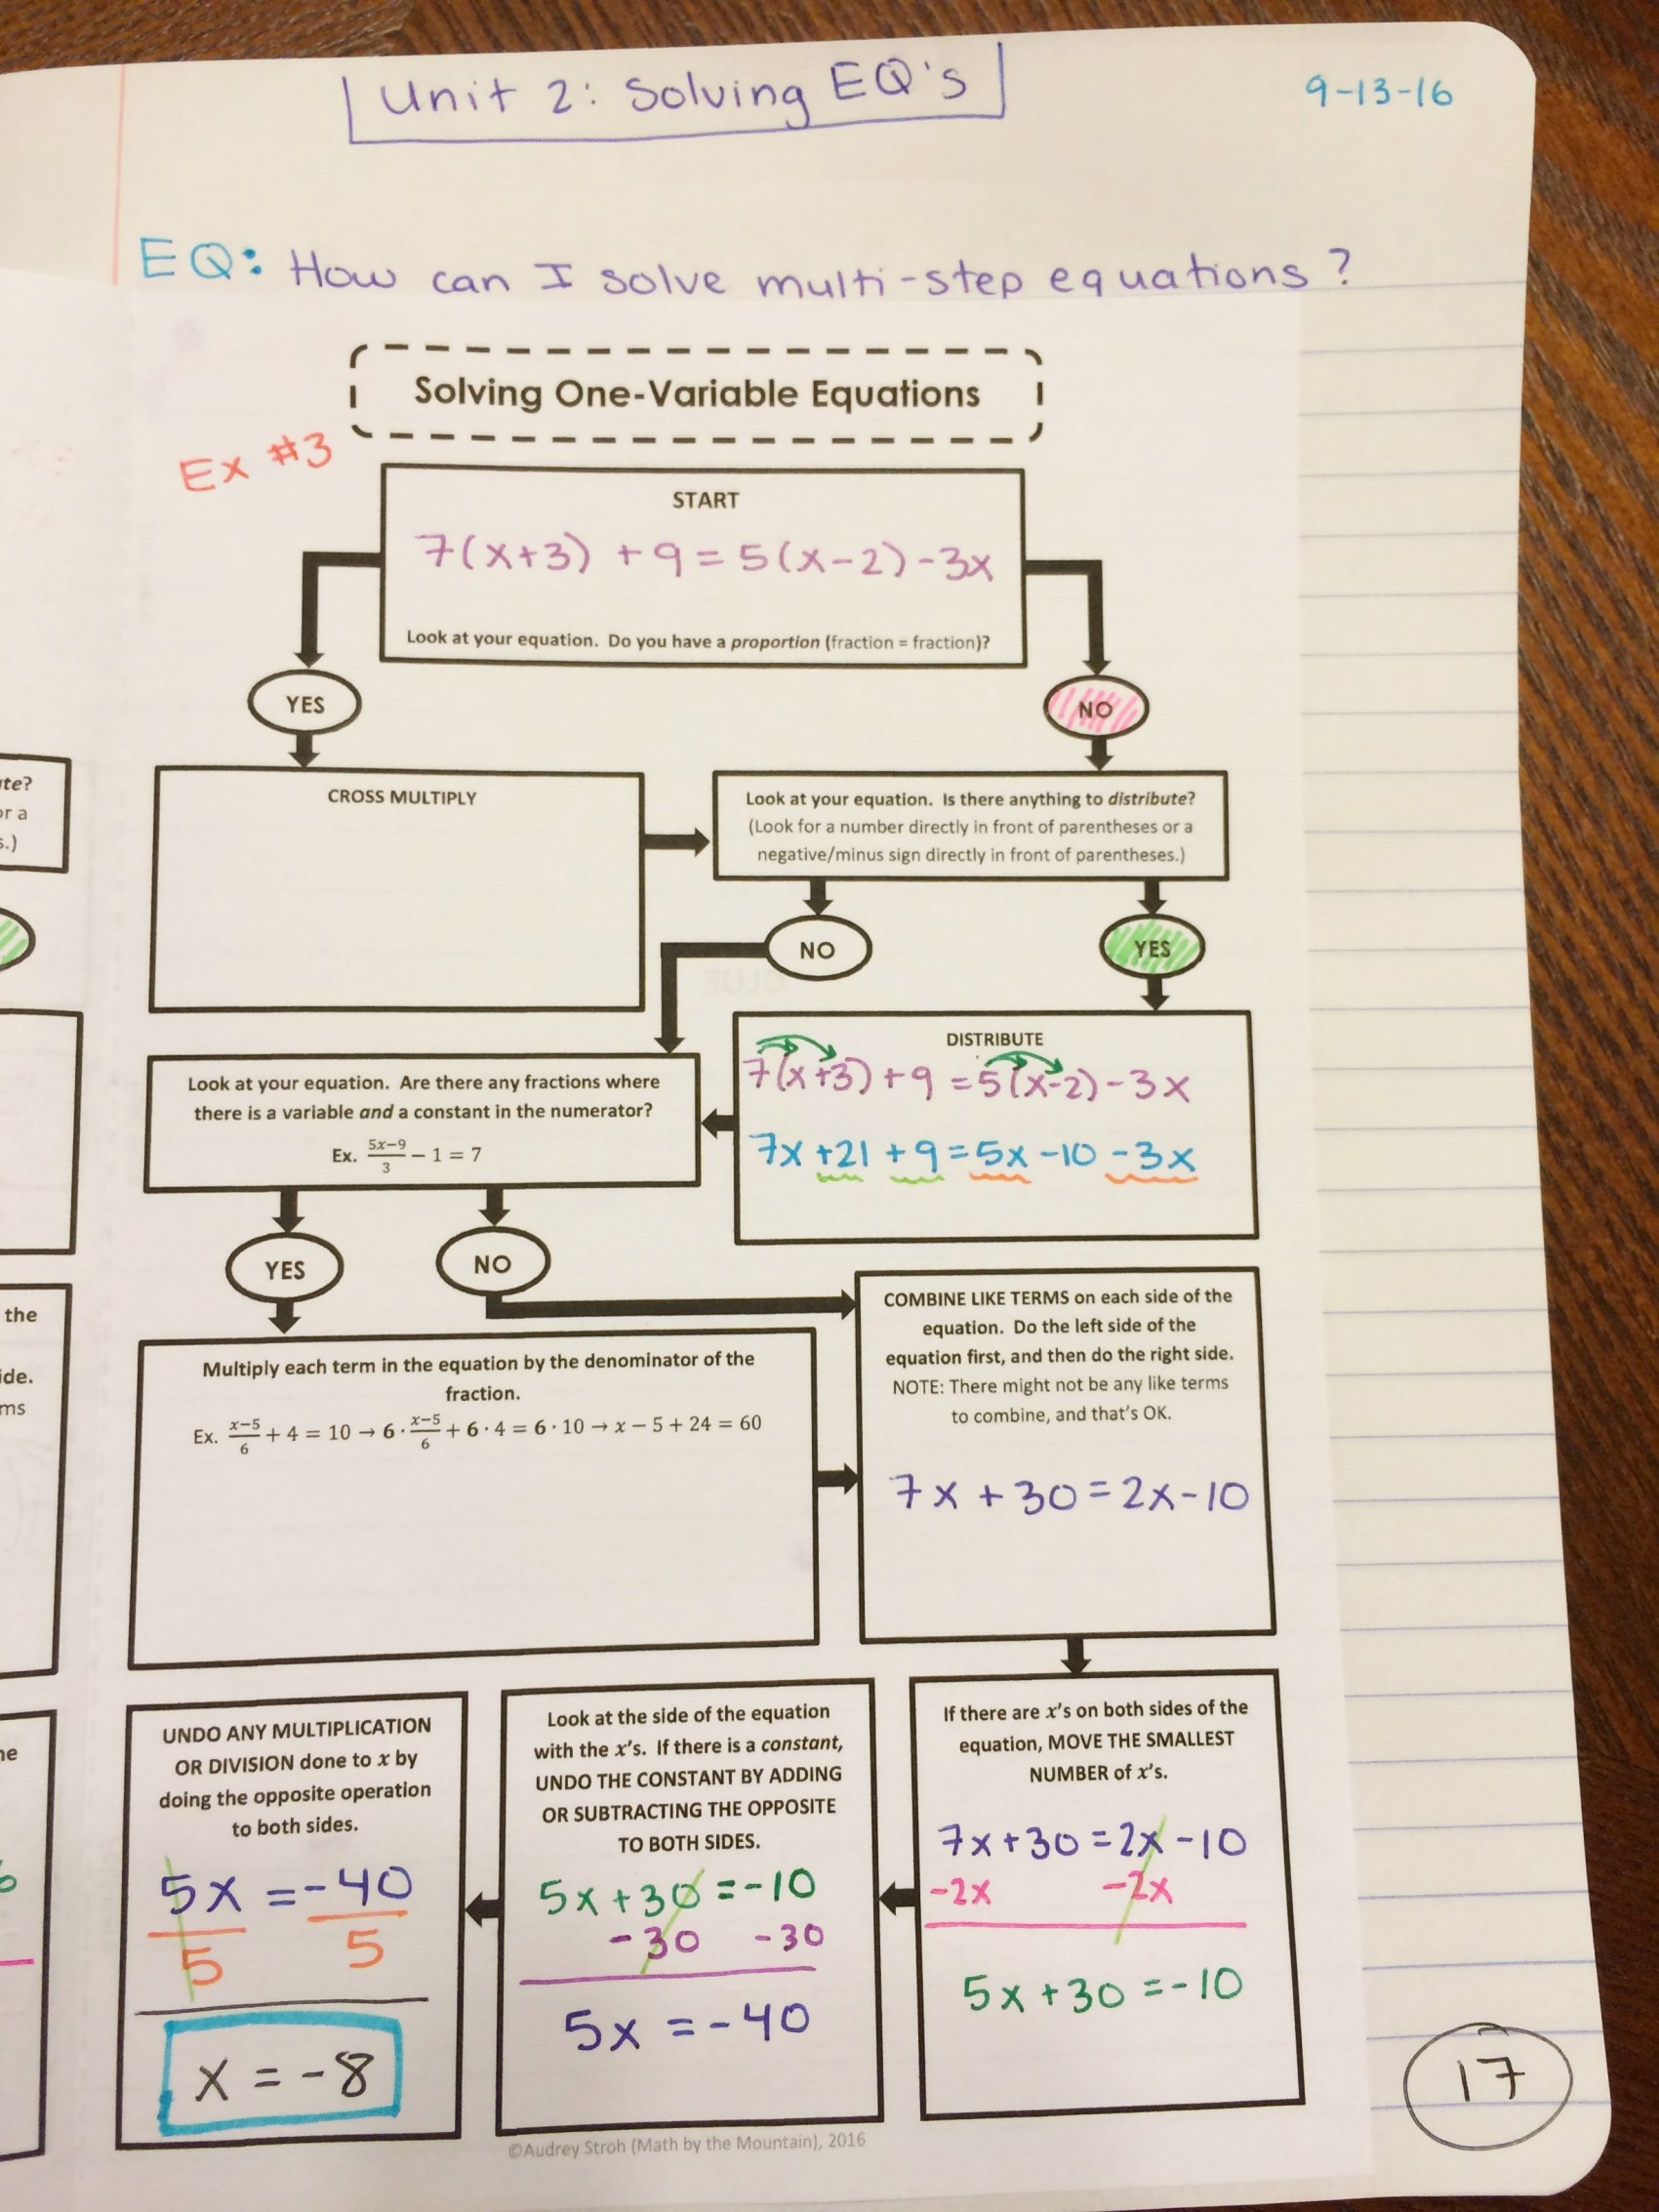
After doing all of the different factoring, I give students one last reference sheet to use in their notebooks, which can be used at any time to refresh their memory on how to solve ANY quadratic trinomial.
If you are interested in this flowchart, it is available in three different sizes here.
Let me know how you teach factoring quadratic trinomials in the comments below!
How-To: Synthetic Division
During my Algebra 2 unit on polynomials, I had asked my (support) class if they would like to stick to just using polynomial long division, which works for every single problem, or if they would like to also learn another method (synthetic) that, while far quicker, only works in certain situations. It was almost unanimous that they favored sticking to polynomial long division, which was fairly surprising to me. I almost figured they would want a quicker method, but their rationale was sound. They thought that having another method would just trip them up, and they didn’t really see a point if it could only be used for linear binomials.
However, a few weeks after our unit on polynomials, we had a bit of down time so I introduced synthetic just for fun. The students caught on quickly, but still preferred long division since it made more sense to them. (I agree that Synthetic is harder to wrap one’s head around. It feels a bit more “magic.”) Unfortunately, most of the class was gone that day due to an optional viewing of the school play being offered for students during the first four periods of the day.
As we start moving toward reviewing for finals, I figured I’d make a slideshow for students to view on their phones if they wanted to get a refresher on synthetic division. Here it is! I like it because it has a quiz-yourself and work-at-your-own-pace feel to it.
Do you cover both synthetic and long division for polynomials? Which does your class seem to prefer?
Download a PDF of the slideshow here: synthetic-division-how-to
My Favorite Resources #MTBoSBLAUGUST #Made4Math
Over the last year or so, I’ve done a lot of work with very low-end students. Between teaching summer school for two years straight in the inner city, and teaching support classes in my regular semi-rural school, I’ve really been pushed to find other ways to convey information that work for my students.
One thing that I found is that no matter how small and bite-sized of steps I could break a process down to in our notes, many of my ELL students and students with IEPs for processing disabilities just couldn’t follow along and rework through the steps to get themselves “unstuck” on a problem. Working toward self-sufficiency is really big for me. I strongly believe that the purpose for high school is to prepare students to be productive once they enter the “real world,” whatever that means for them (school, workforce, military, etc.). Being self-sufficient and being able to problem-solve on their own is a big part of being able to reach this point. So, I kept searching and trying new things until I made my first flowchart graphic organizer. It was a game changer for my class!
Students were able to easily follow along. Using the graphic organizer, they were forced to read and do only one small chunk at a time and they had enough space to do their work right on the flowchart (it’s hard for some students to go back and forth between where the steps are written and where they’re doing a problem on a separate page of paper). Students were able to use the flowcharts as long as they wanted. As soon as they felt comfortable enough without it, they stopped using it. I have also laminated a class set that we used for practice early on.
I’ve also found that these have been very successful with my older students to jog their memories about a method they haven’t used in a while (such as solving systems by elimination). For a lot of my seniors, I’m not the only math class that they are taking–many of them are also taking a class called Math Skills that gives them opportunities to take more Work Samples, which are needed for graduation. Work Samples are an animal of their own and the topics on them can vary widely, so students find themselves needing review on topics that they may have not seen for a couple of years. I’ve had a lot of these students specifically ask if I had a flowchart for topic _______ that they could look over to remind themselves of the details of how to do ________.
With my younger classes, the first time we learn a method, I have a student working at the document camera as our class’ scribe, and the class (no help from me) discusses their way through the problem. They determine which path they need to go down (the “yes” path, or the “no” path), and then work in pairs to do that step. Then, they compare their work for that step as a class, and then move onto the next part of the flowchart and repeat the process. I love, love, LOVE how student and discussion centered this makes my lessons! Seriously! LOVE! It’s almost as if I’m not needed (shh! don’t tell anyone that, because I still want my job).
From there, we do a few examples that we glue into our INBs, and do some practice with dry-erase pens on the laminated copies of the flowcharts. I find that starting slow and having them work their way through a problem as a class, without me, helps them remember the ins and outs of the process a bit better, since they had to struggle together as a class.
Although I don’t have students referring to their notes quite as much as I would like, I have found that they go back to these flowchart examples in their INBs more than anything. When I ask my students why they like these so much, a lot of what they say comes back to the fact that they have the steps on the paper, and the space to do the work on the paper, and the flowchart really forces them to go one step at a time. A lot of them know that they have a tendency to rush through steps, and using the flowchart makes that very difficult to do. Students then self-wean off of the flowcharts at their own pace, which is great in my books! They are taking accountability for their knowledge. If they can do their work straight away, they do so. If they need a bit more help to get through a problem, they don’t just give up–rather, they walk to where I keep extra copies of the flowcharts, grab one, and work through the problem. This has really helped develop the no opt-out culture in my classroom. If students want to learn, there are tools to help them learn. For my classes, the flowchart has been an instrumental tool for their development, both in math skills as well as self-motivation and persistence.
If you like the flowcharts, you can find them at my TPT store! Today, they are 19% off when you couple your purchase with the 10% discount code OneDay.
Solving Systems of Linear Equations Flowchart BUNDLE
Solving Multi-Step Equations Flowchart
Thank you so much for reading!