How to Set up an Interactive Notebook for Algebra 1

Getting started with interactive notebooks? Here’s what to do!

The logistics of starting an interactive notebook is one of the most dauting barriers for math teachers. Here’s a set of simple 3 steps to take to get started!

1. Number the pages (If nothing else, do this!)

You will want to be on the same page as your students, quite literally, when using interactive notebooks. Being on the same page allows you so many opportunities to promote study skills and refer students back to a particular topic to help them get “un-stuck.” Promoting study skills is one of the biggest benefits of interactive notebooks so don’t skip this step.

WORD OF CAUTION: Make sure to number the pages as the very first thing that you do! Interactive notebooks get very thick over the course of a semester, and it will be difficult to write in the corners by the time the notebook is almost complete.

If you want more tips on choosing a notebook, read this post about What notebook should I use for an Algebra 1 Interactive Notebook?

2. Make a Plan

Continue reading

What notebook should I use for an Algebra 1 interactive notebook?

If you’re just getting started with using interactive notebooks with your Algebra 1 class, you might have a few questions about what type of notebook you should use, how many pages, and how to make sure all of your students have one to use. In this post, I’ll try to address them all. If I leave something out, leave me a comment so I can answer your question!

What type of notebook should I use for interactive notebooks?

As a die-hard spiral-notebook lover, it even surprised myself when I first realized that composition books are the best choice for interactive notebooks. They had never been my first, second, or even third choice for my own personal note-writing over my life, so I was a bit resistant to trying them for the first time. Here’s what I found:

Continue reading

Algebra 1 – Unit 1 Interactive Notebook Pages | The Foundations of Algebra

Starting the year off right is SO important for any class, but especially in Algebra in particular, since everything that is done in the first unit is used throughout the entire year. Students NEED to have a strong foundation, or else they’ll be fighting an uphill battle all year, which is no good. I’ve spent a lot of time thinking about what topics are most important for students to know (from vocabulary to skills), so that each following unit has a strong foundation.

Here are all of the notes I used with my students during the 1st unit of Algebra 1.

Continue reading

Algebra 1 Interactive Notebook Pages | Unit 4 – Linear Functions

If you follow me on Twitter, you might have seen the following tweet about a month ago.

gluing shame

You could say I got a bit behind on my semester 1 INB gluing and, as a result, my INB posts have fallen by the wayside.  Semester 1 ended the first week of February and I’m just now getting around to catching up on getting it organized, since I’ve had a few snow days in a row (I really thought this would be a snow-day free year, but nope!).

Without any further ado, here are my INB pages for Unit 4 of Algebra 1: Linear Functions. Note:  There were activity/quiz/review days built into this unit–the days listed out are for days that note-taking occurred.

837
Continue reading

Algebra 1 Unit 3 Interactive Notebook Pages | Solving Equations

Unit 3 of Algebra 1 is all about solving equations and their applications.  We start off with multi-step equations, because 1-step and 2-step equations were covered in Unit 1: Foundations of Algebra. pic_Page_01

Day 1: Multi-Step Equationspic_Page_02pic_Page_03

In addition to the notes that went into our composition books, students were each given a full-sized flowchart over solving one-variable equations.  We did an example as a class, and then I also keep a class set laminated so students can use them with dry-erase markers whenever they like. Students referenced their notes and the laminated flowcharts while working on homework in class. Picture2

Day 2: Solving Multi-Step Equations with Special Case Solutions
To start off the lesson, we did a recap warm-up over the prior day’s lesson. pic_Page_04

We then went into a foldable that covers what special solutions are and when they arise. pic_Page_05pic_Page_06

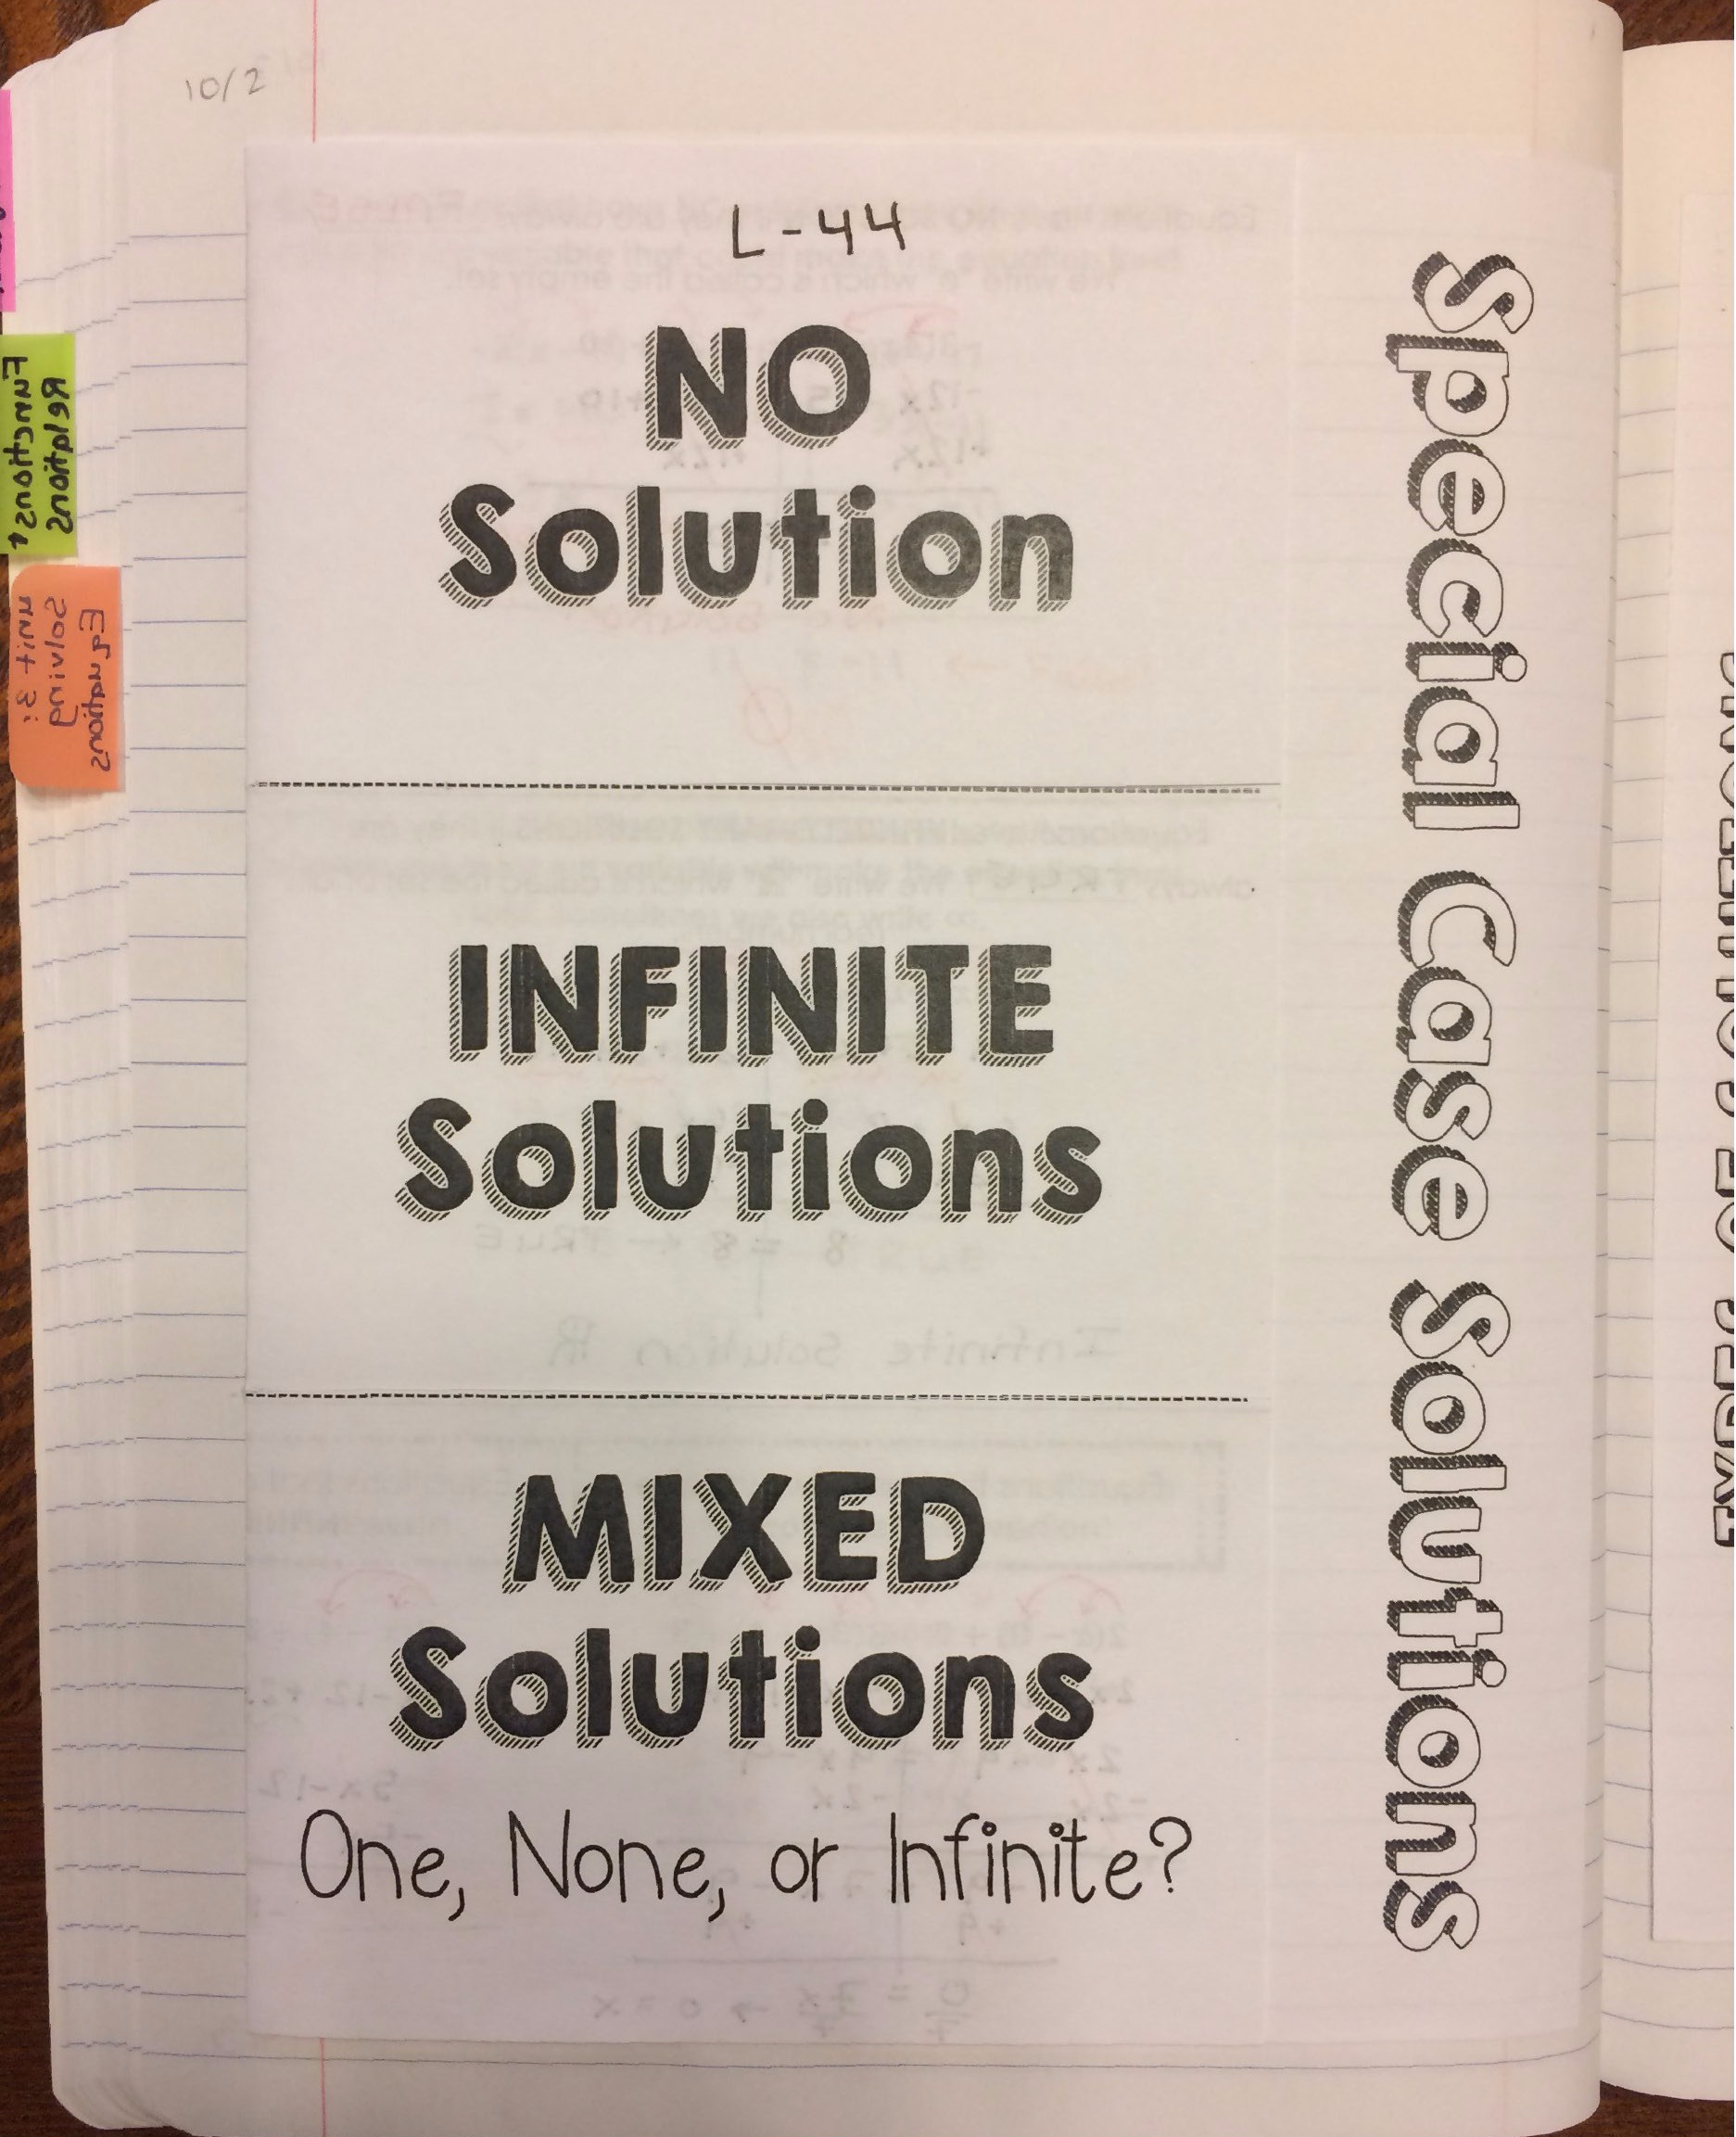
To get even more practice, students did the following Types of Solutions Sort, which emphasized common student errors and misconceptions I’ve noticed in the past. pic_Page_07

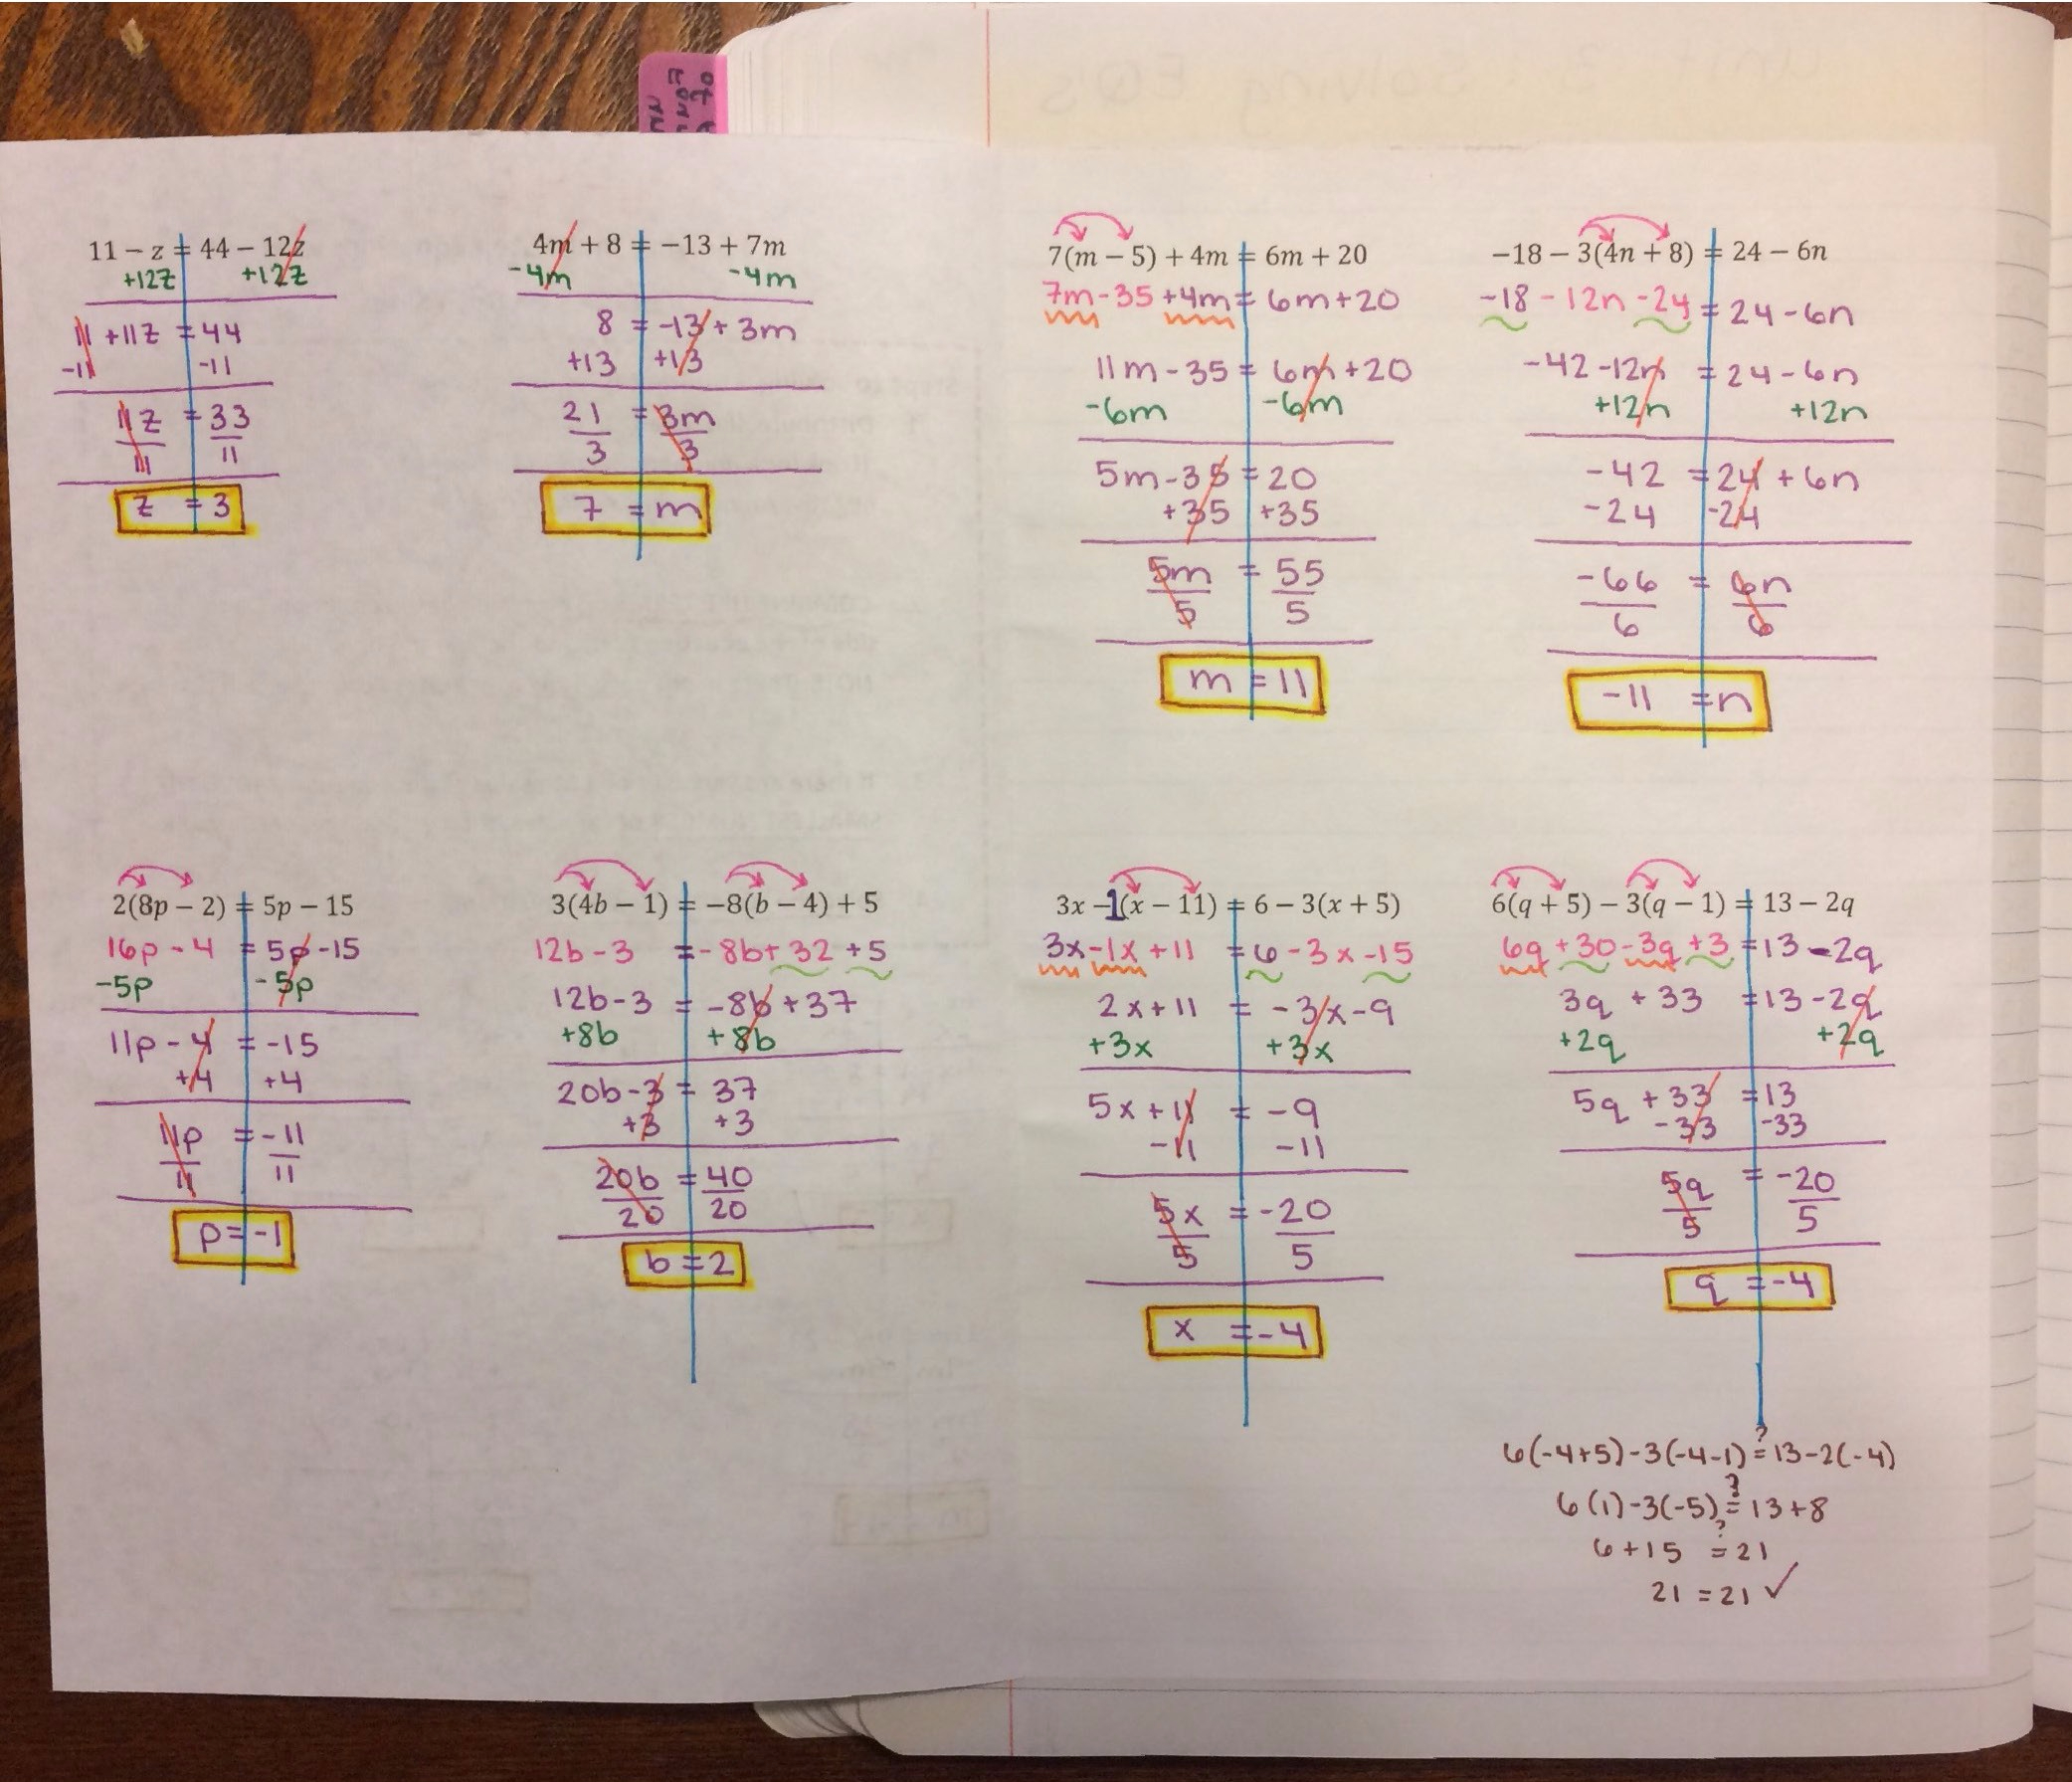
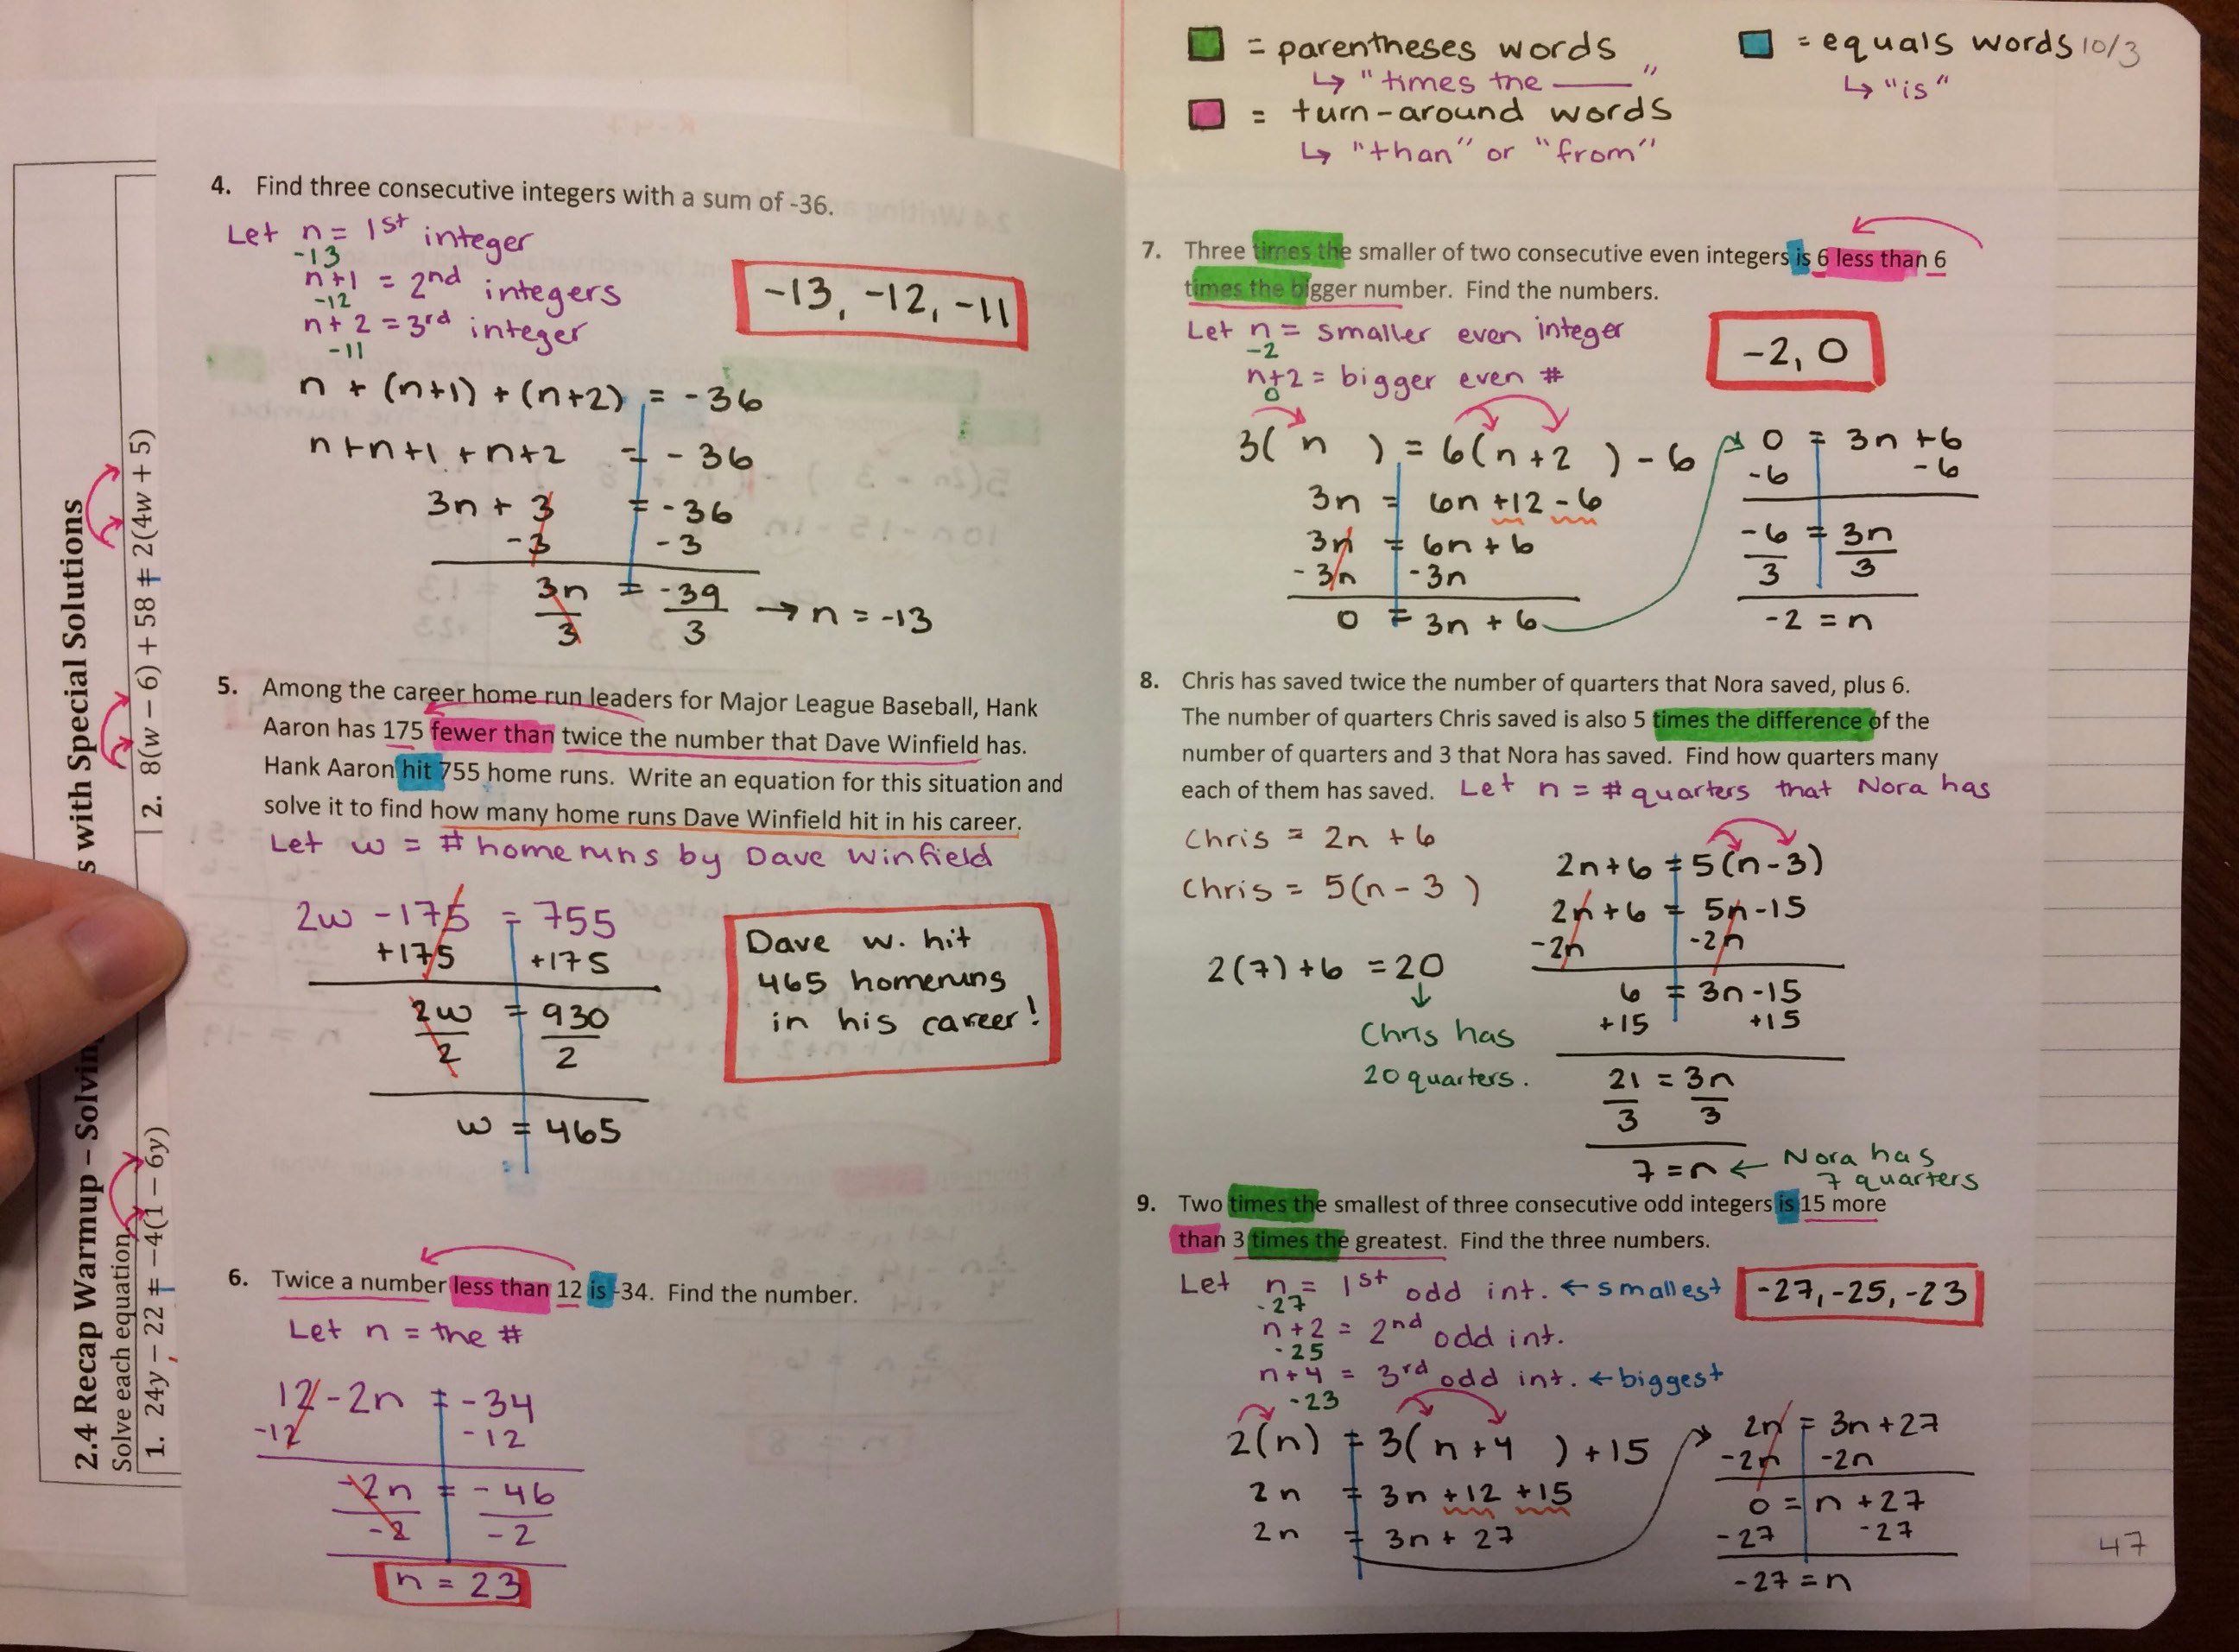
Day 3: Writing Equations to Solve Multi-Step Equations
We started off the lesson with a recap warm-up that contained special solution types.  pic_Page_08

From there, we moved into our main set of notes for the day, with an emphasis on marking the text (NOTE: this is the same color-coding we used in Unit 1). pic_Page_09pic_Page_10

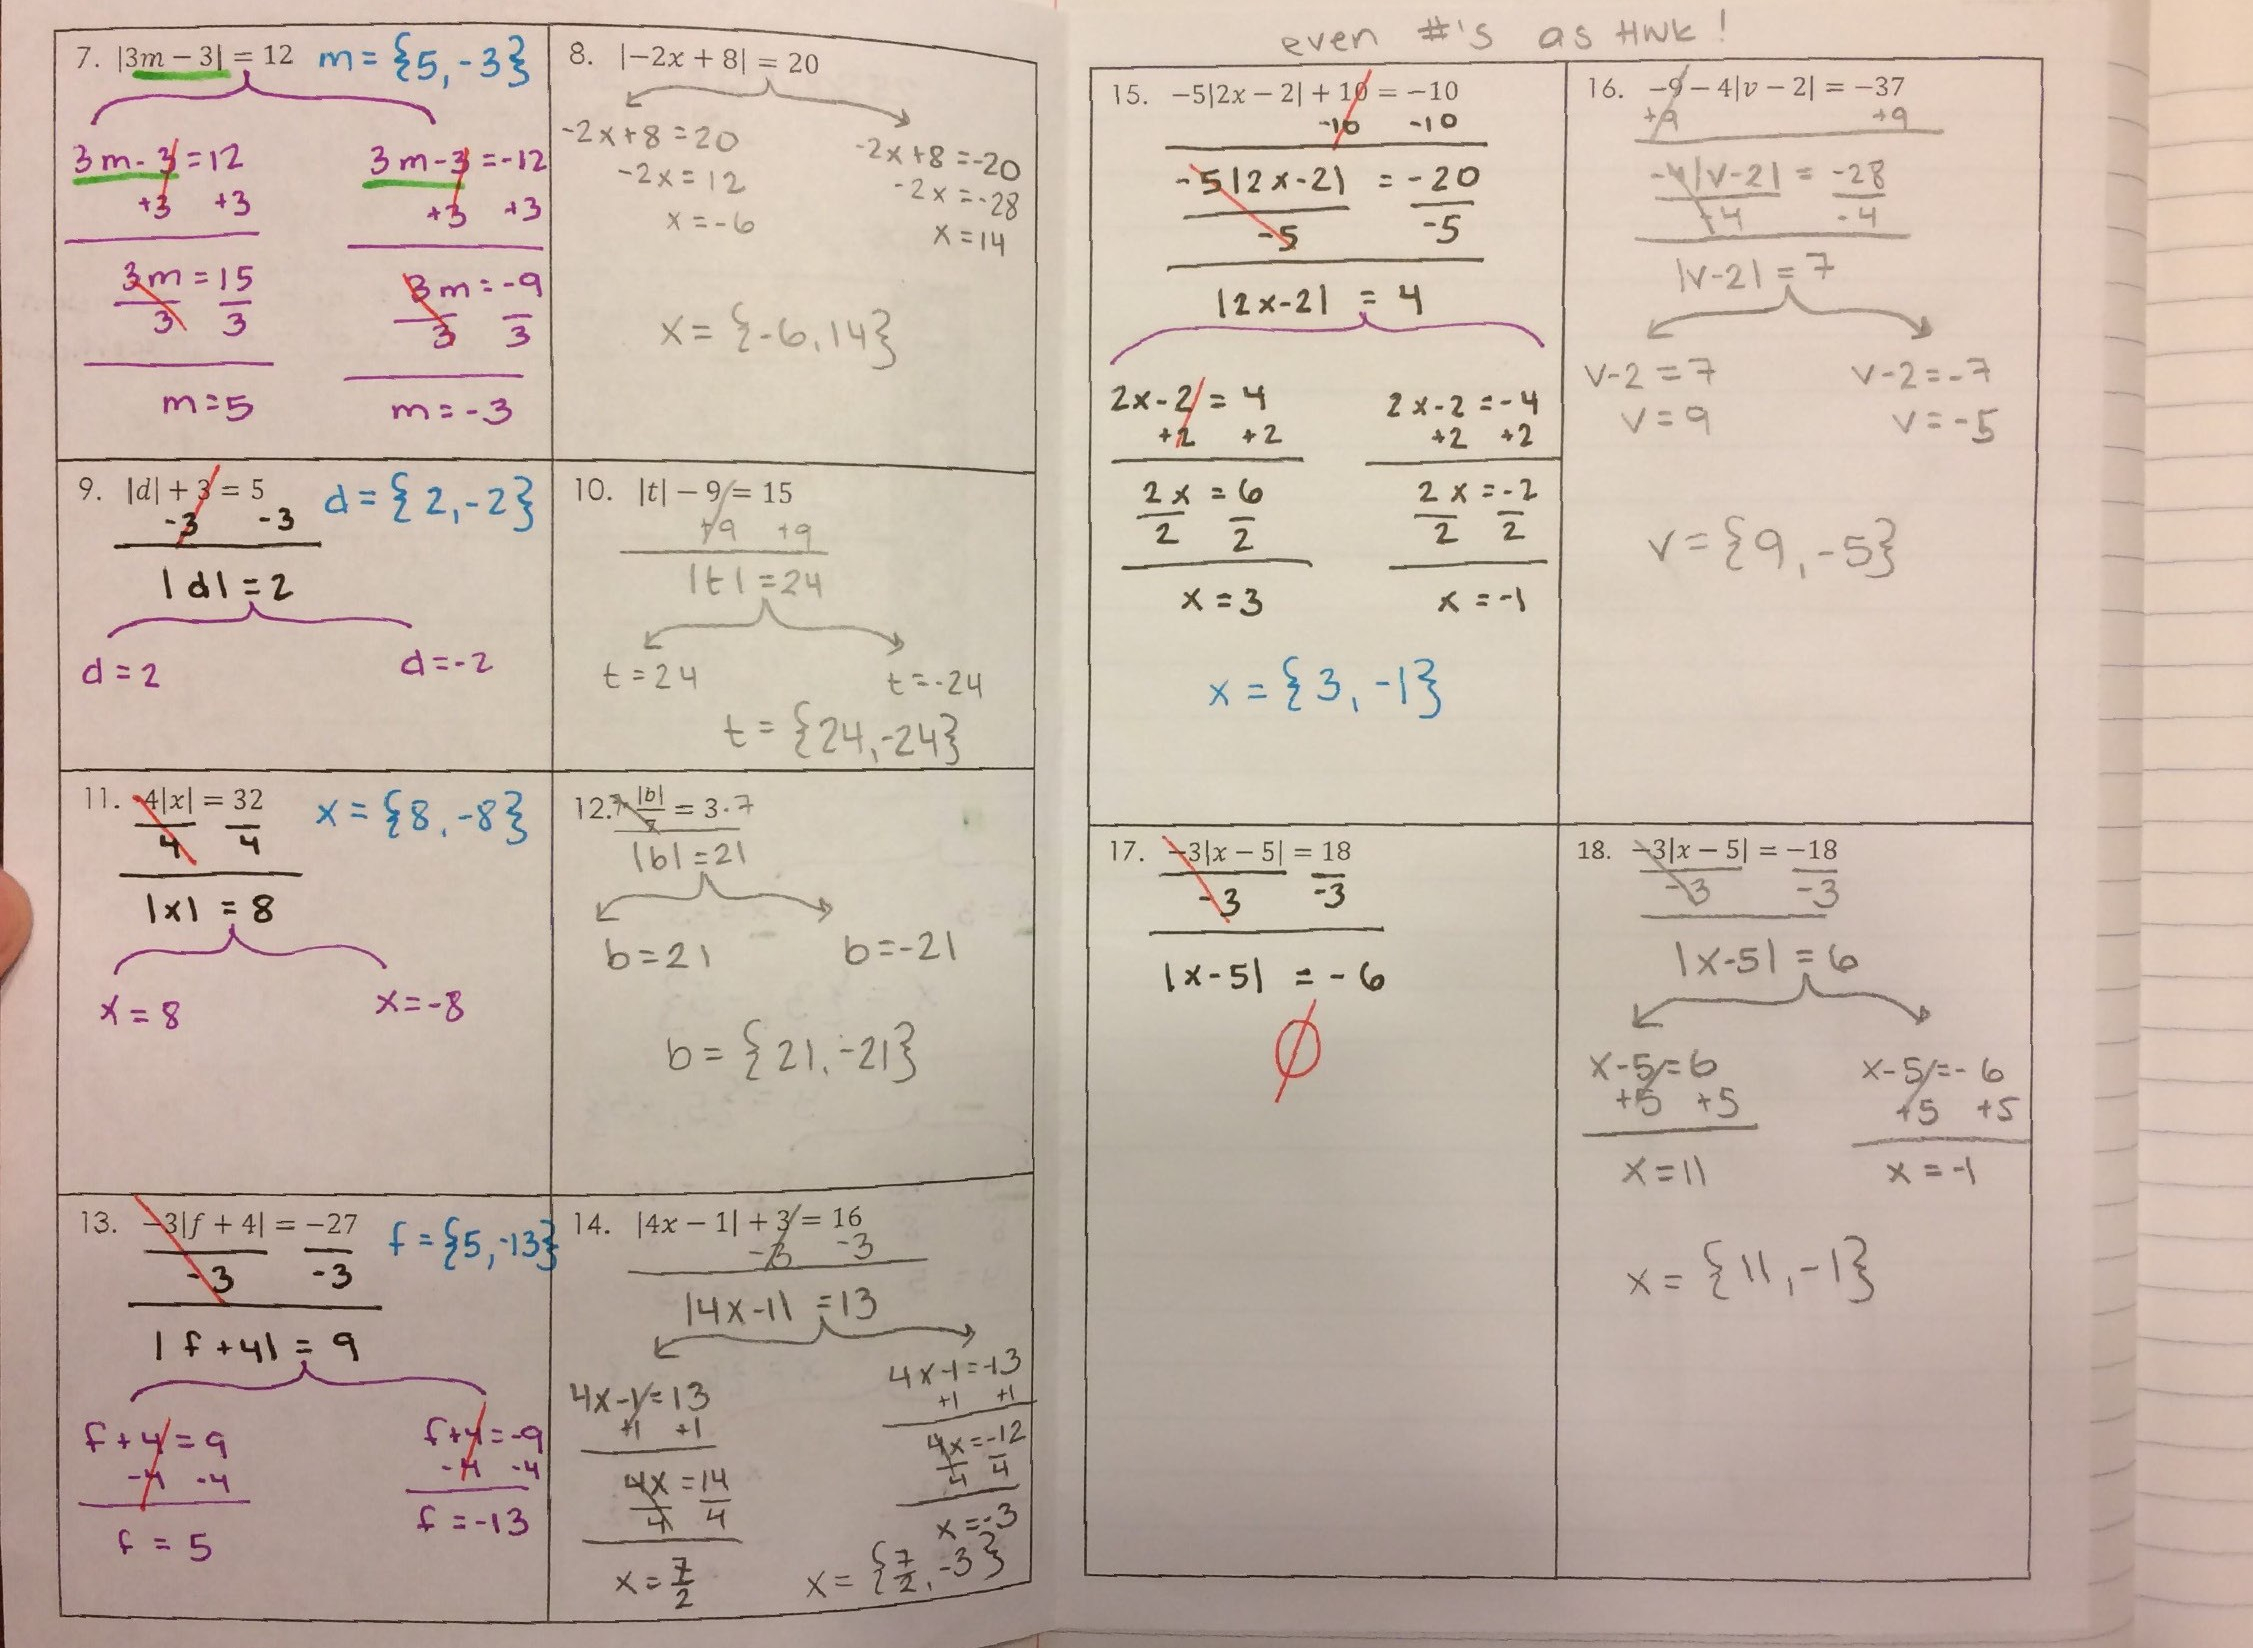
Day 4: Absolute Value Equations
Like usual, we started off the lesson with a recap warm-up of the previous day’s information. pic_Page_11

We started off the topic of absolute value equations by really thinking about what an absolute value means/does.  pic_Page_12pic_Page_13

From there, we used the information we’ve gathered to solve absolute value equations a bit more efficiently (without using the modified cover-up question mark method). Students had the even numbered problems as homework that night.  pic_Page_14pic_Page_15

In addition to the notes that went into the composition books, students were given a flowchart for solving absolute value equations to reference whenever they got stuck. Here’s an example of how they could use it!  Just like the others, I keep a class set of these laminated so students can use them with dry erase markers whenever they get stuck.  I like to color-code each type of flowchart to make it easy to grab the exact one that they need from that unit. IMG_1710

Day 5: Absolute Value Equations Word Problems
To begin the class, we started off by working backwards: writing the absolute value equation that could’ve produced the given solutions. pic_Page_16

From there, we went into story problems involving absolute value equations. pic_Page_17

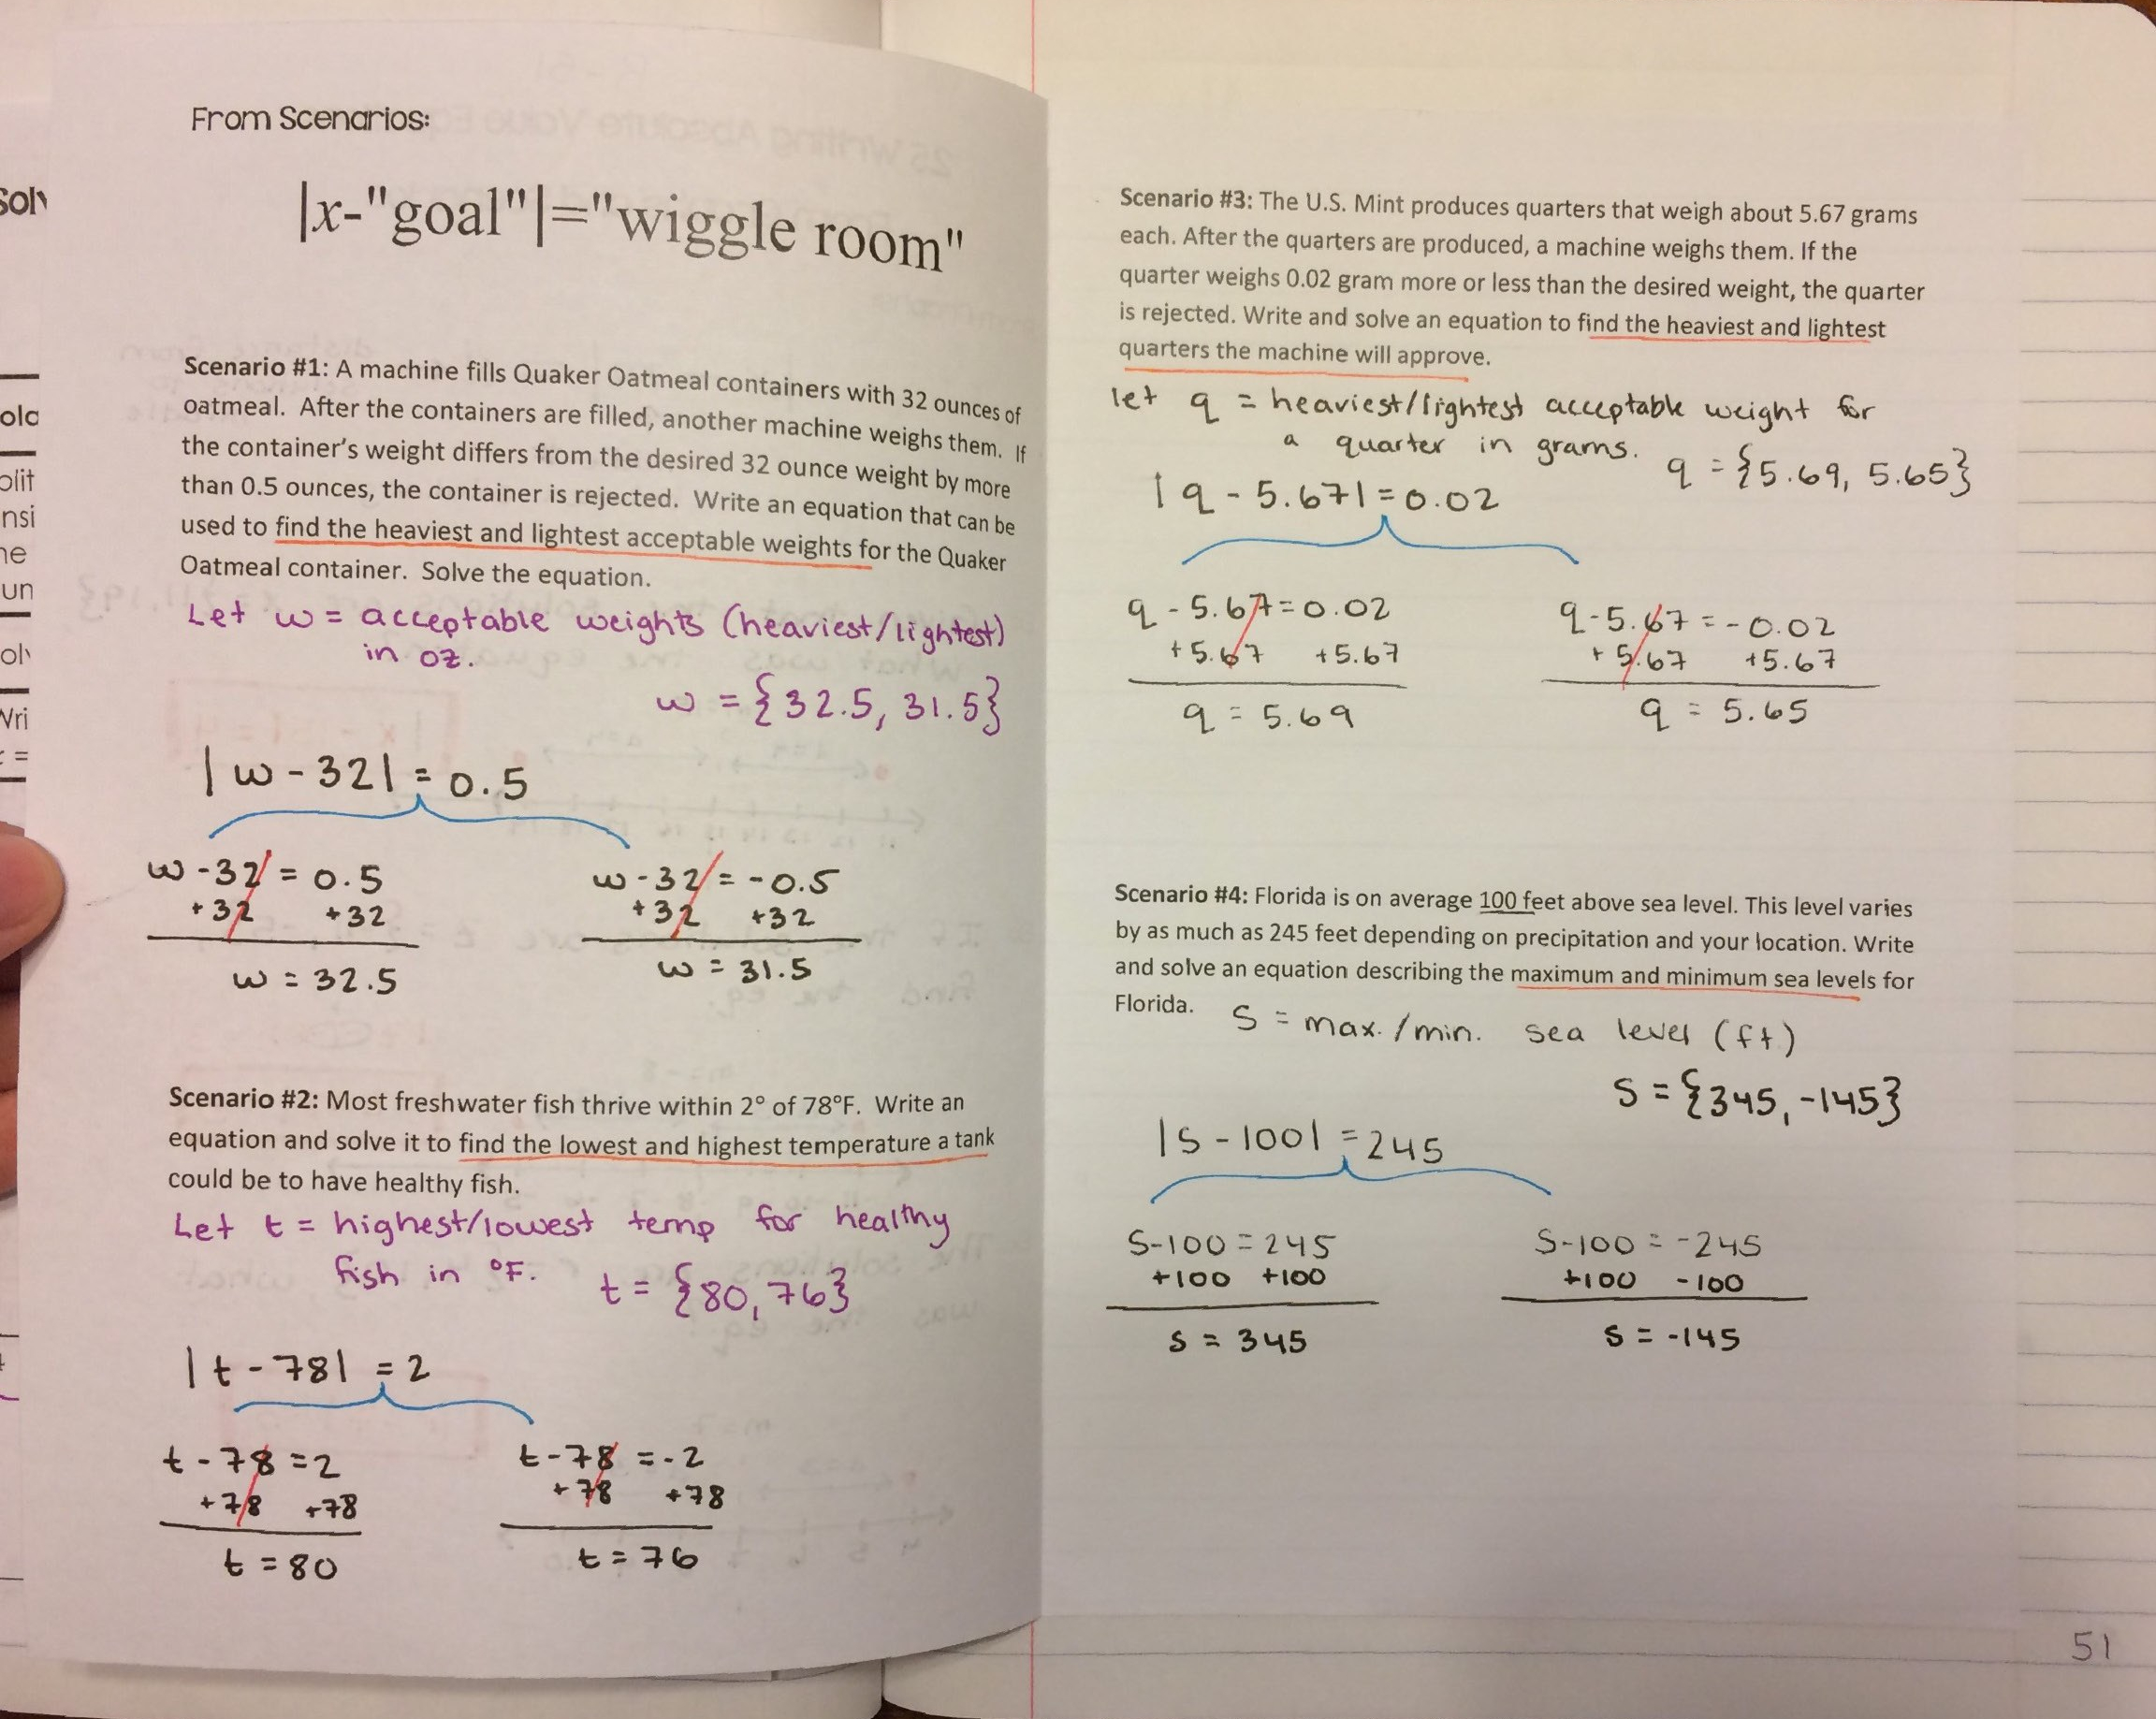
Day 6: Ratios and Proportions
We started the day off with a recap warm-up covering the last two days of information (all absolute value equation related).
pic_Page_18

The first thing that we talked about is what a ratio is and what it means to be proportional. pic_Page_19

We then used the definition of proportional to solve equations requiring cross-multiplication. pic_Page_20

After these examples, students filled out the other side of the flowchart that they were given on Day 1 with a more difficult example of solving for a variable in a proportion. Picture1

Day 7: Percent of Change
Percent of change is a funny topic to cover in Oregon…most of our textbook’s examples are about sales tax, and we have none.  If we go to Washington, we just flash our Oregon ID and presto, bingo, bango, no more sales tax (for the little stuff).  Anyway, we find other examples to try to make it more meaningful. pic_Page_21pic_Page_22pic_Page_23

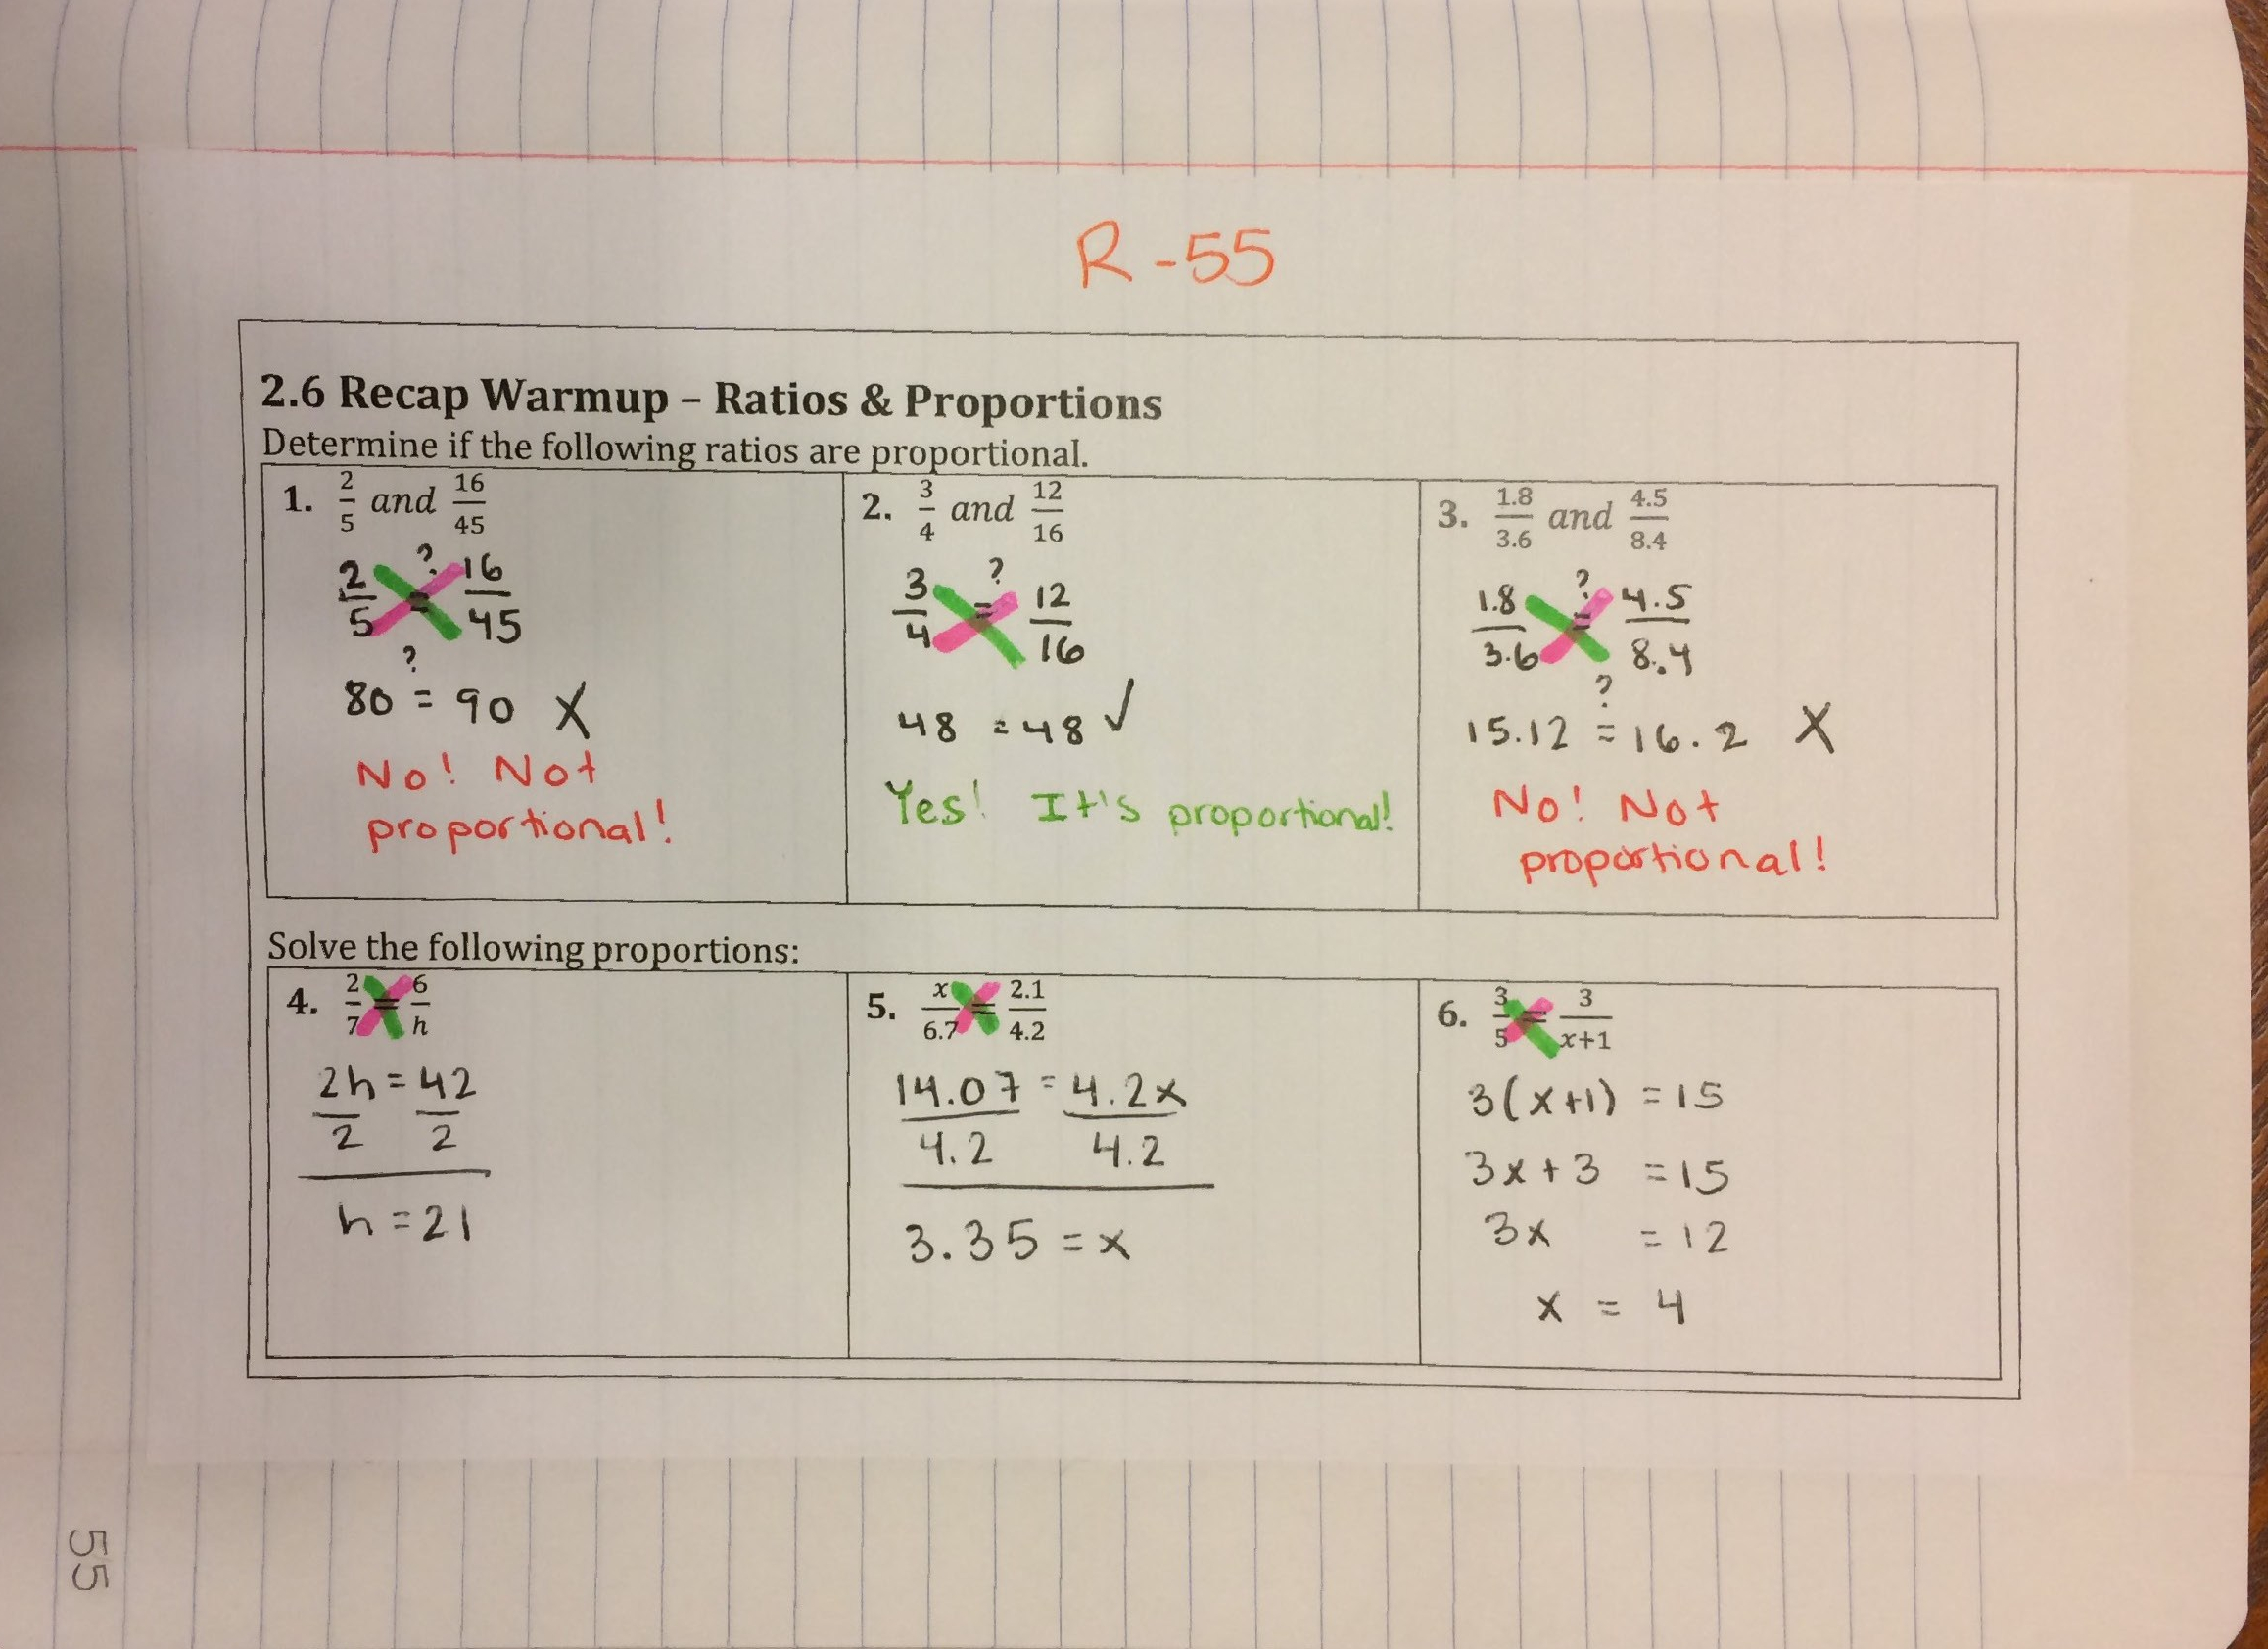
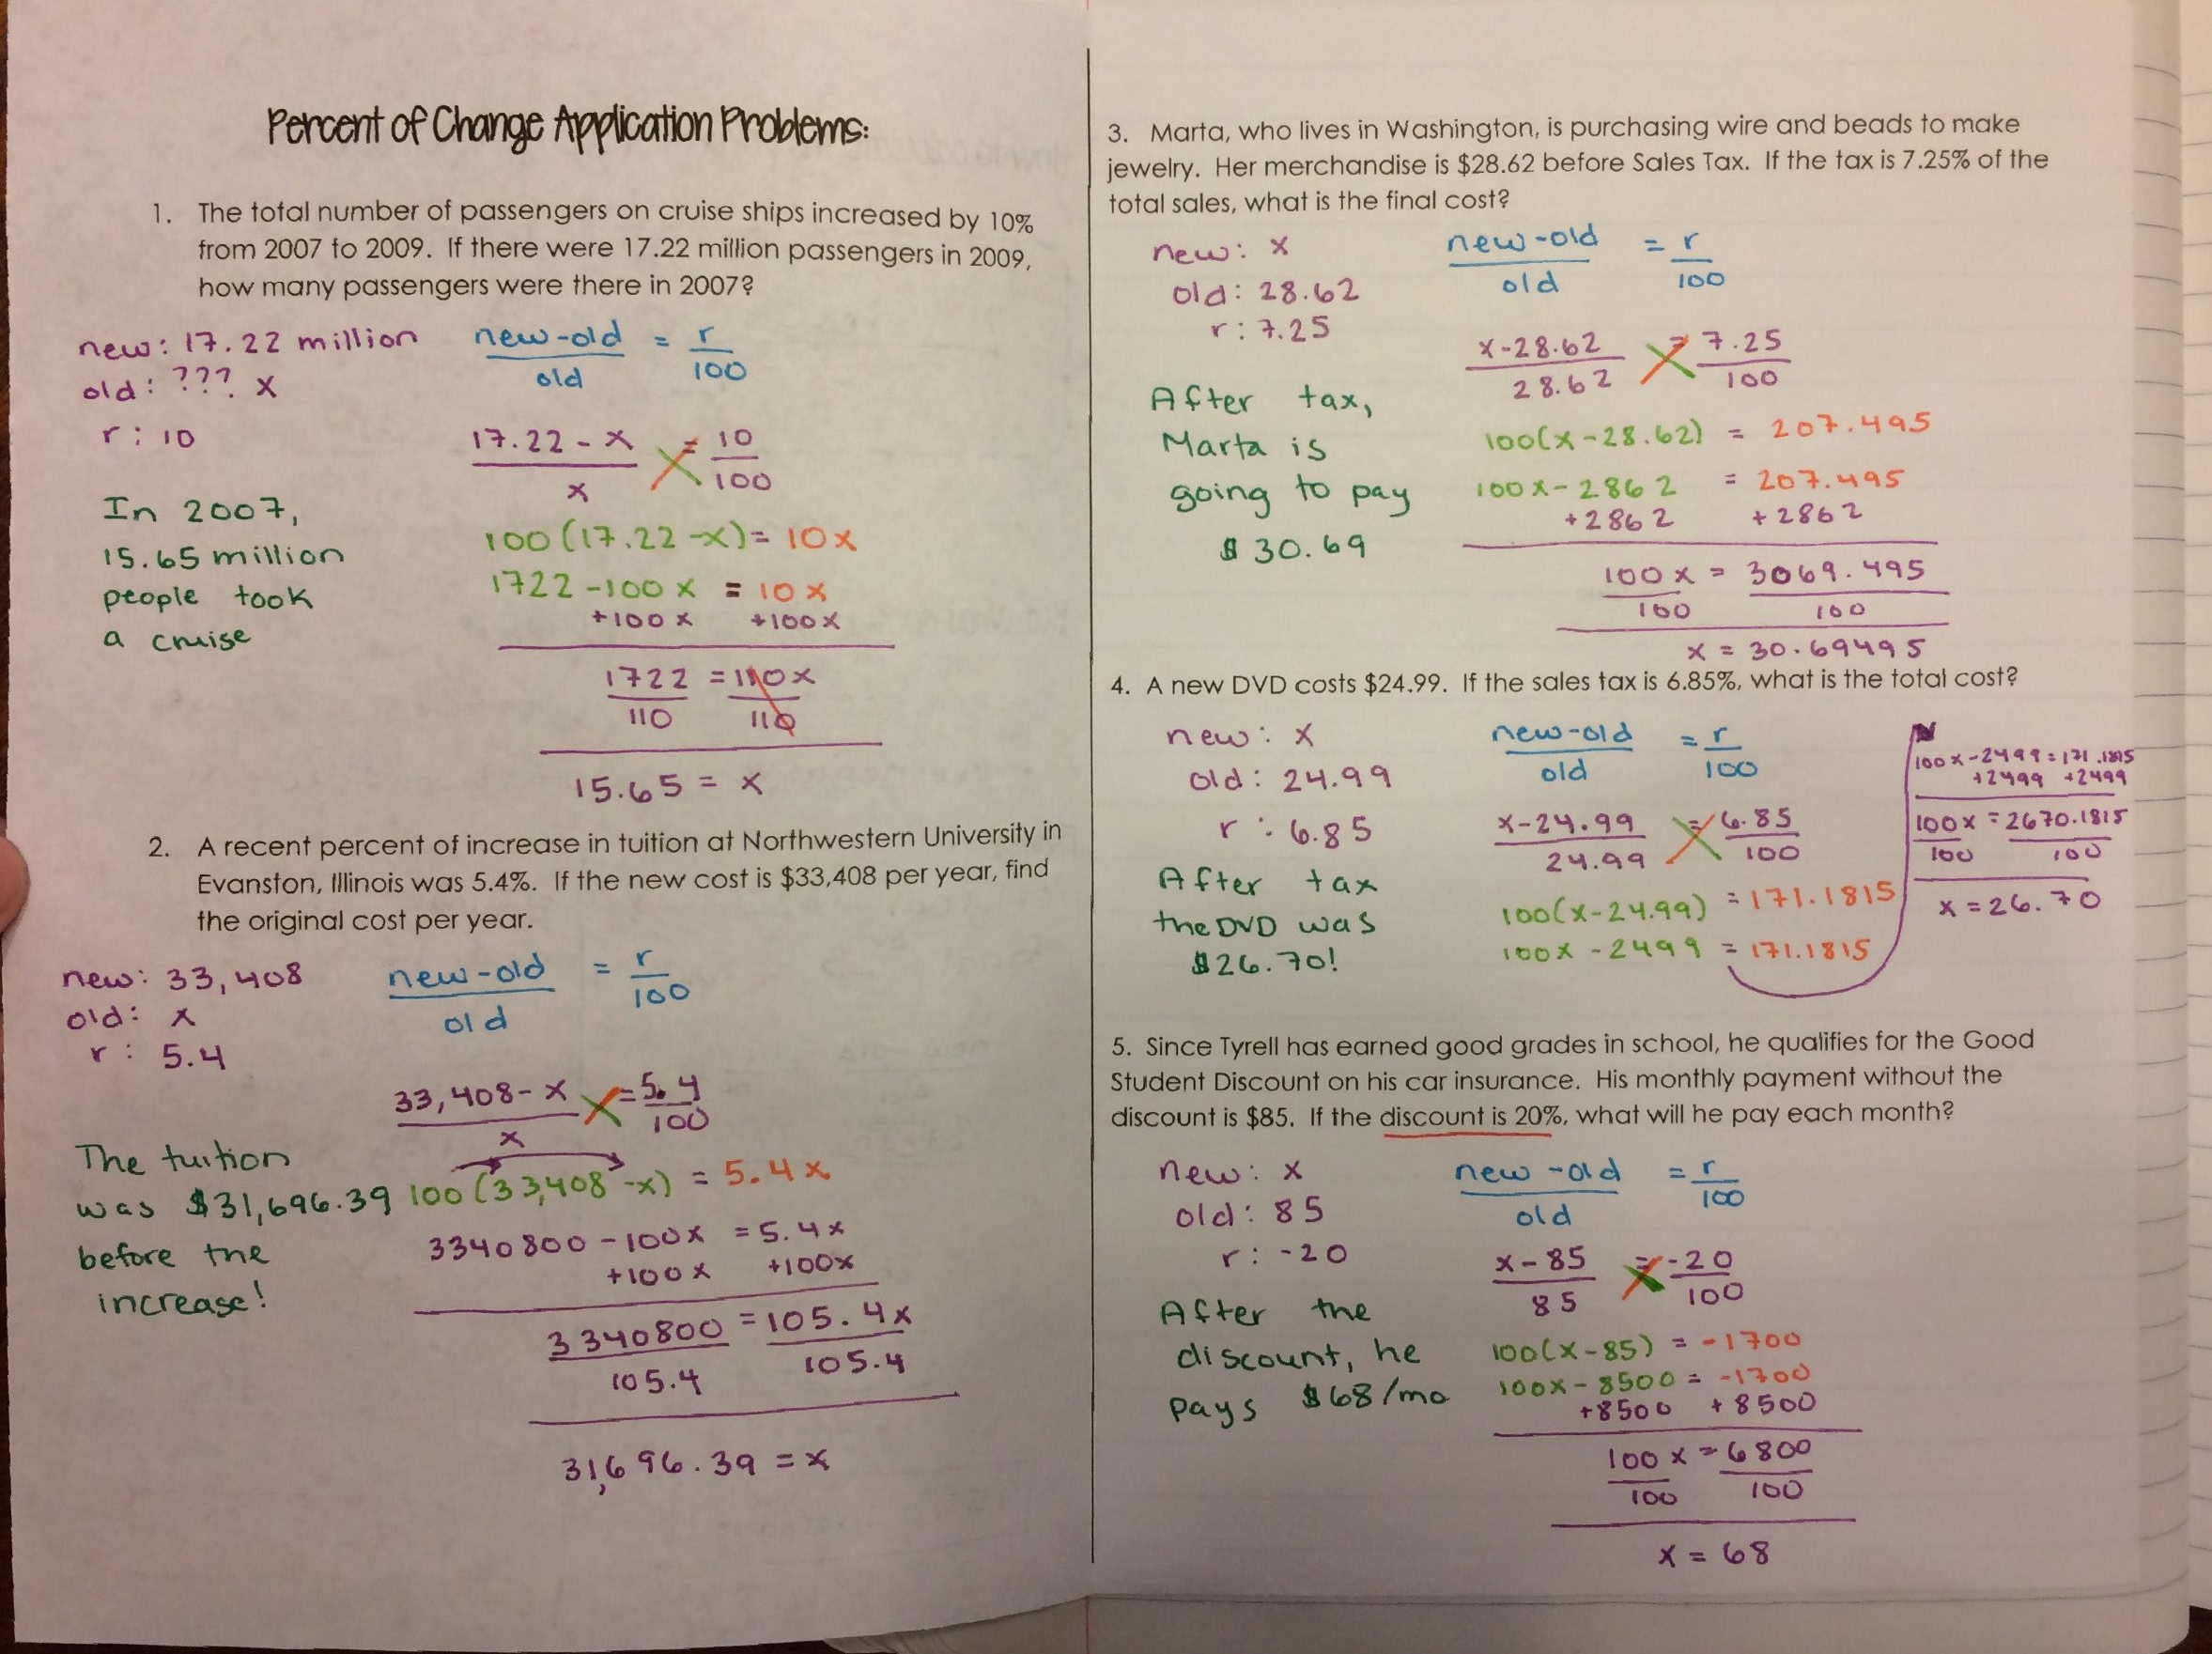
After taking notes, we did this Percent of Change Scavenger Hunt. Students worked really hard on it and had a lot of fun.  For some of them, it was difficult to remember to put a negative sign on their r-value when it was a percent decrease!

Day 8: Literal Equations, Part 1
We recap percent of change problems and then move into basic solving literal equations problems. pic_Page_24

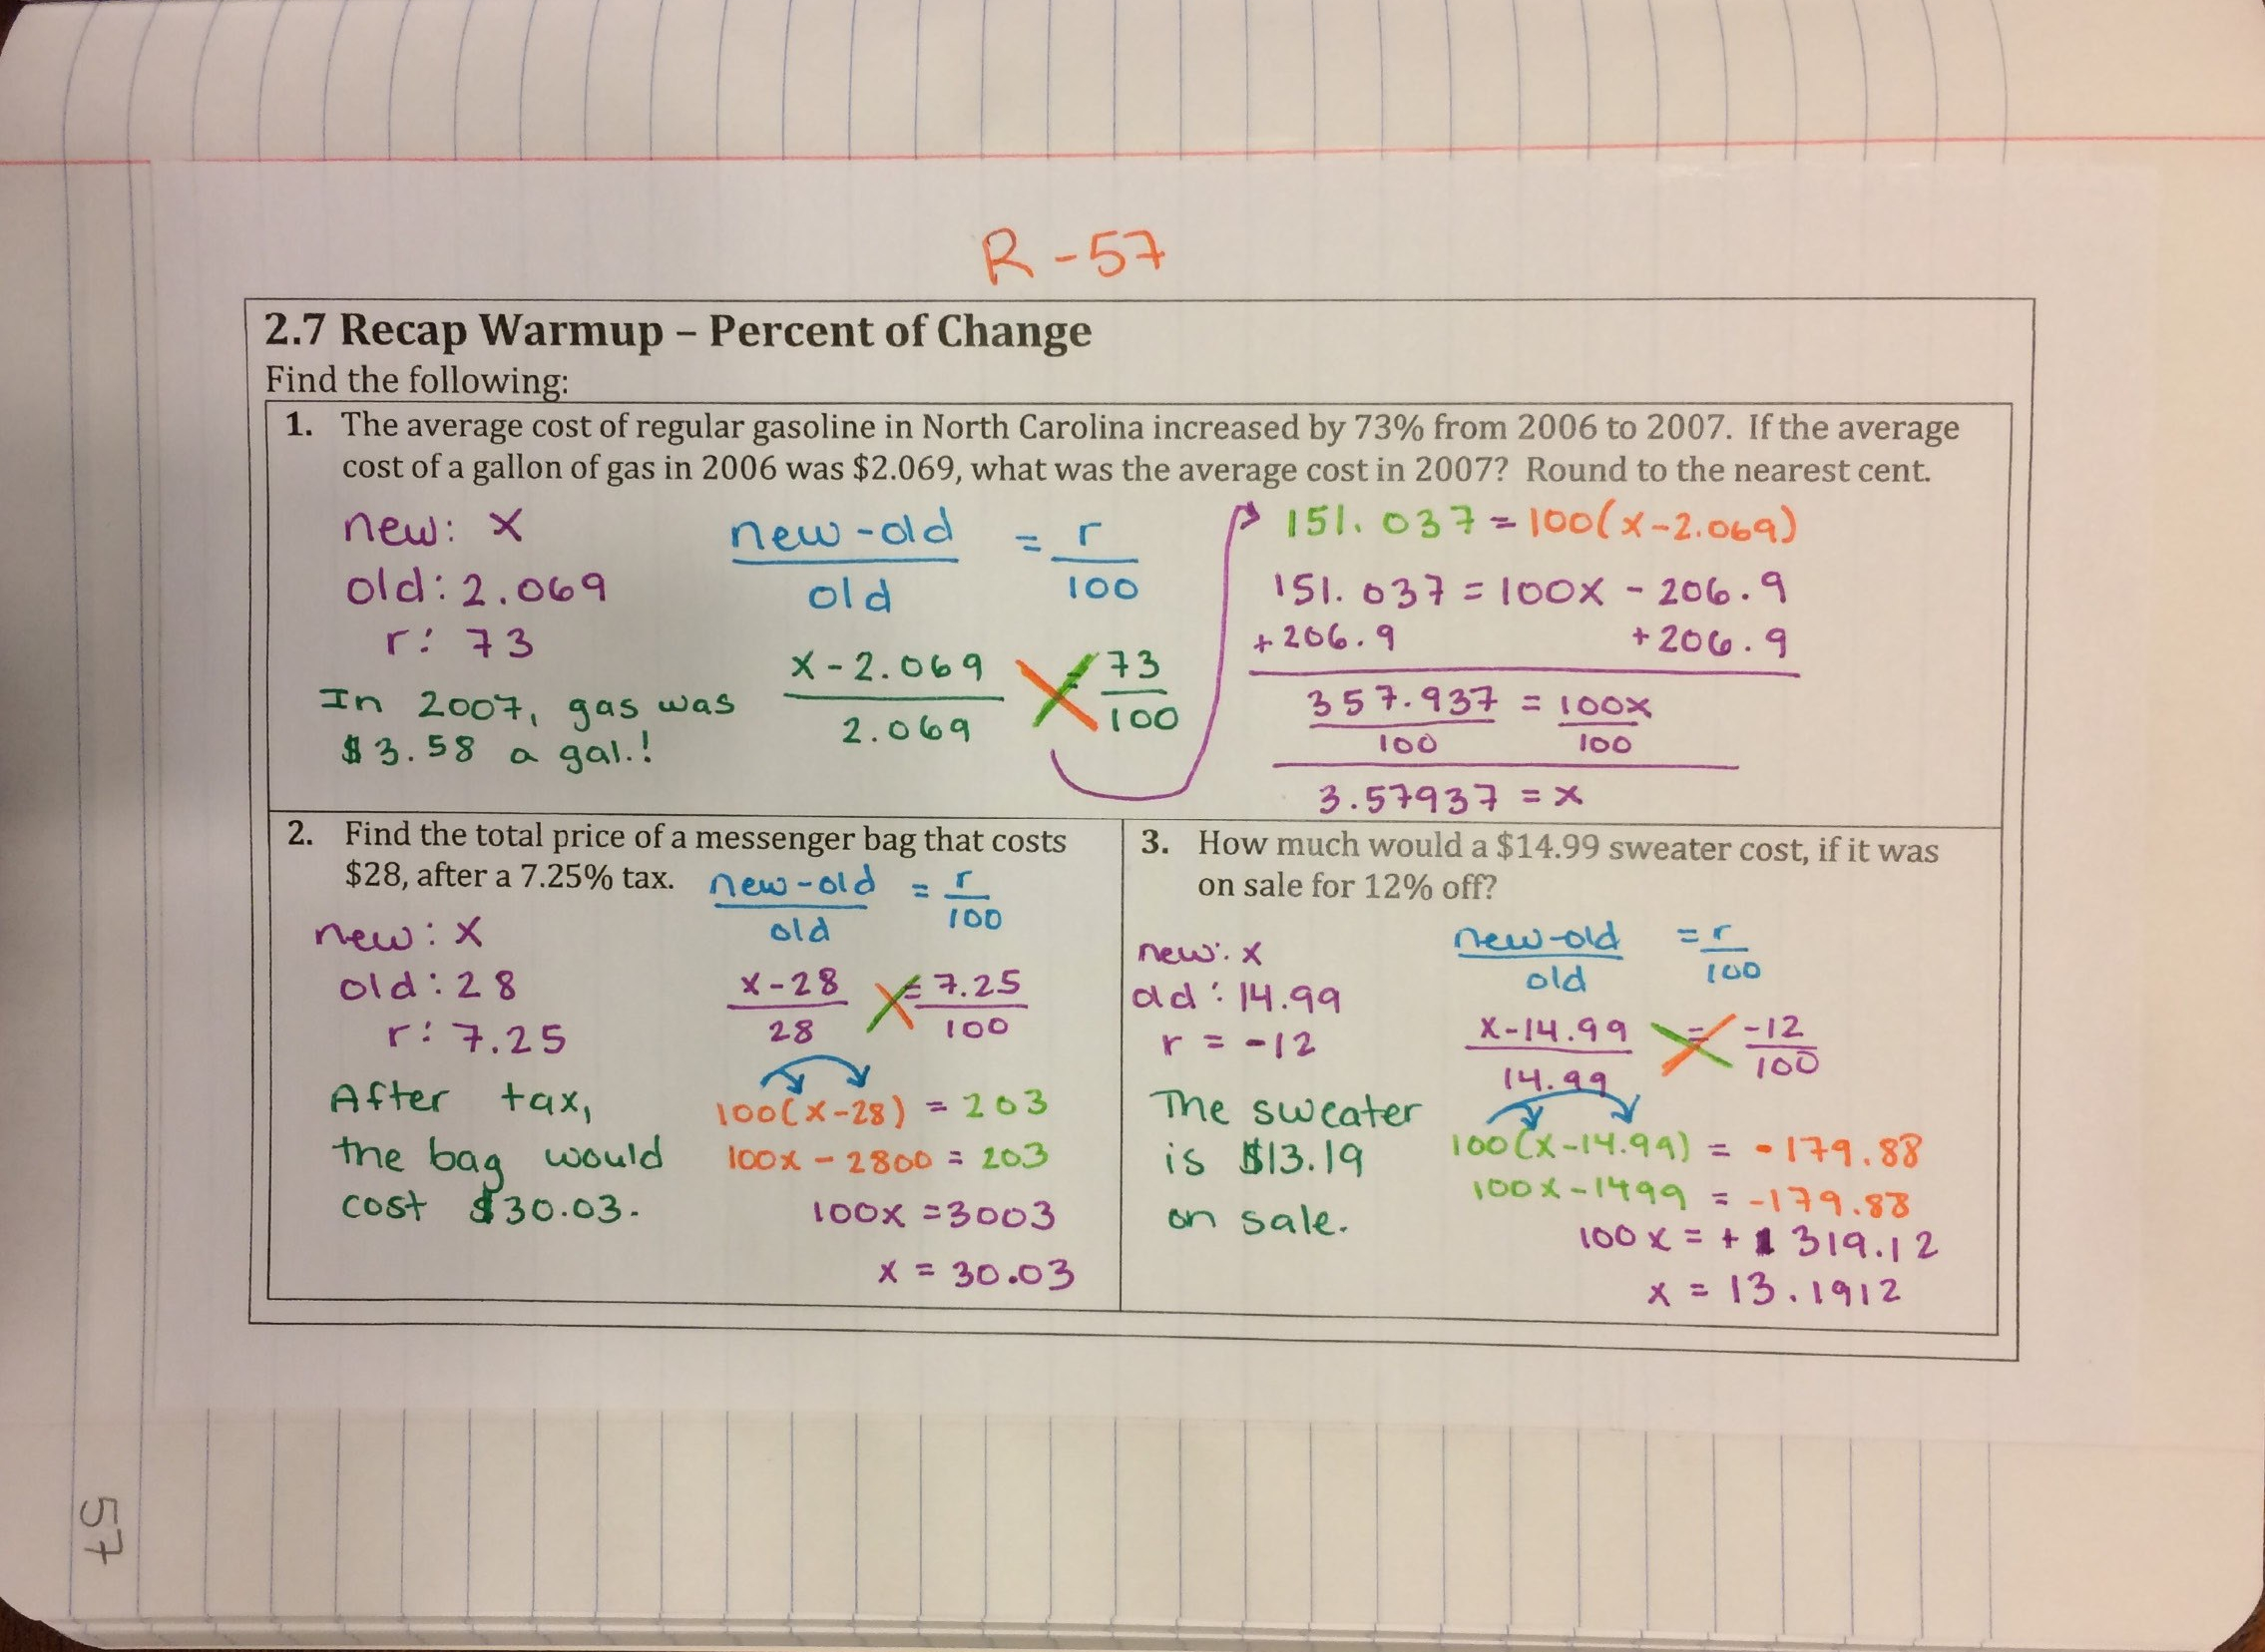
We discuss what a literal equation is, compare and contrast the difference between literal equations and regular equations, and also introduce the flowchart method of solving. pic_Page_25pic_Page_26

Day 9: Literal Equations, Day 2
We move into more complicated literal equations that require more than one step to solve.  After doing a few, students are able to choose which method they wish to solve with (I’m partial to the algebraic method, but some students love the flowchart way). pic_Page_27pic_Page_28

After notes, we play my favorite Connect 4 game for solving literal equations.  We only played until 6 people won, which allowed us to get through about 70% of the problems.  From there, students spent the remainder of class working on a festive Carving Pumpkins coloring activity for solving literal equations.  This activity was awesome because students were super engaged in the coloring (every last one of them–even the boys! PS: I have 22 boys in this one class…ay, yai, yai), and it was super easy for me to find common trends that I might need to readdress (the eyes for Pumpkin #2 were the most common error).  Also, for students, this activity is fairly self-checking, which is a great confidence boost for many of them.

Here’s an example that one student colored!  She even named the pumpkins. carving_pumpkins_in_action

Day 10: Stations Review Activity Day
We did a recap warm-up over solving literal equations and then spend the rest of class doing a stations activity with my solving equations unit task cards.
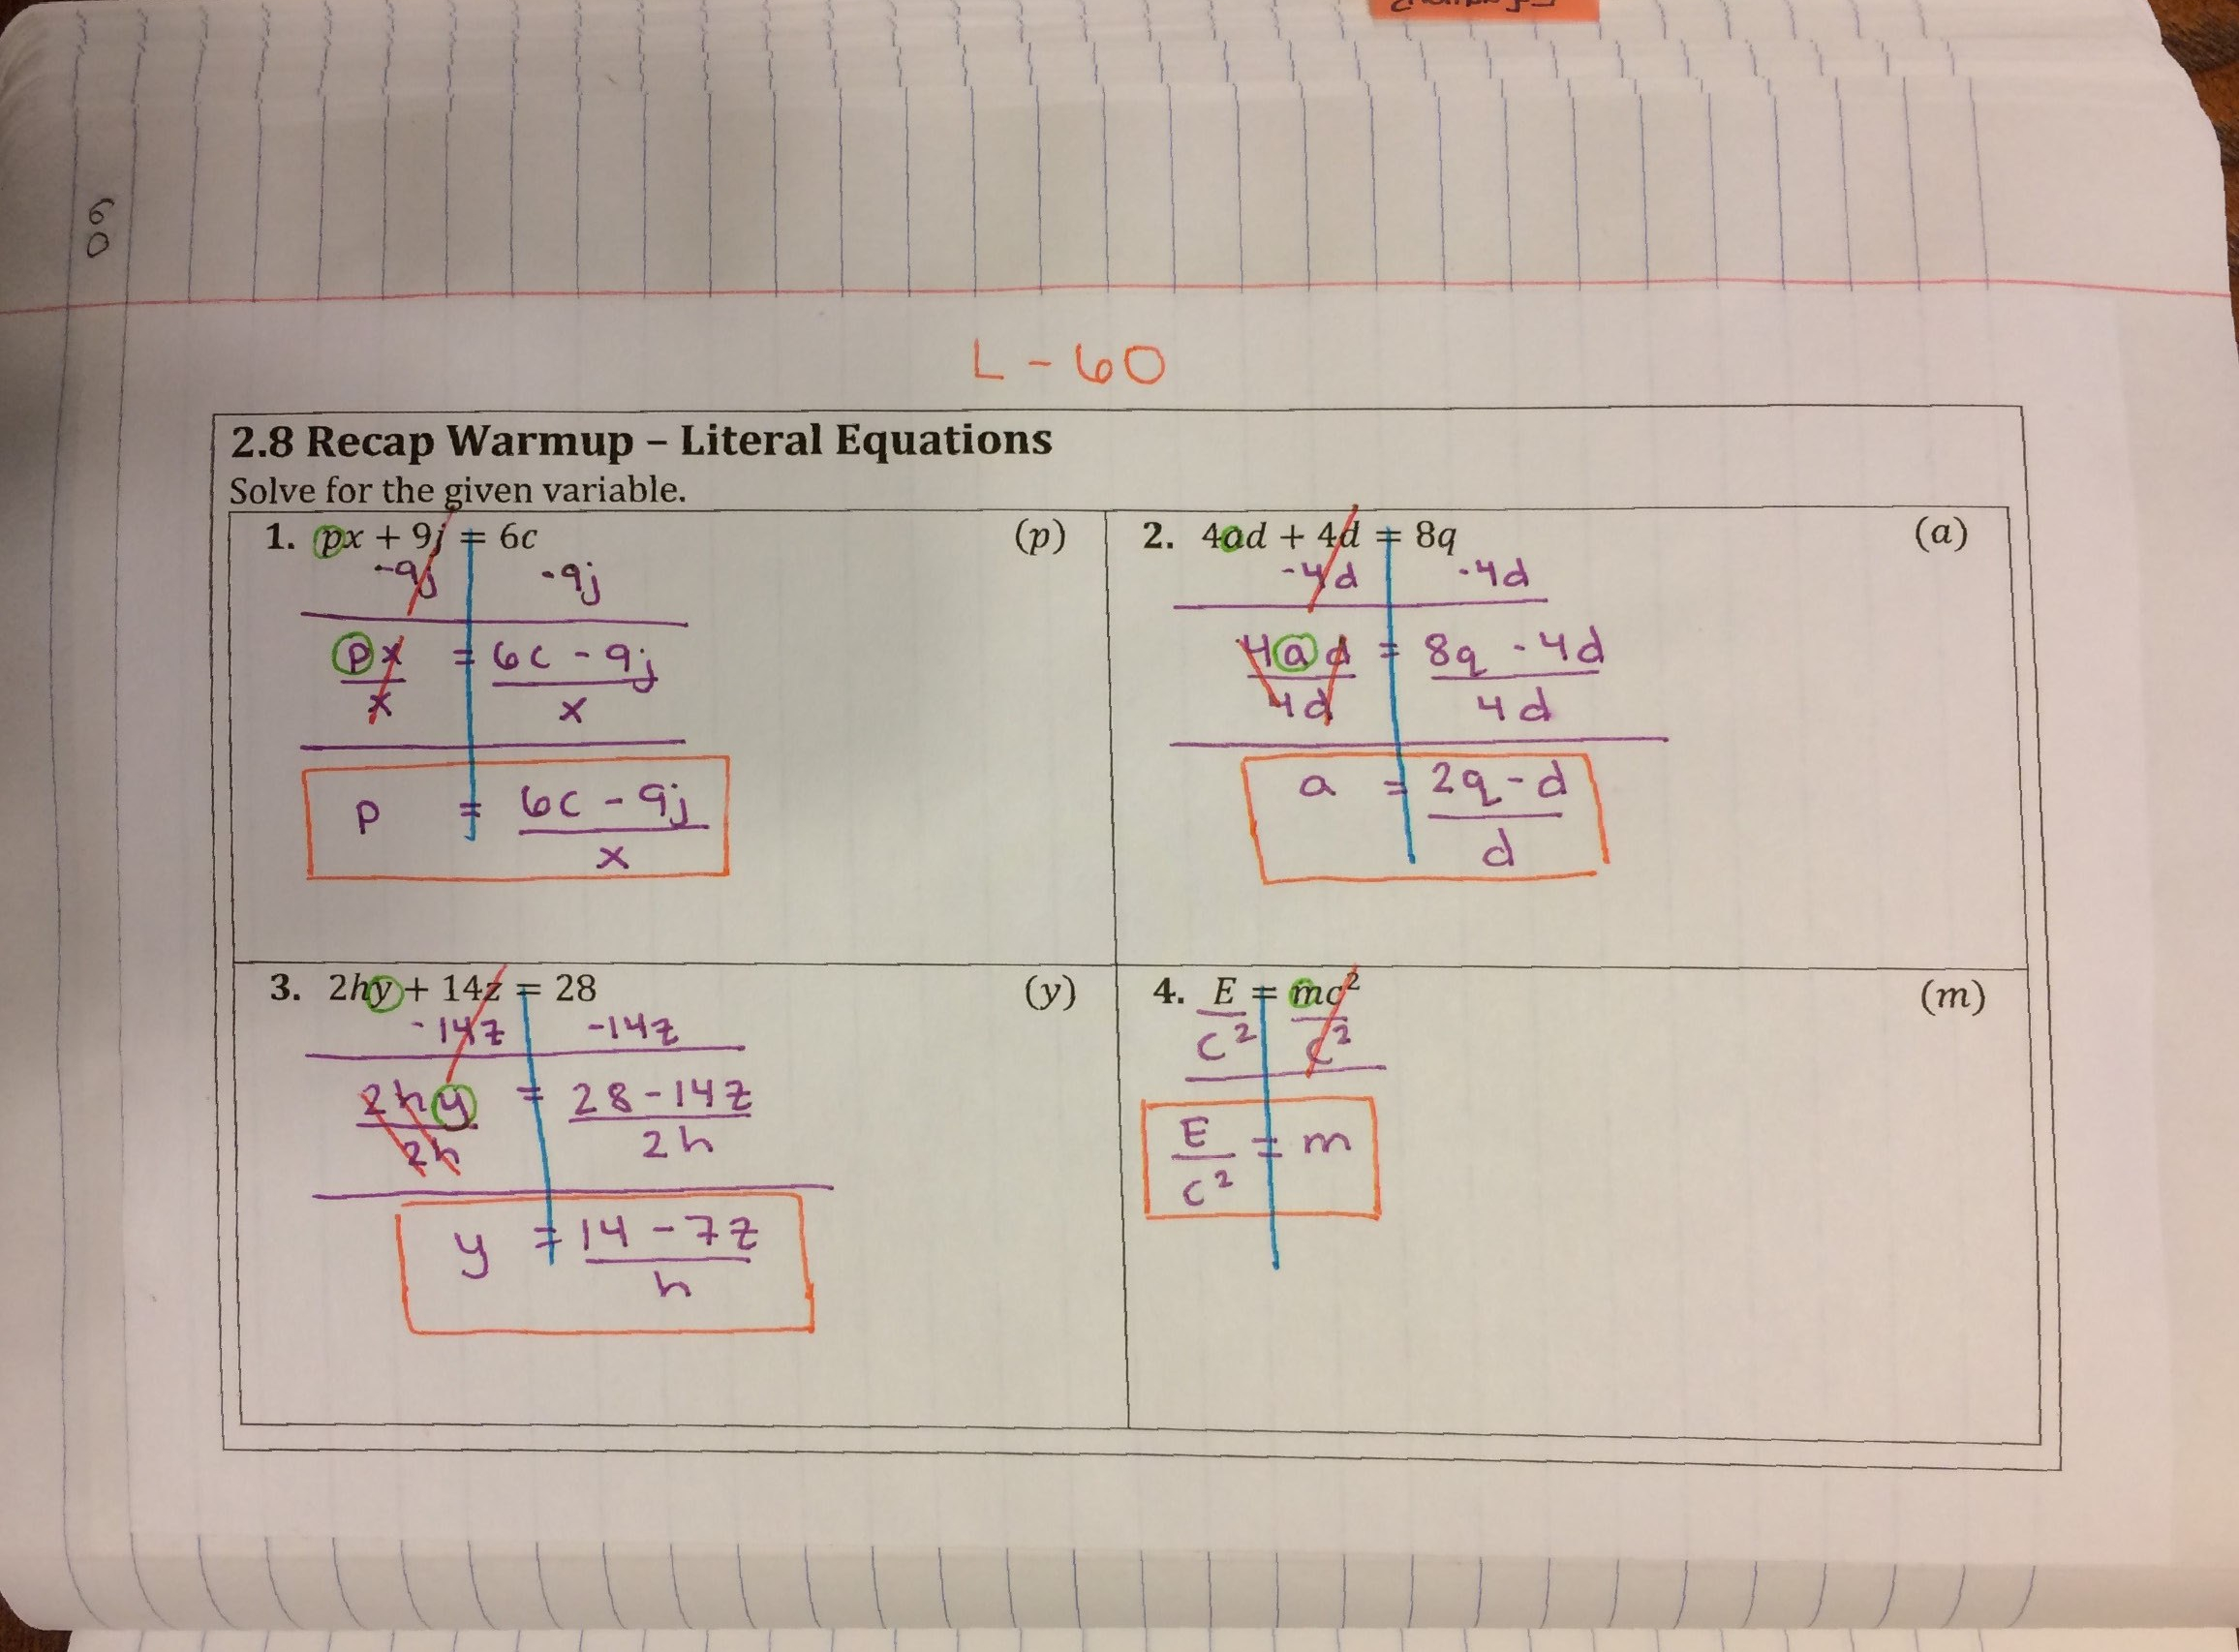
 pic_Page_29

Day 11: Review Day
Day 12: TEST!

Algebra 1 Unit 2 Interactive Notebook Pages | Relations & Functions

Here are the notes I used this year for the 2nd unit of Algebra 1:

pictures_Page_01

Day 1:
We started off the unit with a classifying variables sort. This was a good way to jog students’ memories about their prior knowledge, and it also served as a jumping point into domain and range!
pictures_Page_02

From there, we went into what a relation, domain, and range is, and how it relates to independent and dependent variables. pictures_Page_03pictures_page_04.jpg

We then made the distinction that there are two types of relations, discrete and continuous, and we must pay attention to context to determine what type of relation we have. pictures_Page_05

From there, we started to talk about all of the different ways we could represent a discrete relation, and how we find the domain and range from each representation.  We used this foldable, which went over great with the students.  They caught on super quickly, and they mentioned that they liked having one example to do together, and one to do on their own for each representation. pictures_Page_06pictures_page_07.jpg

Day 2:
We started off with a word problem to review domain and range in a (discrete) relation. pictures_Page_08
From there, we filled out a Frayer vocabulary model for functions, to make sure that students really understood what they are and aren’t. pictures_Page_09

Then, using the definition for function we just wrote down on the Frayer model, we made a cheat sheet to refer back to that tells us all of the different ways a relation (discrete or continuous) would NOT be a function.  pictures_Page_10

We practiced classifying functions using a card sort from Amazing Mathematics.  Instead of cutting and pasting, we decided to color-code instead! Love it! (In the words of one of my students, this is the page that has “fourteen thousand graphs.”)pictures_Page_11

We then filled out another cheat sheet, this time for domain and range of continuous functions.  Students reasoned together through the inequalities and we talked about what a bound actually means (we used a lot of basketball references). pictures_Page_12
We practiced finding the domain and range for continuous relations (as well as determining whether or not they were a function), using the following set of notes.  PS: It took me a LONG time to figure out how to make a parabola or a trigonometric wave using Microsoft’s shape tools.  I feel overly proud of this set of notes! You can download them here! pictures_Page_13pictures_page_14.jpg

Day 3:

We began with a recap warm-up on domain and range for continuous relations. pictures_Page_15
To make sure that students didn’t forget about discrete relations, we went back and did more practice with determining their domain and range, and also stating whether or not the relations were functions.  pictures_Page_16pictures_page_17.jpg

Day 4:
We started off with a reference sheet on function notation and how to read/say it. pictures_Page_18
From there, we did a lot of practice with function notation.  pictures_Page_19

Inside this set of notes, we really emphasized interpreting what we were being given in a problem (input or output value) and what the problem was actually asking us to find (input or output value), before starting the problem.  This helped students from making a lot of careless mistakes.  After we practiced function notation in both directions (evaluating a function, and solving for an input given the function’s output), we mixed up the problems and even threw a few variables and function compositions in there!pictures_page_20.jpg

Day 5:
Recap warm-up on function notation.  Problems 5 and 6 both spurred amazing conversations about order of operations. pictures_Page_21

After doing this recap warm-up, we did my function notation mystery sum activity, which was a blast.  It encourages students to collaborate together and it’s really high engagement each time.

819

From there, we continued talking about function notation, but now in terms of a graph.  Interpreting what the function notation was telling us was such a huge part of the previous day’s lesson, that I wanted to see how they could do when we attached a context to the problem. pictures_Page_22

Inside, we worked on graphing functions, and using the graph to find an x-value.  Some students preferred solving for x, but others were impressed by my tracing over on the graph method.  To each their own–that’s the beauty of math, in my opinion. pictures_Page_23

Day 6:
Recap warm-up over function notation with graphs, and then we reviewed for the test. pictures_Page_24

Day 7: Test!

Algebra 1 – Unit 1 INB Pages | The Foundations of Algebra

updateHere’s what went into our INBs for the 1st unit of Algebra 1:pic_Page_01

Day 1:
We glued in a reference sheet for the real number system. Our textbook uses I for the set of irrational numbers.  I went with the same notation this year, but I think I’m going to go with R-Q for next year, since I is used for imaginary numbers, later on.  pic_Page_02

To practice working with these definitions, we did a real number system sort, which I found from Amazing Mathematics! My students enjoyed doing it, and it spawned many great conversations about the difference (however subtle they may be), between the sets of real numbers.

pic_Page_03
Real Number System Sort from Amazing Mathematics 

For homework, students did this Always/Sometimes/Never sort, which is also from Amazing Mathematics. They were given about 20 minutes in class to begin their assignment, and then had whatever was left as their take-home assignment for the night.  This one was even better than the last card sort, in terms of spurring student conversations.  Students were justifying with counterexamples and providing fully flushed out reasons for where each card should get placed.  It was awesome!

pic_Page_04
Always/Sometimes/Never Sort for Real Numbers from Amazing Mathematics

As a note, we also keep a binder for the class which holds extra handouts, like additional reference sheets and homework assignments that don’t go in the INB. My favorite reference sheet that didn’t go into the INB was this real numbers flowchart that I made.  The day of teaching my lesson on real numbers, I noticed that using the “Venn diagram” approach wasn’t meshing well with some of my students.  That afternoon, I went home and made a flowchart handout that they could refer to, in addition to their INB pages.  Next year, I think I’ll just use this flowcharts in a mini-book format for notes, instead!  I found that students started making more connections about the sets each number belongs to (i.e. not only is a number natural, but it’s a whole number, and an integer, and a rational number), and students were able to remember the questions they need to ask themselves when determining the best classification for a real number.

IMG_1618
Classifying Real Numbers Flowchart from Math by the Mountain

Day 2:
We started off with a recap warm-up on the real number system, which we covered the day before. pic_Page_05

From there, we did a translating expressions sort, also from Amazing Mathematics.  (Can you tell I love her sorts?!).

pic_Page_06
Words into Math Sort from Amazing Mathematics

From there, we used our key words and started defining what a variable is, and what an expression is. pic_Page_07pic_Page_08

For homework, students did the following problems.  They had about 15 minutes of class time to get started.  We color-coded “turn-around words” in pink, “parentheses-words” in green, and “equals words” in blue.  Students marked the page in highlighter before beginning to translate the expressions.  They mentioned that this made the process much easier for them! pic_page_09.jpg

Day 3:
We began with a recap warm-up over translating expressions.pic_Page_10

From there, we talked about evaluating expressions and also reviewed the order of operations.
pic_Page_11

From there, we discussed the properties of real numbers and students made up their own examples for each property.  pic_Page_12

For in-class practice, students did the a properties of real numbers puzzle from Lisa Davenport.  A student volunteered to glue it into my notebook.  Notice the lack of glue?  Notice the crooked edges?  It was a very sweet offer, but I’m I don’t think it’s one I’ll be taking again any time soon. IMG_1668

Day 4:
We started with a recap warm-up over evaluating expressions and identifying properties of real numbers. pic_Page_14

Next we took notes on combining like terms and the distributive property, cutesy of Sarah at Math Equals Love.pic_Page_15pic_Page_16pic_page_17.jpg

Day 5:
Recap warm-up over distributing and combining like terms. pic_Page_18

What is a solution?  What does it mean to be a solution?  What does it look like? pic_Page_19

Up next, we focused on solving and verifying solutions to 1-step and 2-step equations.  I’ve found that verifying a solution is a skill that students struggle with more than solving (at least in Algebra 1), so I wanted to make sure it got emphasized. pic_Page_20pic_page_21.jpg

Day 6:
We filled out a foldable for solving 2-step equations.  Those pesky fractions are going to be our friends by the end of today!

pic_Page_22pic_Page_23

Day 7:
Recap warm-up over solving equations. pic_Page_24

Day 8: Review

Day 9: Test!

download

Want the full unit? Get it here!

Systems of Linear Equations and Inequalities Unit Interactive Notebook Pages (Algebra 1)

Here are the notebook pages my students completed on Systems of Linear Equations and Inequalities during the last school year.  Let me know if you would like me to post any of the documents I used.  Thoughts or suggestions on how I can improve interactive notebooking?  I started this as my work sample for my MAT degree so I am still very new to the world of INBs/ISNs.  I’m not entirely sold on the Left/Right hand page for in’s and out’s.  I understand the concept behind it, but I also don’t believe in forcing notes to be in a specific format for the sake of being in this format.  Anyway, this was my first take on my “INB” inspired notebook…not fully an Interactive Notebook, but on its way.

4701 4702 4703 4704 4705 4706 4707 4708 4709 4710 4711 4712 4713 4714 4715 4716 4717

5365 5366 5367 5368 5369 5370 5371 5372 5373 5374 5375 5376 5377 5378 5379 5380 5381 5382 5383 5384 5385 5386 5387 5388 5389 5390 5391 5392 5393 5394 5395 5396 5397 5398 5399 5400 5401 5402 5403 5404 5405 5406 5407 5408 5409 5410 5411 5412 5413 5414 5415352355